Tired of copy-pasting your form data to your email marketing tools or CRM? Looking for a free and easy way to integrate Contact Form 7 to Brevo?
Contact Form 7 is a simple WordPress form builder. It is a free, open-source WordPress plugin that millions of people use to make simple contact forms and lead forms.
Brevo is an all-in-one email marketing platform with SMS, chat, and CRM tools that helps businesses send newsletters, follow-ups, and automated campaigns. Both are excellent tools, but they don’t integrate directly with each other.
That’s where Bit Flows come to automate. Bit Flows is a no-code automation plugin for Workflow automation. Think of it like a bridge: when someone submits your Contact Form 7, Bit Flows can instantly send that info to Brevo and add them to your email list. The best part is, with Bit Flows, you can integrate Contact Form 7 to Brevo totally free and without any limits!
Throughout this guide, I’ll talk you through everything in easy steps. By the end, you’ll feel confident to click that “start integration” button yourself. Ready? Let’s do it!
Think about how you run your website now. Someone fills out a form, and… what? You might get an email notification or sometimes not even that, and then it’s up to you to copy that info into your email tool or CRM. That manual work is slow, can make mistakes, and honestly, a little scary: what if you miss an email and a lead slips through the cracks?
This is a common headache. Many site owners struggle with “lost leads”. Those people who almost became customers but vanished because you didn’t reach out quickly enough. Studies show that having contact forms really helps. One report says companies with forms get about 45% more leads than those without. But collecting leads is only half the battle. You need to act fast.

Here’s the beauty of connecting CF7 to Brevo: automated, instant follow-ups. The moment someone submits your form, a tool like Bit Flows can trigger an action, for example, Brevo sends a thank-you email or adds the contact to a drip campaign. No waiting, no forgetting. This kind of automation can significantly improve how quickly you engage new leads.
And it’s not just for tech wizards. Bit Flows is designed for beginners. You don’t need to write a single line of code. The whole setup is click-and-point. Even if the idea of “APIs” or “webhooks” makes you break a sweat, don’t worry – Bit Flows handles it behind the scenes. You’ll be amazed at how quickly you can connect forms, CRMs, email platforms, and even other SaaS tools all together.
So, automating Contact Form 7 with Brevo means no more manual list updates, no more delays in contacting leads, and more time for you to focus on running your business or blog. Let’s look at the concrete benefits next.
Automating your forms with Brevo provides you with many benefits for your business or side project. Here are some of the top benefits:
Better Lead Management: Instead of random emails and spreadsheets, all your contacts flow into Brevo automatically. You get a neat list of leads that’s always up-to-date.
Automatic Email Follow-Ups: Set up welcome messages or drip sequences in Brevo and never worry about timing. When a visitor submits the form, Bit Flows can trigger Brevo to send an email right away. It’s like having an assistant who greets every new lead instantly.
Personal Connection with Your Audience: Brevo lets you use tags and segmentation to personalize emails. For instance, maybe someone interested in “Product A” gets different follow-ups than someone interested in “Product B.” Bit Flows can apply tags to new contacts, so in Brevo, you can send the right message to each group. This makes your emails feel more human and relevant.
Save Time and Reduce Mistakes: Automation frees you from those repetitive tasks. A tool like Bit Flows handles the data for you. This means fewer typos, no mismatches, and most importantly, you can spend time on strategy instead of busywork.
Stay Organized and Grow Faster: Brevo’s email list and segmentation features are powerful. It can automatically keep lists fresh based on subscriber behavior and let you sort contacts into segments. Pair that with Bit Flows, and you have an optimized system. That makes it easier to scale up your marketing without turning into a spreadsheet monster.
In short, connecting Contact Form 7 to Brevo with Bit Flows means you become the hero who never lets a lead go cold. Your audience gets faster, friendlier responses. And you save time and headaches
Alright, let’s roll up our sleeves and do this! I’ll walk you through every step, like I’m on a call with you. Take it one step at a time, and feel free to pause and try it yourself as we go.
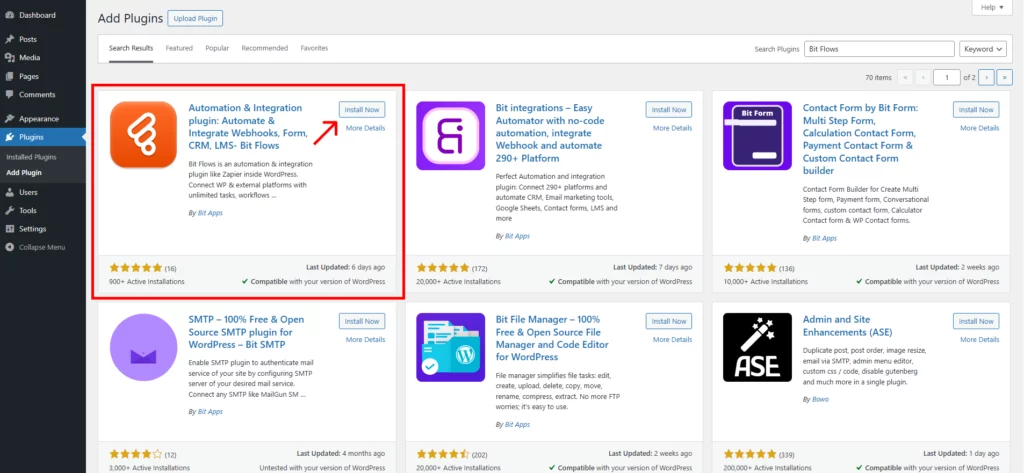
1️⃣ Install Bit Flows on Your WordPress Site: Navigate to your WordPress dashboard. Go to Plugins > Add New, and search for “Bit Flows“. Install and activate the plugin. Bit Flows is what’ll glue everything together, and it’s completely code-free.
2️⃣ Open the Bit Flows Dashboard: Once activated, you should see a new menu item in the WordPress sidebar, named Bit Flows. Click it and look for a button that says Flows. This is where we’ll build the workflow.
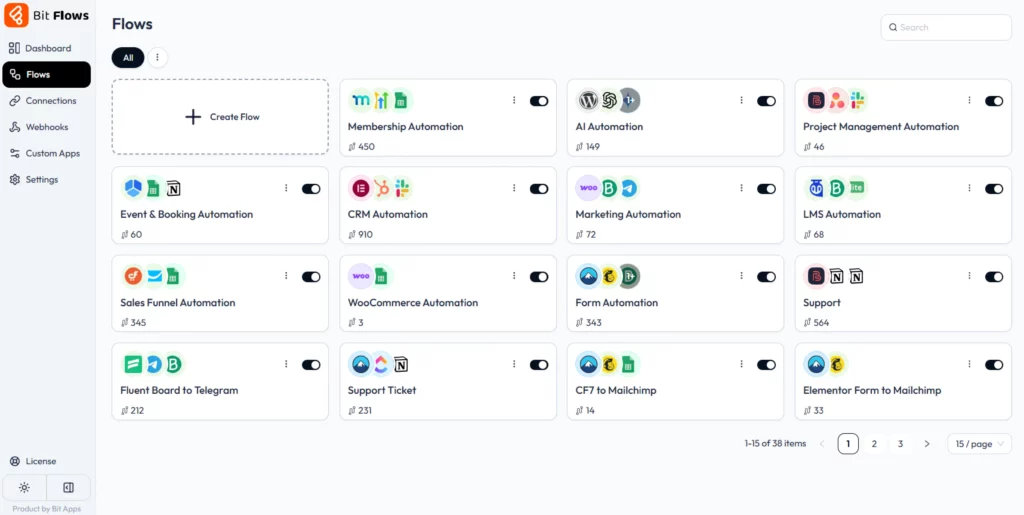
3️⃣ Create and Name Your Flows: Now, click on the Create Flow. Give this integration a title like “CF7 to Brevo” or whatever makes sense. This is just for you, so in a year, you’ll remember what it does.

4️⃣ Choose Contact Form 7 as the Trigger: Next, Bit Flows select Contact Form 7 as the trigger. You will see the “On Form Submit” event, pick that. Then choose which specific form (if you have more than one). This tells Bit Flows to watch for submissions of that form.

Then choose which specific form (if you have more than one). This tells Bit Flows to watch for submissions of that form.

Now, click on the Listen Response button and submit your selected form once. This will help Bit Flows capture your form field data, and this field data will be used for field mapping with Brevo.

5️⃣ Select Brevo as the Action: Now, you’ll set the action. Search for Brevo. Choose the action that matches what you want (likely “Create Contact” or “Add Contacts To List”). This means Bit Flows will create or update a contact in Brevo whenever the form is filled.

6️⃣ Authorize Brevo (Enter API Key): You’ll now need to connect your Brevo account. Bit Flows will ask for an API key. So, go to your Brevo account dashboard and find the API Key section. And click on the “Generate a new API key”. Copy the key and paste it into Bit Flows. Then click “Connect.” This lets Bit Flows talk to your Brevo account.

7️⃣ Select Your Brevo Contact List(s): After authorization, Bit Flows should show a dropdown of your Brevo contact lists. Pick the list where you want these new leads to go. If you don’t see a list yet, head to Brevo and create one first, then hit “refresh” on the Bit Flows dropdown.)

8️⃣ Map Your Form Fields to Brevo Fields: This step is about aligning the data. Bit Flows will show you your Contact Form 7 fields (like Name, Email, Message) and the fields in Brevo (like “EMAIL,” “FIRST NAME,” etc).
Map them correctly: usually your form’s “Email” field goes to Brevo’s email, “Name” to name, etc. Mapping ensures that when data comes in, it goes to the right place in Brevo.

9️⃣ Test by Submitting Your Form: Time to make sure it works! Go to the page on your site where the Contact Form 7 is, and fill it out just like a visitor would. Hit submit. Then check your Brevo contacts. Your test submission should appear there shortly. If it does, awesome!
If not, don’t panic: Bit Flows has logs. Go back to the flow or look for a “logs” section in Bit Flows. and see if it recorded any errors. You can also re-execute it from the logs.
If the contact didn’t show up, open the Bit Flows integration and look for a “logs” It will show a success or error status for each execution.

Common reason: Maybe the API key was wrong, or you didn’t map a required field. The log usually tells you the issue, so you can fix it. Once fixed, try the form again. You can also set up email notifications for failed tasks in Bit Flows.
If the test works, you’re all set! Make sure the integration is active. From here on, every time someone fills out that CF7 form, their info will flow into Brevo automatically.
Now that you have the technical side handled, here are some friendly tips to make your forms and emails work even better together:
Keep forms short and clear. You’d be amazed how a tiny form can capture great leads. Ask only what you really need (usually name and email to start). Studies show that the fewer fields, the more people will complete your form. So, don’t add unnecessary fields. You can always get more info later.
Ask only what you need. Relatedly, think about what info will actually help you. If you run a newsletter, maybe an email is enough for now. If it’s a quote request, maybe you also need a phone number. But every extra field adds friction, so be honest about why it’s there.
Write emails that sound human. When Brevo sends your follow-up, imagine it’s coming from a real person. Use first names, casual greetings, and a friendly tone. Say something like, “Hey [Name], thanks so much for reaching out!” rather than robotic marketing copy. Real, warm emails get opened much more.
Use tags and segments smartly. One of Brevo’s strengths is segmenting contacts. Tag your new Brevo contacts (e.g., “blog reader,” “support request,” etc.) and then use those tags to send targeted emails later. Bit Flows can handle tagging when mapping fields, so think about how you want to organize people from the start.
Stay consistent with follow-ups. Your form probably has a purpose, like signing up or requesting info. Make sure Brevo’s automated emails match that purpose. For example, if someone asked for a quote, don’t only send them a generic newsletter; send them exactly what they signed up for. And then follow up after a few days if needed.
By following these best practices, you’ll not only set up the integration right, but you’ll also get better results from it. Your audience will appreciate clear, friendly communication, and you’ll feel confident that your new leads are being treated well.
By connecting Contact Form 7 to Brevo with Bit Flows, you’ve taken a big step toward smarter, more efficient marketing. Now, every time someone fills out your form, a new contact appears in Brevo almost magically. That means faster follow-ups, happier customers, and one less thing to worry about.
Remember, automation like this is not just for big companies or tech wizards. Bit Flows is designed for real people like you and me. We’ve seen how easy it is: install a plugin, choose your trigger, choose your action, map a few fields, and you’re done. In minutes, you’ve built a system that would have taken hours manually.
So go ahead and try it out. Give your forms a boost and let Bit Flows do the heavy lifting. Your email list will thank you, and so will your future self when you see how smoothly everything runs. Happy automating!
By default, when someone submits a CF7 form, the data just goes to your email inbox. Connecting it to Brevo means every submission also becomes a contact in your email list automatically.
This saves time and avoids errors. It also means you can set up automatic follow-up emails in Brevo (like a welcome message) the moment someone signs up.
Yes! Using Bit Flows, you can create a workflow so that each CF7 submission triggers an action in Brevo. This process is totally free in Bit Flows without any limits.
First, check your Bit Flows logs history. It will show whether the Brevo action ran successfully or if there was an error.
Common fixes include re-checking your Brevo API key, ensuring you have a target list selected, and verifying that all required fields (like email) are mapped. Also, make sure your Contact Form 7 is set up correctly. If logs show a failure, fix the settings as needed and test again.
With Bit Flows, you can integrate Contact Form 7 with Brevo for free with unlimited executions. This means you don’t need to pay a single penny to send your contact form submission data to Brevo!