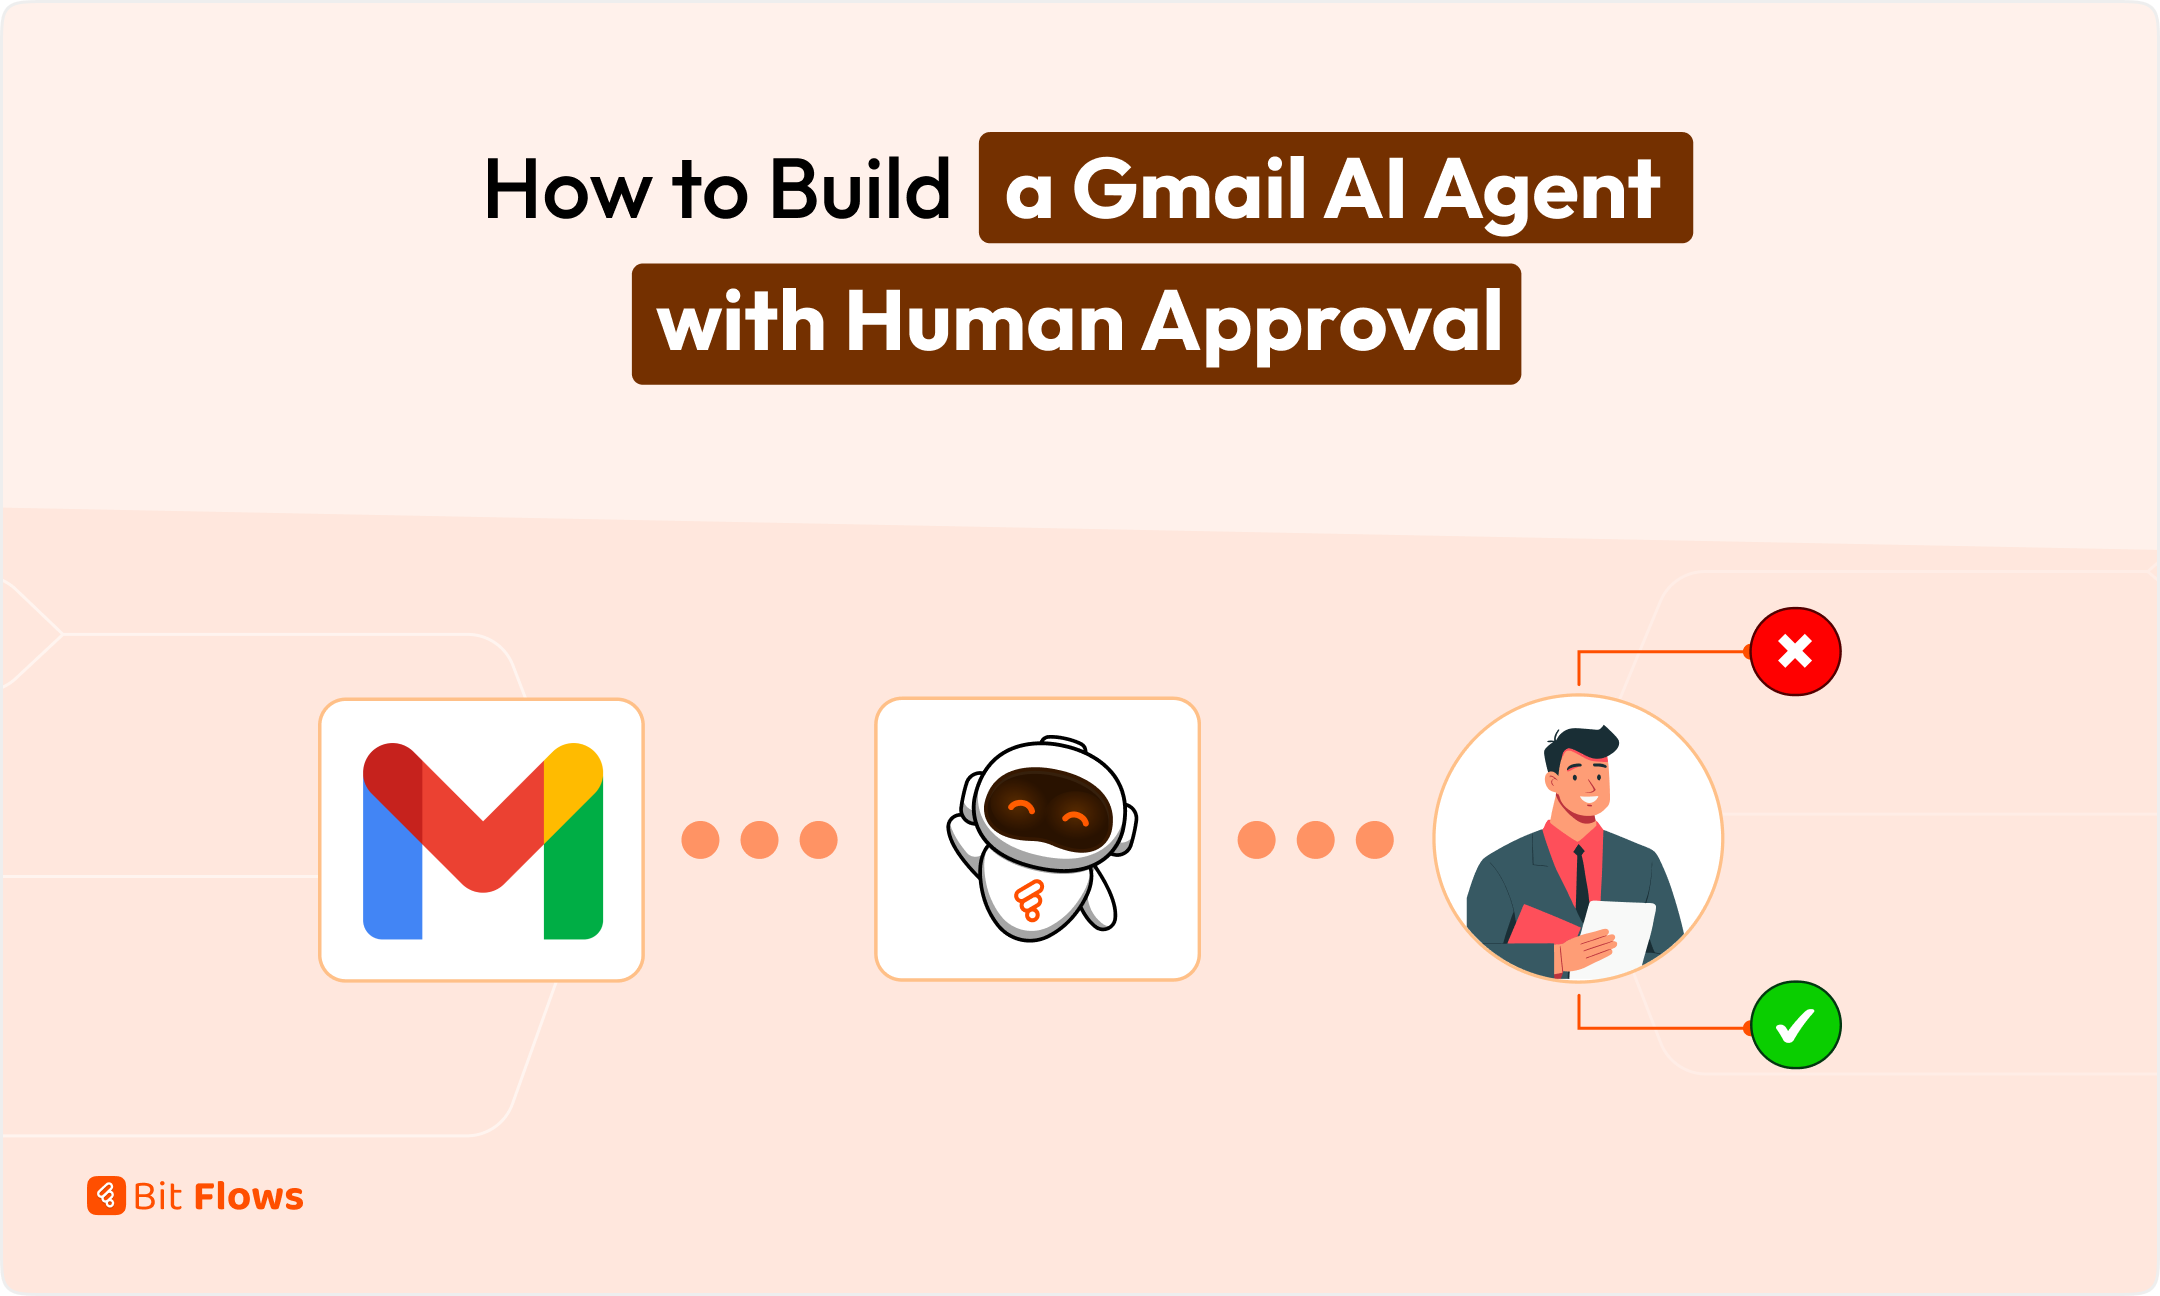
Most inboxes handle emails the same way. A message arrives, someone reads it, decides how to respond, writes the reply, and sends it. When the inbox is busy, responses slow down. When the team is small, emails pile up faster than anyone can answer them.
Automating replies completely is not the answer either. A refund request, a billing complaint, or an account access issue should not be answered by AI without someone checking the response first. A Gmail AI Agent with human approval solves both problems.
AI handles the reading, classifying, and drafting. A human reviewer approves or declines before anything reaches the customer. The workflow runs automatically. The response only sends when a person says it should.
This workflow uses Bit Flows to build a Gmail AI Agent that helps manage replies without giving AI full control. Bit Flows checks unread Gmail emails, sends each message to the AI Agent, and lets AI classify the email, set priority, and prepare a short reply draft.
AI-Processed.For this workflow, we’ll use Bit Flows. It lets you build automated workflows with triggers, actions, tools, AI Agent, conditions, Gmail, Google Sheets, and Human in the Loop review.
To install Bit Flows, go to your WordPress dashboard. Open Plugins → Add New, search for Bit Flows, then click Install Now and Activate.
Before setting up the nodes, here is the full workflow path:

This workflow is useful when you want AI to help with email triage and reply drafting, but still want a real person to approve the response before it reaches the customer.
You can use it for support inboxes, sales emails, partnership requests, billing questions, client messages, and small team inboxes where full auto-replies are too risky.
| Tool or app | Role in the workflow |
| Schedule | Starts the workflow automatically |
| Gmail Find Email | Finds unread inbox emails |
| Iterator | Processes each found email one by one |
| Gmail Get Email Details | Gets the email subject, sender, snippet, and message ID |
| AI Agent | Classifies the email and writes a reply draft |
| Condition/Filter | Decides whether the email needs approval or should be skipped |
| Gmail Human in the Loop | Sends the AI reply draft to a human reviewer |
| Gmail Reply to Email | Sends the approved reply in the original email thread |
| Gmail Add Label to Email | Marks the email as processed |
| Google Sheets | Logs the result for tracking |
Start the workflow with a Schedule trigger. This tells Bit Flows when to check Gmail for new unread emails.
For this Gmail AI Agent workflow, set the trigger interval based on how often you want the inbox to be checked.
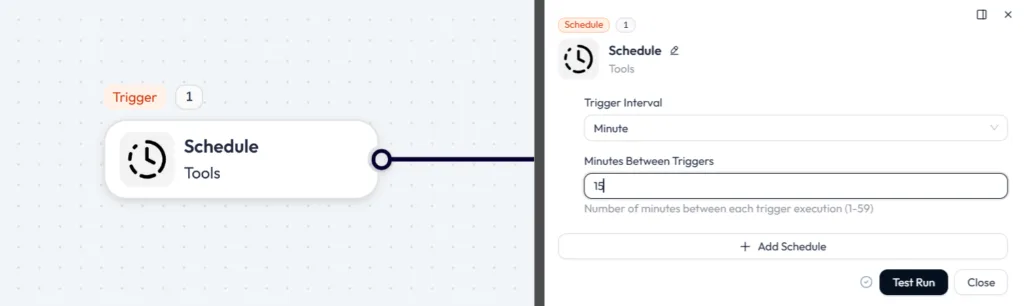
You can use a shorter interval while testing, but every 15 minutes is safer for a real inbox. It prevents the workflow from checking Gmail too aggressively.
Click on the + icon after the Schedule trigger → go to Apps → select Gmail → choose Find Email.
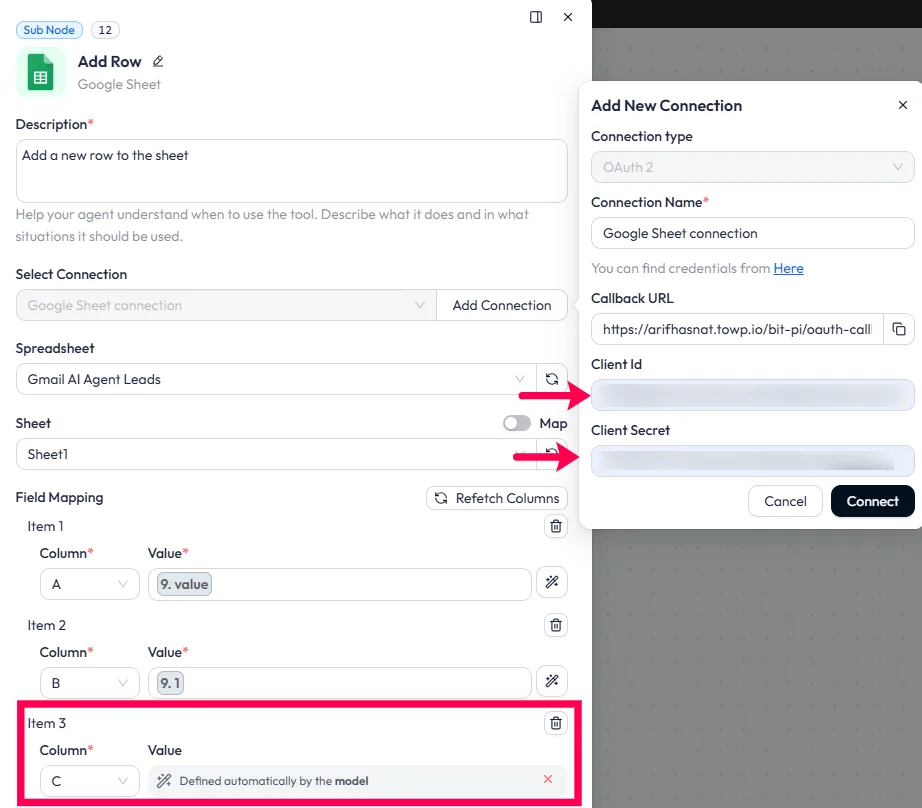
Click Add Connection → select OAuth → you will need a Client ID and Client Secret key.
Now connect your Gmail account with Bit Flows. If you have not connected Gmail yet, follow the Gmail connection guide. Once the connection is ready, return to this workflow and select your Gmail account inside the Gmail Find Email step.
For this workflow, we’ll use this Gmail search query:
in:inbox is:unread newer_than:2d -label:AI-Processed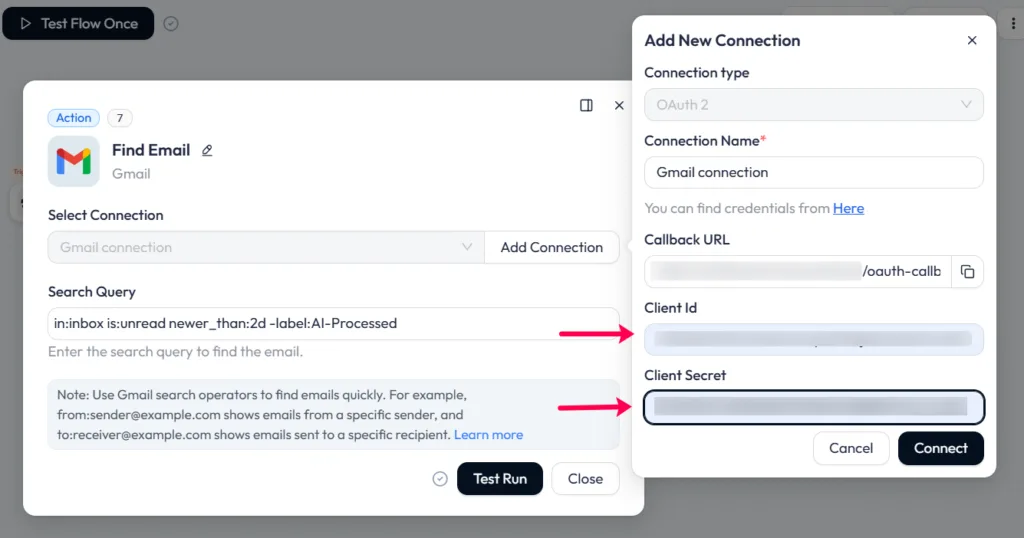
This finds unread inbox emails from the last two days and skips any email already labeled as processed. Adjust newer_than:2d to match your inbox volume; use newer_than:1d for busier inboxes.
Gmail Find Email may return more than one message per scheduled run. Without an Iterator, only the first email gets processed. But for a more complete Gmail AI Agent workflow, add an Iterator after Find Email. Configure Iterator like this:
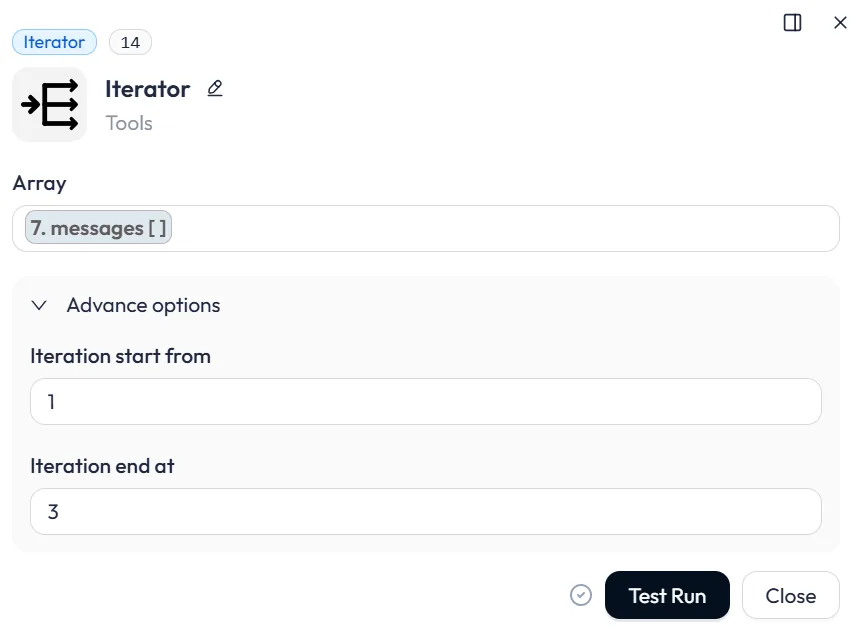
Map the messages array from the Gmail Find Email output into the Iterator. Set a Batch Size of 3 to 5 emails per run. This prevents one scheduled run from generating too many approval requests at once.
After the Iterator is set up, add the Gmail → Get an Email Details action. This step reads the full details of each email that comes from the Iterator.
In the Message ID field, map: Iterator → id
Do not use: Find Email → messages → 0 → id
Once the Iterator is added, each email is handled as the current item. So the correct source is the Iterator output.
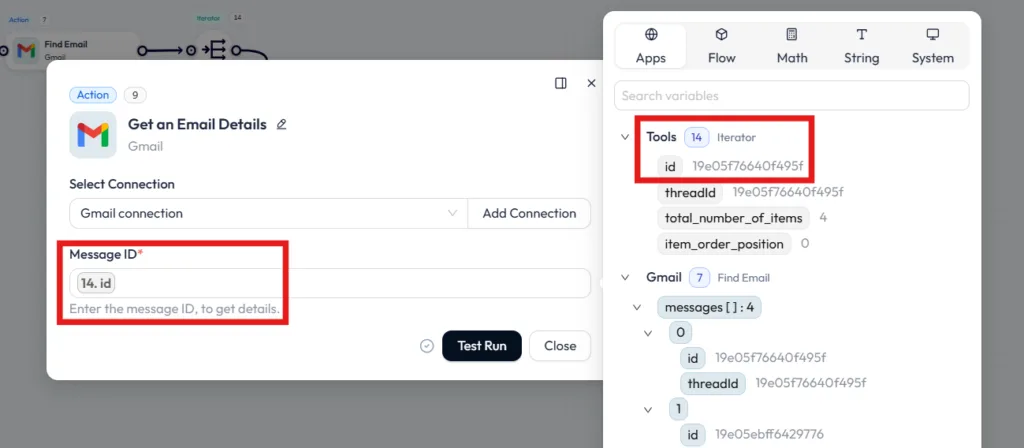
Now click Test Run. If the setup is correct, the output should return one Gmail message with details. This confirms that Bit Flows is now reading each email one by one before sending it to the Gmail AI Agent. Use the snippet, From, Subject, id, and threadId fields from this output in the next AI Agent step.
Add the AI Agent node after Gmail Get Email Details. Connect the required Chat Model first. In this example, we are using the OpenAI Chat Model, but you can use other models as well.
To use OpenAI, create an API key from your OpenAI developer account, then paste that key into the OpenAI connection settings in Bit Flows.
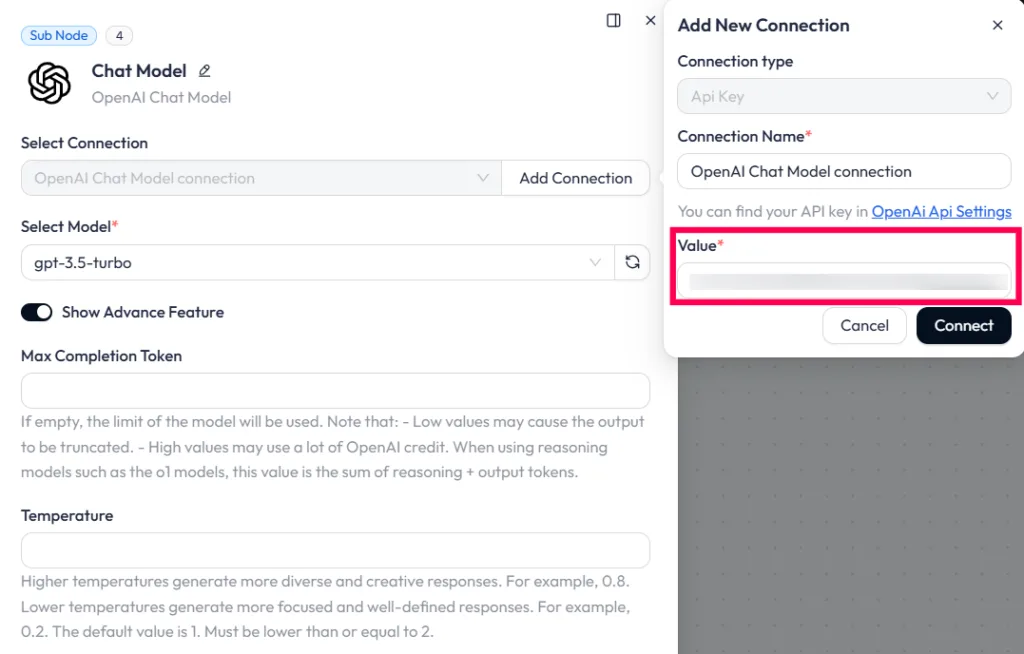
OpenAI provides secret API keys from the API keys page, and the key should be kept private. You can check OpenAI’s model pricing and usage costs on the official API pricing page before choosing a model.
Once the OpenAI connection is saved, select the model in Bit Flows and attach it to the Chat Model port of the AI Agent. Without this chat model connection, the Gmail AI Agent cannot analyze the email, classify it, or return the JSON response used in the next steps.
You can also connect Simple Memory if you want the agent to remember short context during the workflow. For this setup, keep the memory key tied to the current email ID so each email stays separate.

You can use a custom prompt according to your business. You can connect your business database to this AI Agent, and it will use that or the replies. But here is a simple example system prompt:
| You are a Gmail AI Agent for a business inbox. Analyze the email and return only valid JSON. Rules: – Return only JSON. – Do not add markdown. – Do not send emails. – Do not use tools. – Do not write to Google Sheets. – Fill every field. – Keep the reply short, polite, and professional. – Do not promise refunds, discounts, delivery dates, account changes, or legal decisions. – If the email is about a refund, billing, complaint, account access, pricing, partnership, or anything unclear, set needs_approval to true. – If the email looks like spam, set category to Spam, label to Spam-Review, needs_approval to false, and body to an empty string. – The body field must contain only the customer-facing reply. – Do not include category, summary, priority, approval text, or internal notes inside the body. – End non-spam replies with: Best regards, Bit Apps Team |
Adjust the AI Agent prompt based on your inbox type, response tone, approval rules, and business needs. Test the workflow multiple times with different email examples before using it on real customer emails.
In the prompt field, map the email data from the previous Gmail step:
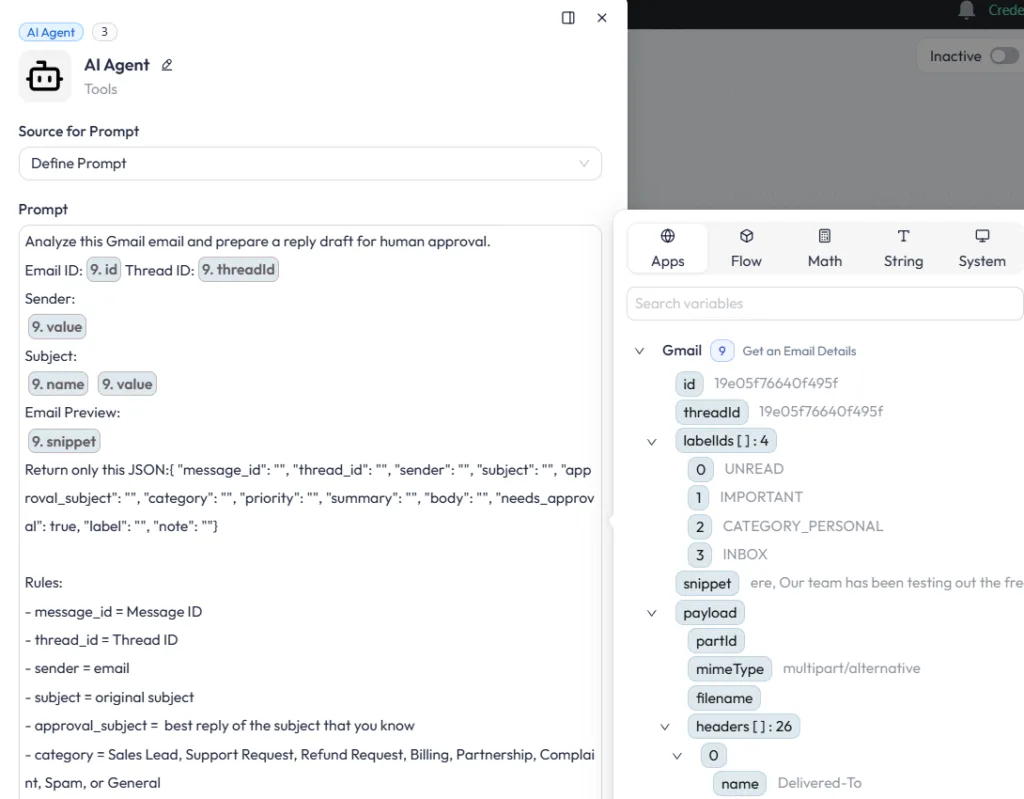
For this tutorial, we kept the AI Agent simple. It should return a short JSON response with the email category, priority, summary, reply body, approval subject, label, and internal note.
You can use a custom prompt based on your business rules. For example, a support team may ask the AI Agent to detect refund, billing, or complaint emails. A sales team may ask it to identify license inquiries, pricing questions, or demo requests.
After the AI Agent returns the JSON response, add a Condition/Filter node. This step decides which emails should go to human approval and which emails should be labeled or logged without sending a reply.
In this example, we created a condition for the Sales Lead email
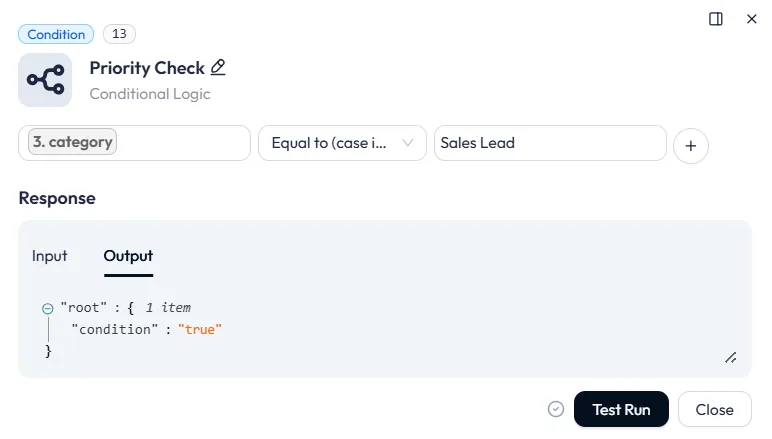
This condition works; the AI Agent prompt must clearly tell the agent to return the category exactly as Sales Lead when the email matches that intent.
For example, if someone writes: Ready to purchase: 10 Annual Pro Licenses, the AI Agent should return: “category”: “Sales Lead”
If the AI Agent returns “Sales Lead,” the condition evaluates to true, and the workflow sends the AI-written reply to Gmail Human-in-the-Loop for review in the next step. If the condition evaluates to false, the email will not proceed to the Human in the Loop section.
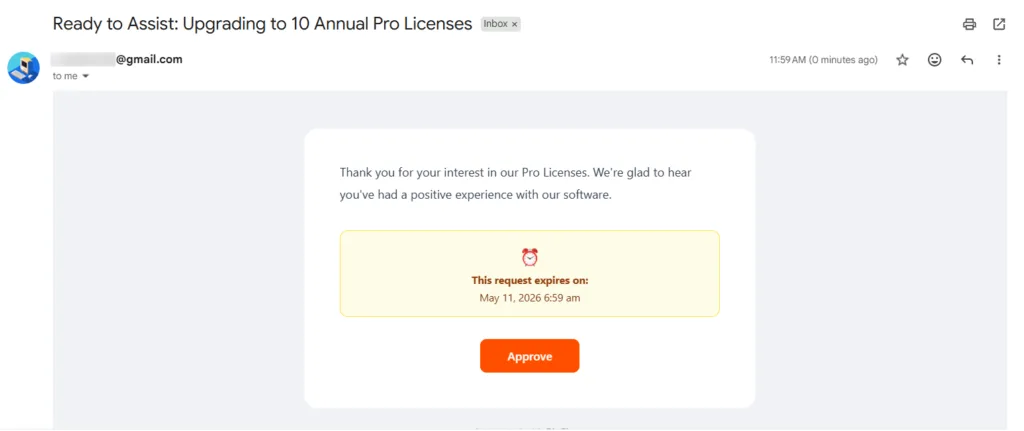
After the condition confirms that the email should be reviewed, add: Gmail (HITL) → Send and Wait for Response node
This step sends the AI-written reply to a reviewer and waits for approval before the workflow continues. First, select your Gmail (HITL) connection, just like you selected the Gmail connection earlier in Step 2. If you have not connected it yet, click Add Connection and connect the Gmail account that will send the approval email.
Configure the fields like this:
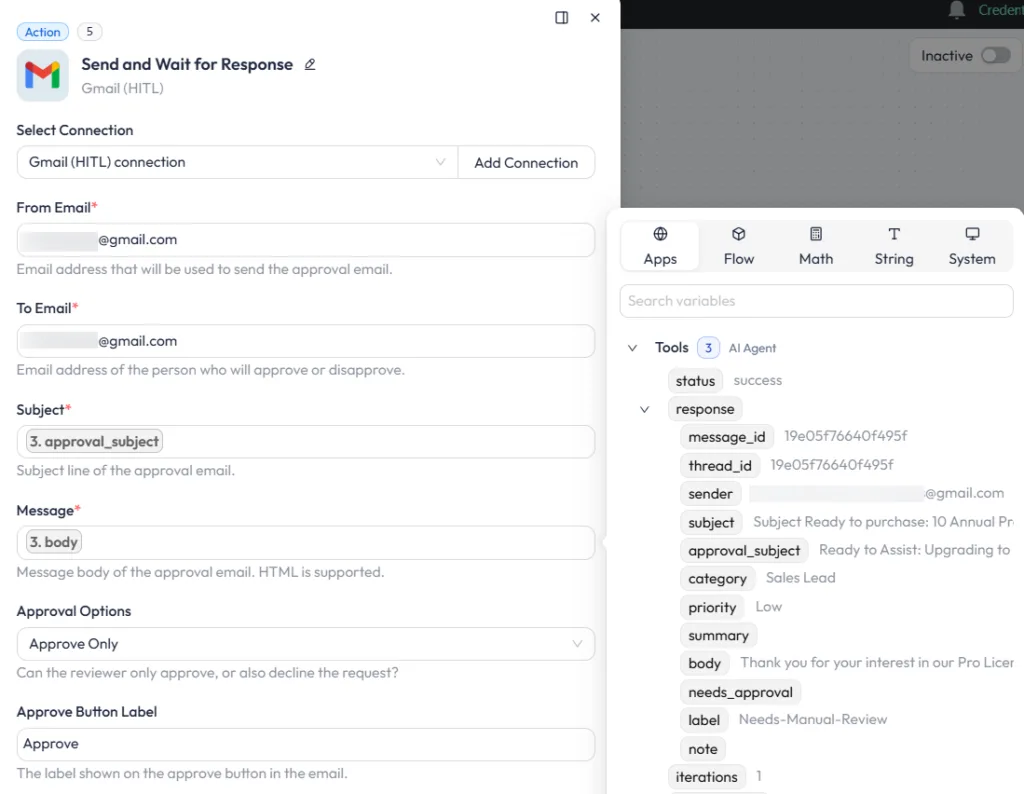
Do not send this approval email to the customer. The To Email should be the person who will approve the AI reply. When the reviewer approves the email, the workflow can continue to the next step and send the reply through Gmail.
If the reviewer does not approve or the request times out, the workflow stops or follows your fallback path.
After the reviewer approves the draft in Gmail Human in the Loop, add the Gmail → Send an Email action. This step sends the AI-written reply to the original sender.
Select your Gmail connection, just like you did in Step 2. Then, map the fields from the AI Agent response.
Use this setup:
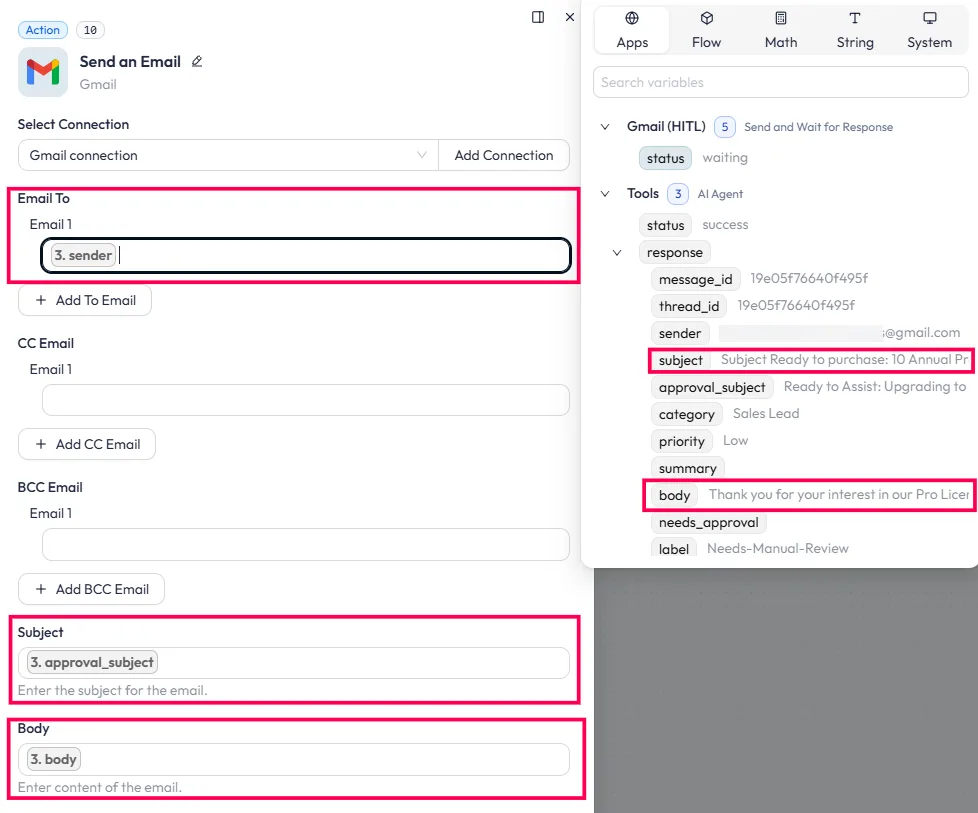
The Email To field should contain the original sender’s email address. The Subject should use the subject prepared by the AI Agent, and the Body should use only the AI-generated reply text.
Make sure the body field contains only the customer reply, not the category, summary, priority, or internal note. Those details are only for the approval email and logs.
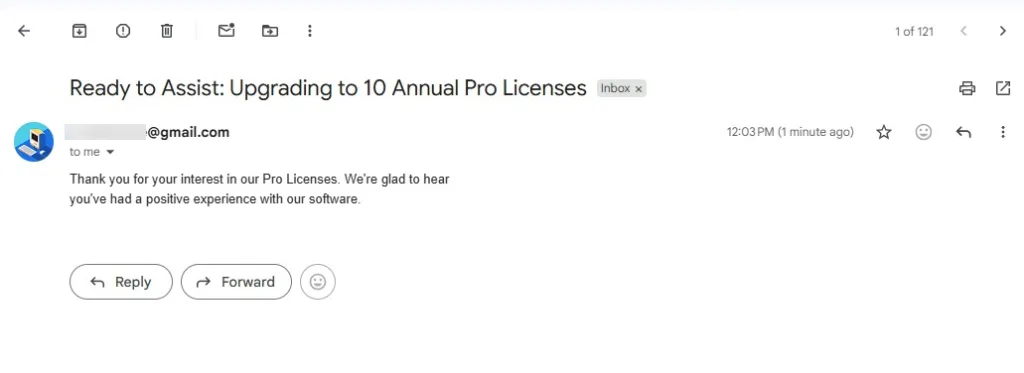
The sent response should look like a normal seller reply:
If you want the reply to stay inside the original Gmail thread, use Gmail → Reply to Email instead of Send an Email. But if you are sending a new email response, this Send an Email setup works fine.
After the email is sent, add Gmail → Add Label to Email and select your Gmail connection, just like you did in Step 2. This step adds a Gmail label to the email created by the Send an Email action, so you can easily track it later in Gmail. Configure it like this:
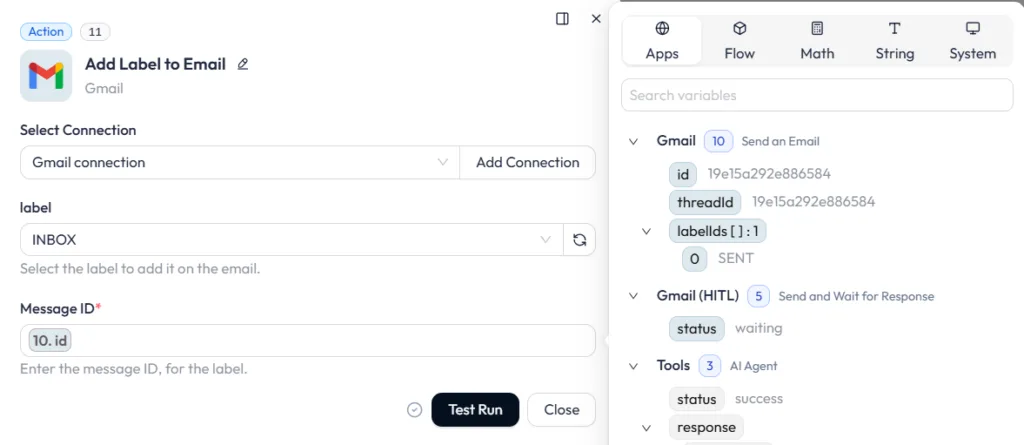
The Message ID must come from the Send an Email step because you are labeling the email that was just sent. Gmail already stores sent messages in the Sent folder, so this label is mainly for tracking or organizing the sent response
Google Sheets is optional, but it is useful if you want a clear record of each email handled by the Gmail AI Agent.
In this setup, Google Sheets works as a workflow log. After the reply is sent, declined, skipped, or labeled, add Google Sheets → Add Row and map the fields or define it with AI.
After the workflow runs, your Google Sheet will show each processed email with its category, approval status, and AI-generated reply details.
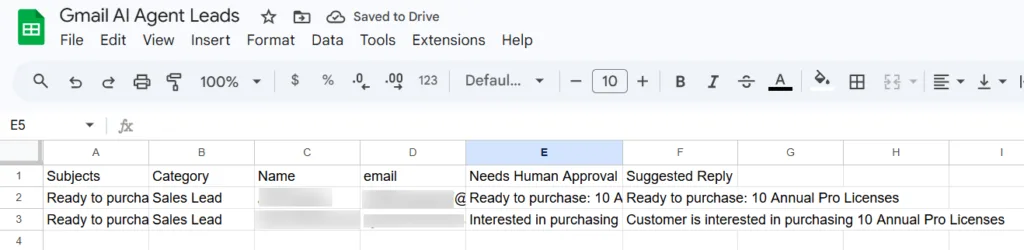
This gives your team a simple way to review what the AI Agent processed, which emails were approved, which ones were marked as spam, and which ones still need manual review.
If the reviewer declines the AI-written draft, the workflow should not send the email. A simple fallback path is:
AI-Needs-Manual-ReviewThis keeps the workflow safe. It also gives your team a clear list of emails that need human attention.
AI-Processed label to the original email so the workflow does not process the same message again.AI-Needs-Manual-Review and let a team member handle it manually.The Human in the Loop node is not a limitation on the automation. It is the feature that makes the automation usable in a real business context.
Fully automated email replies work for low-stakes messages where accuracy does not matter much. But for sales inquiries, billing complaints, refund requests, and client communication where the wrong reply damages a relationship, a human check before sending is not optional.
This workflow gives your team the speed of automation and the control of human review at the same time. The AI does the work that scales. The reviewer makes the call that matters.
Start with a small batch size and keep every AI-written reply behind human approval. After a few test runs, review the Google Sheets log, check where the AI Agent misclassified emails, and update the prompt before increasing the volume.
Yes. Bit Flows supports DeepSeek, Groq, and OpenRouter Chat Model as the AI Agent’s chat model. The prompt structure in Step 5 works with any model that returns valid JSON. Test the output carefully when switching models; different models handle JSON formatting instructions differently.
The Condition node in Step 7 will fail because it cannot read a field from malformed JSON. Add error handling to your prompt, specify that the model must return only valid JSON with no markdown, no extra text, and no missing fields. Test the prompt with several different email types before running the workflow on a live inbox.
Yes. Increase the Iterator batch size. Start at 3 to 5 and increase gradually. A higher batch size means more approval emails are sent to the reviewer per run. Make sure your reviewer can handle the volume before increasing it.
The Gmail search query in Step 2 uses -label:AI-Processed to skip emails already labeled.
The standard Gmail Human in the Loop setup captures approve or decline only. If you need the reviewer to add notes, consider sending the approval request through a form instead, where the reviewer can submit a comment alongside their decision.
The AI Agent handles multiple languages depending on the model you use. GPT-4o reads and writes in most languages. Add a language instruction to your prompt if you want replies to always be in a specific language, regardless of the language the email was written in.
Yes, but it is safer to use human approval for customer-facing replies. AI can misunderstand billing, refunds, complaints, or account-related messages, so approval keeps the workflow controlled.
Use Reply to Email for the final customer response. It keeps the response inside the original Gmail conversation thread.
The AI-Processed label prevents the same email from being handled again in the next scheduled run. Without this label, the same unread email may keep entering the workflow.