
Do you want to answer customer questions on your WordPress site automatically? Bit Flows can help! It’s an automation plugin that lets you set up workflows with no coding needed. Bit Flows connects things like your contact forms to smart tools.
You can link it with ChatGPT, Gemini, your email server, and more tools. You can set everything up with a simple visual builder. You don’t need any special tech skills. Just follow the steps in this guide.
I’ll show you how to collect questions from a form, auto-reply customer questions with ChatGPT, and email that answer to your customer. You build a “flow” in WordPress that takes care of common support on its own.
With Bit Flows, you collect questions sent through your site’s forms. Bit Flows sends the question to an AI, which writes a reply. The AI’s answer gets emailed straight to the customer.
It’s all automatic and needs no coding. The flow uses your form, a tool called a Router to sort the questions, an AI Action to write the reply, and a Mail Action to send it. Support becomes faster and easier for you and your customers.
Don’t use AI auto-replies for billing, account, or security questions. If a customer asks about these, it’s safer to send them to a real person. Also, don’t use AI replies when someone’s question involves personal data or legal rules.
Later, I’ll show you how to set up Bit Flows so it recognizes these special cases. For example, you can train your prompt to tell the AI: say, “I’ve flagged this for a specialist” when a question has the word “billing” or “password.” Bit Flows can handle this with just a few settings.
AI does best with questions that have simple, clear answers. For anything needing account changes, refunds, or private info, get a human agent involved.
Tip: If you don’t set up SMTP, emails might end up in spam. It’s a good idea to install and test Bit SMTP first.
Let’s look at the goal. Whenever someone fills out a support or contact form, Bit Flows will create an answer with AI and email this answer back. It can also save the details–like name, email, and question–to Google Sheets. The whole thing is hands-free and helps your team stay quick.
Here’s how it works:
Form Submission (Trigger): A user fills out your form with their name, email, and their question.
Router Tool: Bit Flows checks the kind of question.
AI Action: General questions go to ChatGPT or Gemini. AI writes the reply.
Mail Action: AI’s answer is emailed to your customer using SMTP.
(Optional) Google Sheets Action: The whole submission is saved for your records.
You do all these steps in the Bit Flows builder, no code at all.
Let’s start by creating your form to collect questions.
In Bit Form (or your preferred plugin), add fields for Name, Email, Question, and a drop-down for Category (“General” or “Billing” options work well).

Add the form to your contact or support page so customers can find it. Ensure you know the exact labels (such as name, email, or question). You’ll need them soon. Submit a test entry yourself to verify that all fields function correctly and the entry appears as expected.
Tip: Use simple field names like “name” and “email” to make setup in Bit Flows easier.
Now let’s get your workflow up and running.
Create a new flow: In WordPress, open Bit Flows, go to Flows, and click Add New. Give your flow a name and hit the create button.
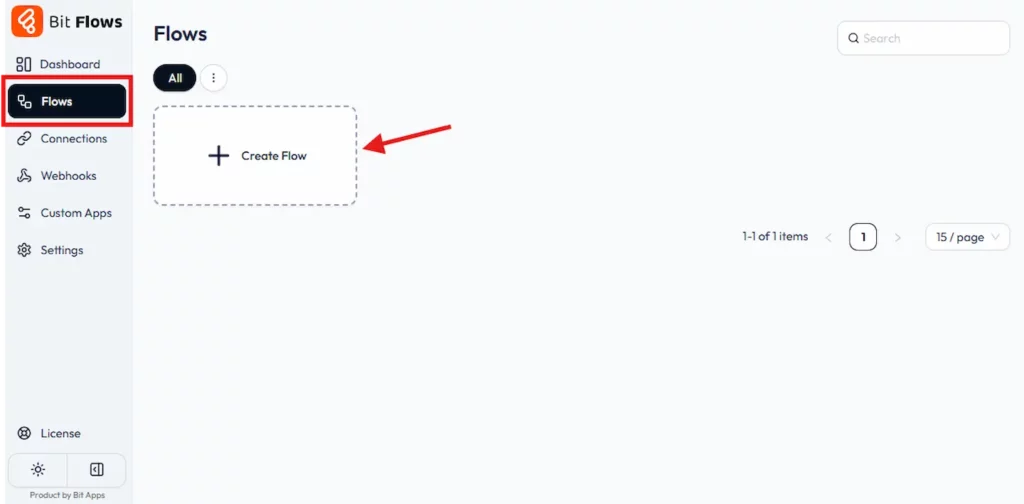
Connect your form as the trigger: Select Trigger and pick your form app (like Bit Form). Choose “Submit Success” and select the correct form.

Capture a sample entry: Click Listen Response so Bit Flows can read your form data.

Add a Router: After your trigger, add a Router. This helps to create multiple branches.

For example, you can send the form submission to a Google Sheet and Telegram.

Add Conditions: If the category is “Billing,” AI will not answer–these go to a human or send a holding reply. To do this, add a condition.
This is an example of a conditions node in Bit Flows. You can add similar conditions as per your requirements.

The Router protects sensitive topics by keeping them out of the AI’s hands and ensures customers get the right kind of help every time.
📌Telegram is available in the Bit Flows Pro plan. All other actions, such as Google Sheets, Mail, Router, and the Condition tool, are totally free in Bit Flows.
Now, let’s connect the AI to automatically generate a reply for your customer.
First, click the plus (+) icon and choose either ChatGPT (OpenAI) or Gemini as your AI tool. You’ll need to enter your API key to connect the service.

📌 Follow this easy guide to connect ChatGPT to your Bit Flows workflow.
Once connected, set up the AI’s response by adding a simple instruction as a “prompt” to guide how the AI should reply. For example, you can add the following prompt:

Personalize the reply by using fields like {Name} and {Question} from the form fields. Bit Flows makes it easy to drag and drop these fields into your prompt. After setting up the prompt, run a test to see how the AI’s response looks. If needed, adjust the wording or settings to make sure the reply is just right.
Once you’re satisfied, the AI-generated response will be saved as AI_Response, which will be used in the next step to send the email to your customer.
Now it’s time to send that answer out–fast and personal.
Mail Action: Add the Mail (SMTP) action to the “General” branch.
From Email: In the From Email field, choose the email address from which you want the reply to be sent (this could be your support email or the user’s email).
From Name: In the From Name field, enter the name you want the email to appear from, such as “Bit Form Support.”
To (Recipient Email): Under To, select the email address of the customer (this should be mapped from the form you set up earlier). This ensures that the reply goes to the correct recipient.
CC (Optional): If you need to send a copy of the email to another person or team, you can add an email address here.
BCC (Optional): For a blind copy of the email, add any recipient emails here.
Reply To: Set a reply-to address, where customers can respond if needed. This should typically be your support email (e.g., support@example.com).
Subject: Write a subject line for the email, such as “We Have Received Your Queries.”
Body: Map the Body field to the AI-generated response. For example, you can use the field from the AI step, which holds the response text generated by ChatGPT.
Test the Email: Before going live, click Test Run to send a test email and ensure everything works as expected.

Test Email Example: Here’s an example of the test email you’ll receive after setting up the email action. The email includes a friendly message from your support team and provides clear, step-by-step instructions based on the customer’s question. It’s personalized with the customer’s name and includes helpful content, ensuring the reply is both fast and informative.

You can add more actions as per your needs.
Always set a maximum answer length for AI replies, so emails stay the right size; 150 to 200 words is usually ideal.
Before going live, you should always test.
Common issues you might face:
After setting up Bit Flows and AI replies, you’ll notice these things:
Bit Flows makes automating customer support on WordPress simple. No coding is needed. With a few steps, you can set up AI to reply to common questions and send answers by email.
This saves your team time and keeps customers happy with quick responses. You can customize the setup to fit your needs, including saving records in Google Sheets or adding extra features.
Start building your Bit Flows workflow today. Automate your support and improve your WordPress site.
Yes! Bit Flows works with over 50 different form plugins: WPForms, Gravity Forms, Contact Form 7, and others. The steps in Bit Flows are almost the same.
Just pick the right AI Action in your flow. Use OpenAI for ChatGPT and Gemini for Google’s AI. Make sure you’ve got the right API key.
Use the Router tool to separate these questions. You can also tell your AI in the prompt not to answer them.
If you use SMTP correctly and Bit SMTP is set up, your emails should reach inboxes, not spam.
Yes, just add the correct action in your flow. Bit Flows has options for Google Sheets, HubSpot, and others.
Ask the AI to answer in the needed language in your prompt, or add a translation step before sending to the AI.
Yes. You can set up a branch that sends answers to an agent for review. Only after approval, the reply is sent to the customer.




 EN
EN  DE
DE  ES
ES  NL
NL  IT
IT  PT
PT  JA
JA