Every WordPress form submission is the start of a possible sale. The problem is what happens next. If that lead sits inside your form entries until someone copies it into a CRM by hand, follow-up slows down, records get duplicated, and the detail from the original message gets lost.
The fix is to automate lead capture from WordPress forms to CRM software, so a submission turns into a real lead record the moment it lands. No copy-paste, no missed inquiries, no cold leads waiting on a spreadsheet.
This guide shows two no-code ways to do it with Bit Flows. The first sends Gravity Forms leads straight into Bit CRM, a WordPress-native sales CRM. The second sends Bit Form contacts to HubSpot for teams that already work there. Pick the one that matches where your sales team lives.
You can automate lead capture from WordPress forms to a CRM by connecting a form submission trigger to a CRM action in Bit Flows. This guide covers two setups:
Option 1: Gravity Forms to Bit CRM. Best for teams that want a sales CRM inside WordPress. It creates a real lead with an owner, source, status, currency, tags, and the inquiry details.
Option 2: Bit Form to HubSpot. Best for teams already managing contacts in HubSpot. It creates or updates an external CRM contact.
You can also add an AI Agent later so only high-intent leads trigger a Gmail or Telegram alert to your sales team.
Choose based on where your sales team already tracks leads. If you want everything inside WordPress, use Bit CRM. If your team already lives in HubSpot, sync there instead. Both run on the same Bit Flows workflow pattern, so the build feels the same either way.
| Setup | Best for | What it creates |
| Gravity Forms to Bit CRM | WordPress teams that want to manage sales leads inside WordPress | A lead with status, source, owner, tags, currency, and inquiry details |
| Bit Form to HubSpot | Teams already using HubSpot as their external CRM | A new HubSpot contact, or an update to an existing one |
This is the setup to use when you want a sales CRM that lives inside WordPress. It takes a Gravity Forms submission and creates a lead in Bit CRM, complete with the fields a sales team actually uses to follow up.
It turns a form entry into a sales lead, not just another row of form data. When someone submits your Gravity Forms lead form, Bit Flows reads the fields and creates a lead in Bit CRM with the name, email, company, website, and message mapped in. You then set the source, status, owner, currency, and tags so the record is ready for follow-up the second it appears.
Bit CRM is built for this. It is a complete CRM plugin inside WordPress that manages leads, contacts, companies, deals, products, and invoices from one dashboard, and it runs entirely on the WordPress admin side.
● Gravity Forms installed and activated, with a published lead form
● Bit Flows installed and activated
● Bit CRM installed and set up
Build a Gravity Forms lead form with the fields your CRM needs. For this workflow, use Name (first and last), Email, Phone, and your desired fields. Make Last Name required because the Bit CRM Create Lead screen treats last name as a required field.

Save the form and place it on a test page. Keep that page open in another tab, but do not submit it yet. You will open the Bit Flows trigger and start listening first, then submit.
In your WordPress dashboard, open Bit Flows and create a new flow. Name it something clear like Gravity Forms Lead Capture to Bit CRM. Click the trigger node, choose Gravity Forms as the app, set the trigger event to Form Submission, and select your Lead Form from the dropdown. This tells Bit Flows to run the workflow only when that form is submitted.

With the trigger open, click Listen Response. Bit Flows now waits for a real submission so it can read the exact field values. The listener runs for about three minutes, so you have time to fill in the form.

Leave that popup open, switch to the form page, and submit a realistic test lead. Use a name, email, company, website, and message you will recognise later.
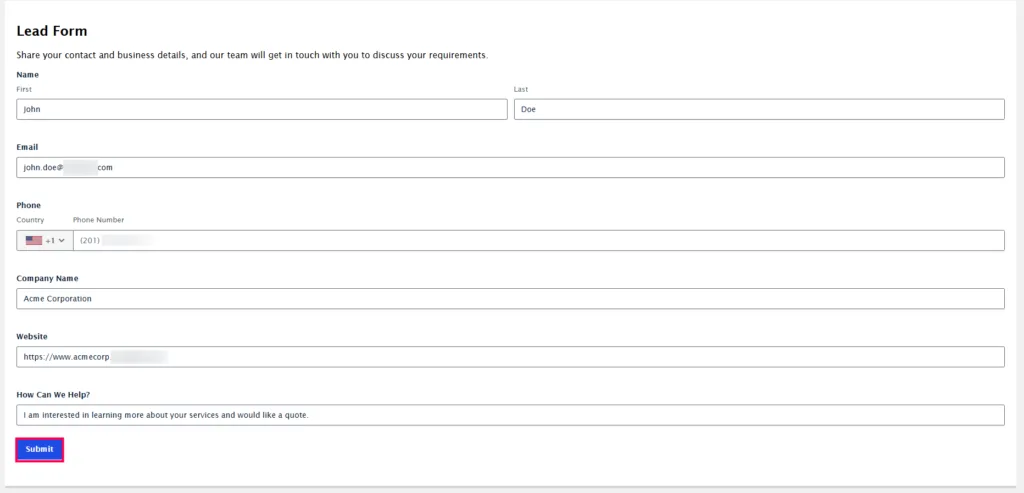
Return to Bit Flows. You should see Response captured with the submitted values listed below it. This order matters. If you submit before clicking Listen Response, Bit Flows may not catch the entry. Use these captured values for mapping instead of guessing field IDs, and re-listen if you ever change the form.

Click the plus icon after the trigger, choose Bit CRM as the action app, and select Create Lead. Your workflow now has two nodes: the Gravity Forms trigger on the left and the Bit CRM action on the right.

Keep the first version direct like this. Add a Condition node later if you want to filter leads by consent, service interest, budget, or location before they reach the CRM.
Open the Create Lead action and map each Bit CRM field to the matching value from the captured response. Bit Flows shows the values as field IDs, so pull them straight from the response you captured in Step 3.

Add Phone only after you submit a real phone number and confirm its field ID. In the test capture above, the phone value came through empty, so mapping it from that response would be unreliable.
Below the field mapping, set the values that organise the lead for your sales team. These are not public form questions, so you choose them once, and they apply to every lead this form creates.
Click Test Run inside the action. If the mapping is right, Bit Flows returns the lead values it sent to Bit CRM, including the first name, last name, email, company name, website, description, and lead source.

Open Bit CRM and go to Leads. Your test lead should appear at the top of the list. Check that the full name reads correctly, that first and last name are stored separately, and that the email matches the form.

Open the lead record and confirm the owner, source, status, tags, and currency are all set the way you want. Once that looks right, the Gravity Forms-to-Bit CRM workflow is live, and every submission becomes a ready-to-work lead.
Use this setup when your team already manages contacts in HubSpot. Here, a Bit Form submission creates or updates a HubSpot contact through Bit Flows, so a repeat submission using the same email address can update the existing HubSpot contact instead of creating another record.
● Bit Form installed and activated, with a published lead form
● Bit Flows installed and activated
● A HubSpot account and a supported HubSpot API credential for the Bit Flows connection
Build a Bit Form lead form with First Name, Last Name, Email, an Interest dropdown, a Message field, and a consent checkbox. The consent box matters because it lets you filter out submissions that did not opt in before they reach your CRM.
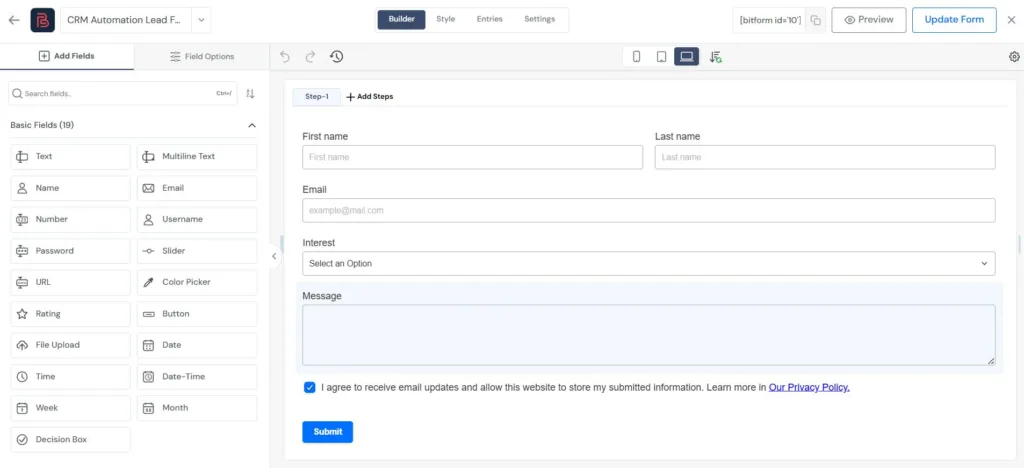
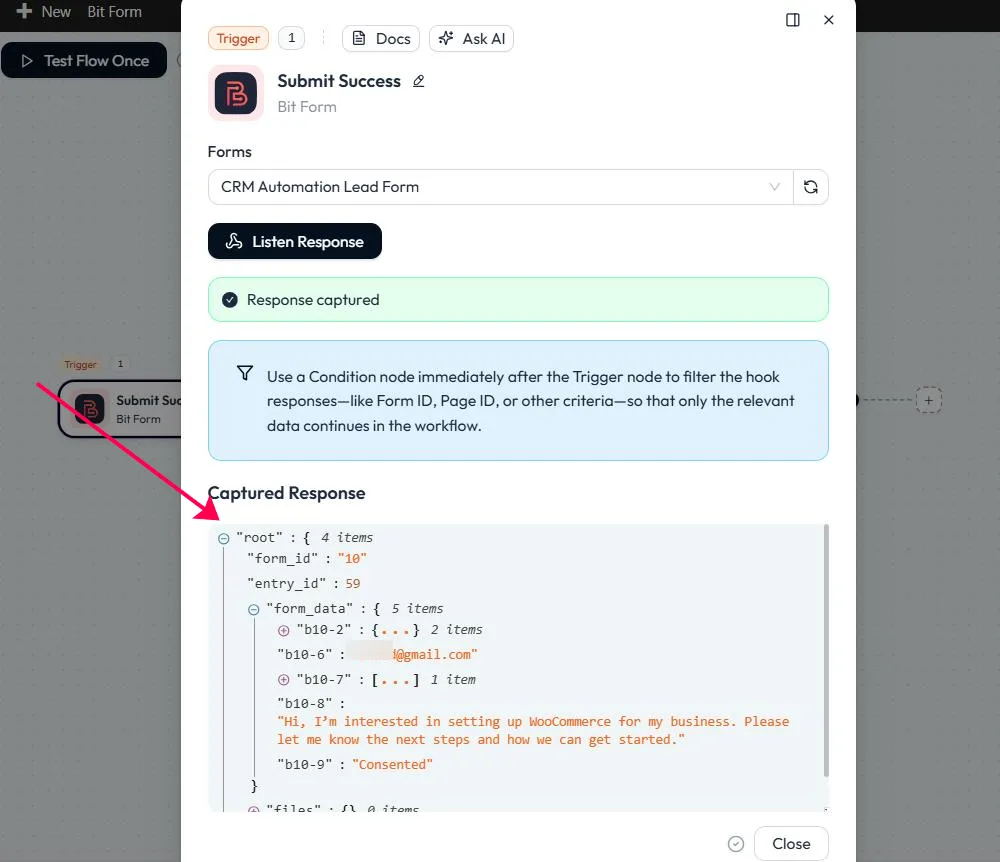
Create a new flow, click the trigger node, and choose Bit Form with the Submit Success event. Select your lead form, then click Listen Response and keep the popup open.

Submit the lead form with test data while the listener is running. Fill every field, tick the consent box, and submit.

Back in Bit Flows, confirm you see the captured response with the form ID, entry ID, and submitted fields. Map from these values so you never guess a field ID.
Before the lead reaches HubSpot, add a Condition tool so incomplete submissions never sync. Set rules that the email, message, interest, and consent fields must exist, joined with AND. If any are missing, the workflow stops on the unmatched path and your CRM stays clean.

Click Test Run in the condition. A valid lead returns a true result, which means it can move on to the HubSpot action.
Add HubSpot as the action after the condition and choose Create or Update Contact. This is better than a create-only action, because a repeat submission from the same email updates the existing contact instead of making a duplicate.
Inside the action, click Add Connection, name it, and paste your HubSpot service key or private app access token into the Value field. For this workflow the key only needs contact scopes, such as read and write on contacts. In HubSpot you create a service key under Development, Keys, Service keys.

Need the full credential walkthrough? Follow the official HubSpot service keys guide. Once connected, turn on Update Contact, set the fixed CRM fields like Lead Status and Lifecycle Stage, then map Email, First Name, Last Name, and Message from the captured response. If you want to store the Interest value, create a custom HubSpot property and map it there.

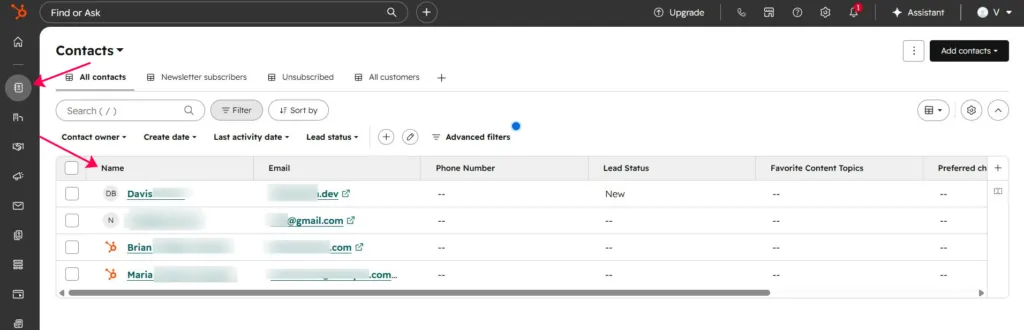
Click Test Run. A correct setup returns a HubSpot response with the contact ID and the properties you sent. Then open HubSpot, go to Contacts, and confirm the lead was created or updated.
Both workflows above save every valid lead. The next upgrade is deciding which leads deserve an instant alert. You can add an AI Agent after the eligibility check to read the message and alert the sales team only when the lead looks high intent.

In this setup, the condition still handles the fixed checks like email, message, interest, and consent. The AI Agent handles the judgment: is this lead worth a notification right now? The CRM action still runs, so every valid lead is saved while only the serious ones create noise. See the Bit Flows AI Agent guide for the full agent setup.
Use a strict prompt so the agent does not overreact to every submission:
You are a lead qualification assistant for a WordPress automation business.
Analyze the submitted form data and decide whether the sales team should be alerted.
Form data: Name, Email, Interest, Message, Consent.
Rules:
Send a Gmail or Telegram alert only if the lead is high intent.
High intent means the message mentions pricing, a demo, urgent setup, agency work, WooCommerce automation, CRM automation, or custom automation.
Do not alert for general questions or low-detail messages. Do not invent missing details. Keep the alert short and useful.
Reason: [short reason why this lead needs attention]Use Gmail when the sales team works mainly from email. Use Telegram when you want a faster alert in a group or channel.
| Alert type | Best use |
| Gmail | Normal sales team notification |
| Telegram | Fast alert for high-intent or urgent leads |
| Both | Only for leads that need quick follow-up, such as pricing or demo requests |
Do not alert on every submission. If every lead pings the team, they will start ignoring the alerts. Let the AI Agent notify them only when the message shows real intent, and test with a few sample leads before you go live.
Submitting the form before clicking Listen Response is the most common one. Bit Flows only captures a submission while it is actively listening, so start the listener first.
Guessing field IDs is the second. Always map from the captured response, because IDs change when you edit the form. If you rearrange fields later, re-listen and capture a fresh entry before touching the CRM action.
Copying screenshot values without checking is the third. A source, status, or tag that fits a store campaign will not fit a general lead form. Match every fixed value to your own CRM and your own form.
| Problem | Likely cause and fix |
| No response captured | The form was submitted after the listener stopped. Click Listen Response again and submit within the timer window. |
| A field maps as empty | That field came through blank in the test entry. Submit a real value, then re-capture and confirm the field ID before mapping it. |
| Duplicate CRM records | A create-only action was used. Switch to Create or Update Contact in HubSpot, and use Email as the matching field. |
| Lead never reaches the CRM | The eligibility condition failed. Open the Condition and Test Run it to see which rule returned false. |
| HubSpot connection fails | The credential may be invalid or missing the required contact permissions. Verify the credential and make sure it has the required contact read/write scopes, then reconnect and test again. |
Once the trigger, condition, and CRM action each work on their own, run the whole thing. Click Back in the Flow Builder, then Test Flow Once, and submit a fresh test lead. After it runs, check three places.
| Where to check | What to confirm |
| Bit Flows canvas | The trigger, condition, and action are connected correctly |
| Your CRM | The lead or contact was created or updated |
| Bit Flows logs | Each step ran successfully |
A CRM workflow should make follow-up lighter, not heavier. Once a visitor submits a WordPress form, the lead should move into your CRM with the right details and the right checks, with fewer chances for a human slip.
Start with the basic sync first. When it works, improve it only where it helps: add Gmail or Telegram alerts for faster follow-up, or add an AI Agent to qualify leads. The real win is cleaner data and quicker response time, whether you keep leads inside WordPress with Bit CRM or push them to HubSpot.
Connect a WordPress form submission trigger to a CRM action in Bit Flows, then map fields like name, email, and message, so each submission creates a lead automatically.
Yes, Bit Flows can send a Gravity Forms submission to Bit CRM using the Create Lead action, which stores it as a real sales lead inside WordPress.
Map first name, last name, email, company name, website, and the message field, and add phone only after you confirm it captured a real value.
No, set Lead Source and Lead Status as fixed values in the action, because they organise the lead for sales rather than being questions the visitor answers.
The Bit CRM Create Lead screen marks last name as required, so your Gravity Forms last name field should also be required to avoid a failed sync.
Use Test Run on the Create Lead action, then Test Flow Once, and confirm the new lead appears in Bit CRM Leads and in the Bit Flows logs.
Submit a fresh test entry with that field filled in, re-capture the response, and confirm the field ID before mapping it to your CRM.
Bit CRM creates a lead record, while HubSpot creates or updates a contact, so pick the setup that matches how your sales process tracks people.
Yes, set the Owner field in the Create Lead action to the responsible sales user, and every new lead from that form is assigned to them.







 EN
EN  DE
DE  ES
ES  NL
NL  IT
IT  PT
PT  JA
JA