Every business owner knows the scenario. A potential client fills out a contact form on your WordPress site. The lead sits in your inbox. Someone on your team opens GoHighLevel, manually creates the contact, opens the pipeline, adds an opportunity, writes a follow-up task, and enrolls the contact in a nurture workflow.
If they do it the same day, the lead has a chance. If they get busy and come back to it tomorrow, the response time will already have hurt conversion.
That gap between a form submission on WordPress and a live contact in GoHighLevel is where leads get lost. A GoHighLevel WordPress integration removes that gap.
Every form submission on your WordPress site creates the contact in GoHighLevel, opens a sales opportunity, assigns a follow-up task to your rep, and enrolls the lead in a nurture workflow automatically, within seconds of the form being submitted.
GoHighLevel WordPress integration helps businesses send new leads from WordPress forms into GoHighLevel automatically. In this guide, Bit Form is used as the example lead form, and Bit Flows handles the automation between WordPress and GoHighLevel.
When someone submits the form, the workflow can search for an existing contact, create or update the contact, add an opportunity to the right pipeline, assign a follow-up task, and enroll the lead in a GoHighLevel workflow. This reduces manual data entry, prevents duplicate records, and helps sales teams follow up faster. Before going live, test the full flow and review the Bit Flows logs to confirm each step works correctly.
| Feature | Manual Process | With Bit Flows |
| Speed to Lead | Minutes to hours | Near-instant (typically seconds) |
| Data Accuracy | Prone to typos and missing fields | Maps fields automatically, no re-entry |
| Pipeline Updates | Requires manual stage changes | Opportunity created automatically |
| Task Assignment | Reps must check inboxes | Task assigned directly in GoHighLevel |
When someone submits the lead form on your WordPress site, Bit Flows starts the automation with the Bit Form Submit Success trigger.
The workflow then searches GoHighLevel contacts using the submitted email address. This search step comes before adding a contact, so the same lead does not get created twice in your CRM.
After the search, the Conditions/Filters node checks the result. If the contact is not found, Bit Flows sends the lead to GoHighLevel → Add Contact. If the contact already exists, Bit Flows sends the lead to GoHighLevel → Update Contact.
So the main workflow is:
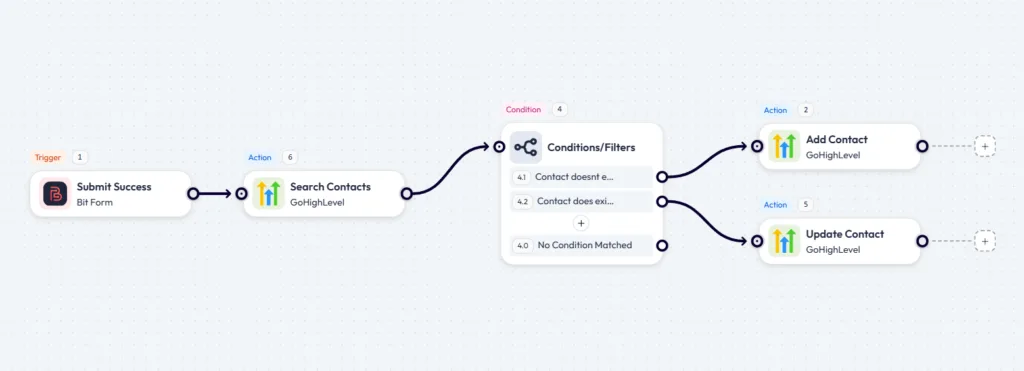
This gives you a cleaner GoHighLevel CRM because every WordPress lead is checked first, then added or updated based on the search result.
WordPress side: Go to Plugins → Add New, search for Bit Form, and click Install and Activate. Install Bit Flows the same way. Both should appear in your WordPress dashboard menu once activated. Bit Flows also supports Contact Form 7, WPForms, Elementor Forms, and 75+ other form plugins as triggers. For this guide, we’ll use Bit Form for the setup.
GoHighLevel side: You need admin or agency-level access with API access enabled on your plan. Check your GoHighLevel subscription to confirm API access is available before starting.
Open Bit Form → click Add New Form → name it: WordPress to GoHighLevel Lead Form
Add these fields to your required fields.
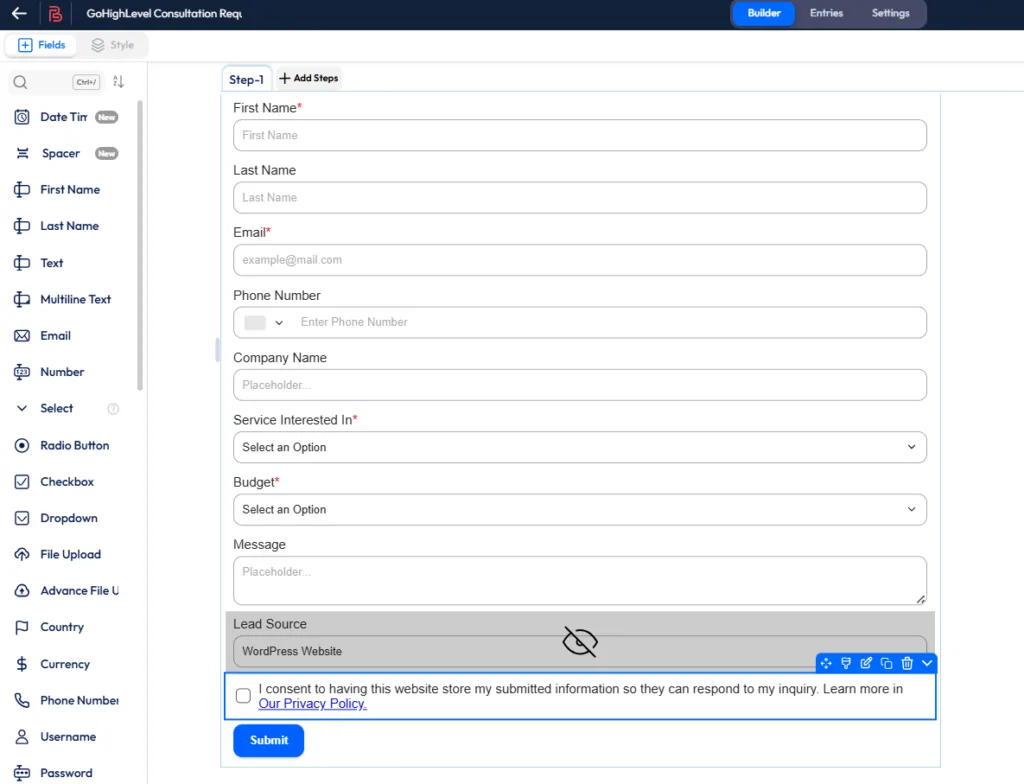
For Service Interested In, use these options:
For the hidden field: Set Lead Source = WordPress Website as the default value. This value maps to GoHighLevel’s Source field, so every contact from your WordPress form is tagged correctly inside the CRM. This matters for reporting, you will know exactly how many GoHighLevel contacts originated from your WordPress site.
Open Bit Flows → click Create New Flow → name it: WordPress to GoHighLevel Lead Flow
Click the trigger node and configure it by choosing the Bit Form/Or Trigger you need, selecting Submit Success as the trigger event, and then choosing the WordPress to GoHighLevel Lead Form that you created earlier.
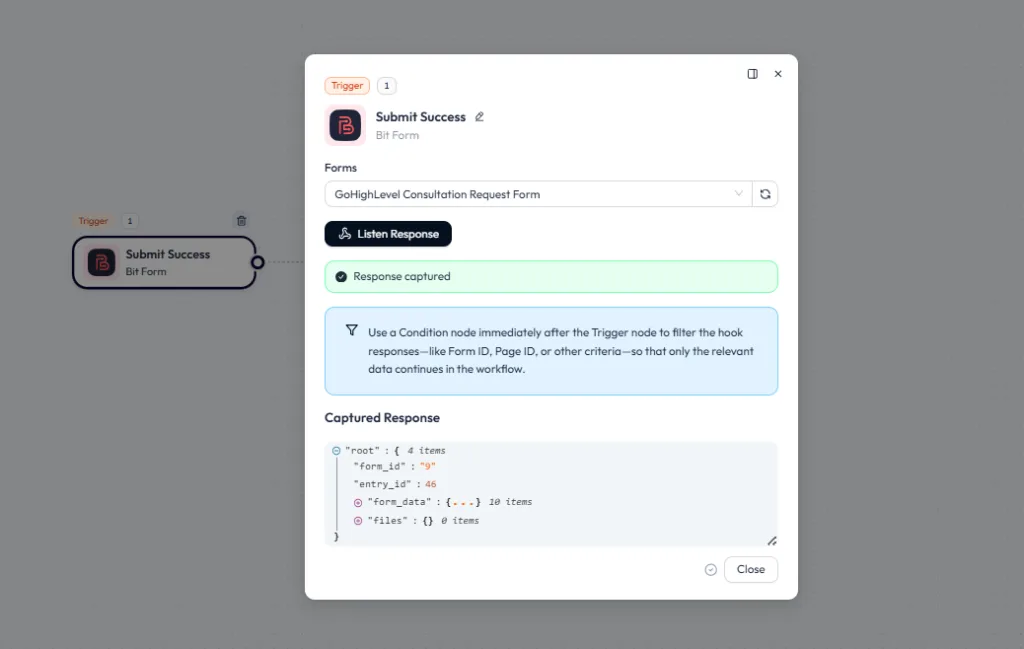
Click Listen Response → go to your form and submit a test entry with realistic data. Confirm the captured response includes all your form fields before moving to the next step.
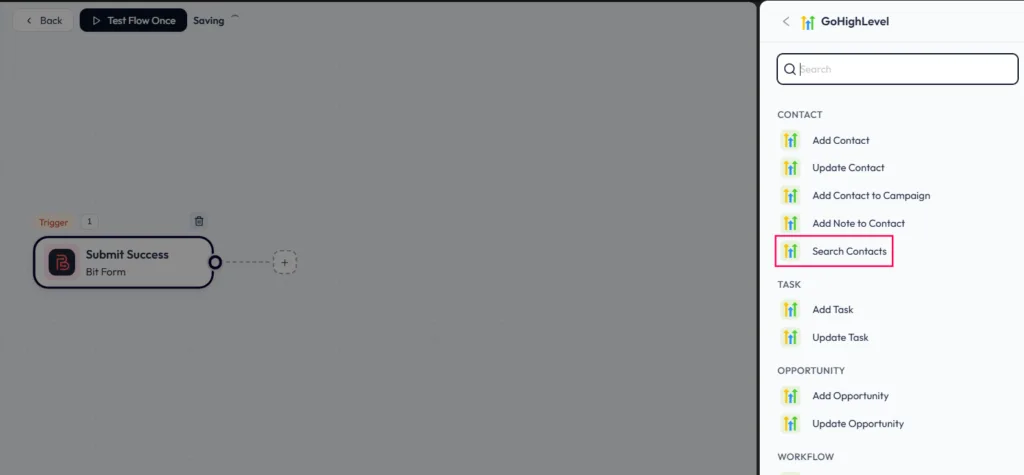
After setting the Bit Form trigger, add your first GoHighLevel action. Click the + icon, go to Apps, select GoHighLevel, and choose Search Contacts.
Inside the Search Contacts step, click Add Connection. Bit Flows will open the GoHighLevel connection popup. From this popup, copy the Callback URL first. You will need this URL when creating the GoHighLevel Marketplace app.
Now go to the GoHighLevel Marketplace, sign up or log in with a developer account, open My Apps, and click Create App. Give the app a clear name, such as Bit Flows – WordPress Lead Integration. Select Private as the app type, choose Sub-Account as the target user or distribution type, and create the app. GoHighLevel’s docs say Marketplace apps are created from My Apps → Create App, and private apps are intended for personal or internal use.
After creating the app, open its Auth or Advanced Settings → Auth section. Paste the Callback URL from Bit Flows into the Redirect URL field. HighLevel’s OAuth docs explain that the Auth page is where you configure scopes, redirect URLs, and client credentials, and the redirect URL is where HighLevel sends the authorization response after the app is installed.
Add these scopes for this workflow:
contacts.readonly, contacts.write, opportunities.readonly, opportunities.write, users.readonly, workflows.readonly, locations.readonly, locations/tags.readonly, and locations/tags.write.
These scopes let Bit Flows search contacts, add or update contacts, create tasks and opportunities, load users for task assignment, fetch workflows, read the connected sub-account, and handle tags if your GoHighLevel fields need them.
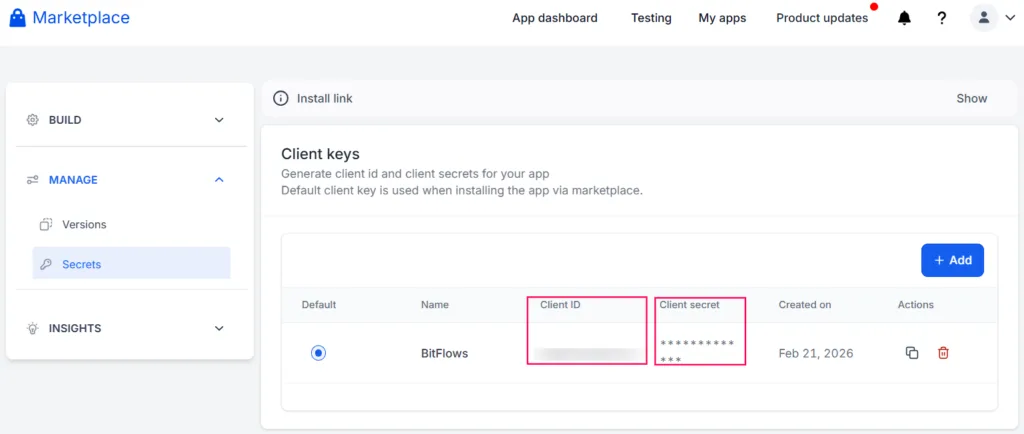
Next, create a new Client Key in the same Auth section. Copy the Client ID and Client Secret. HighLevel’s OAuth docs note that the Client Secret should be copied and stored securely because it cannot be viewed again after closing the screen.
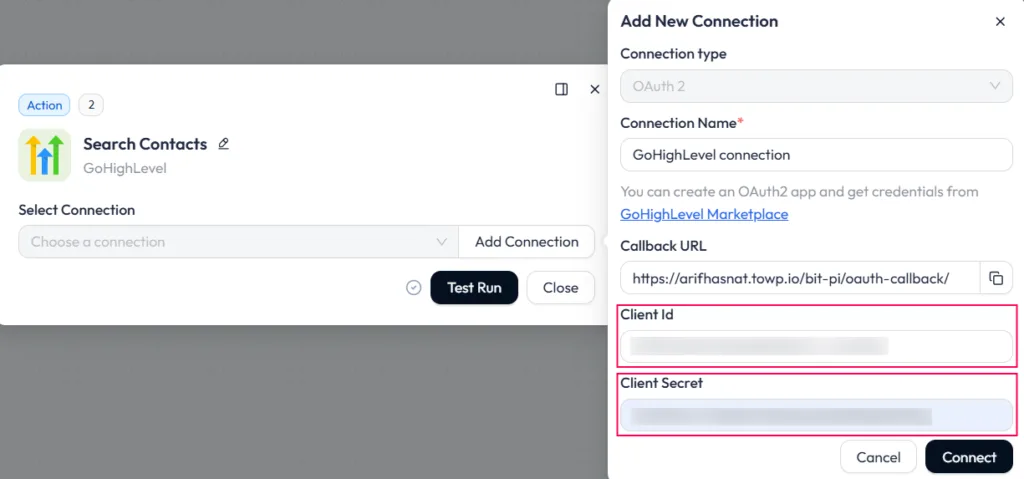
Return to the Bit Flows connection popup. Add a connection name, paste in the Client ID and Client Secret, then click Connect. Once connected, select that connection inside the Search Contacts action.
Configure the search:
This checks whether the submitted email already exists in GoHighLevel before creating a new contact, which prevents duplicate records when the same person submits the form more than once.
Next, add a Conditions/Filters node after Search Contacts.
This node decides whether Bit Flows should add a new contact or update an existing one.
Use two condition paths:
| Path | Purpose |
| Contact Does Not Exist | Contact not found, so create a new GoHighLevel contact |
| Contact Exist | Contact found, so update the existing GoHighLevel contact |
The condition should check the output from the Search Contacts step. If no contact is returned, continue to Add Contact. If an existing contact or contact ID is returned, continue to Update Contact.
After the Conditions/Filters node, you can either add a new contact or update an existing contact in GoHighLevel.
If the search result shows that the contact does not already exist, click + → select GoHighLevel → choose Add Contact as the action.
If the search result shows that the contact already exists, choose Update Contact instead and map the existing contact ID from the Search Contacts step.
For the Add Contact path, map the fields like this:
| GoHighLevel Field | Bit Form Field |
| First Name | First Name |
| Last Name | Last Name |
| Phone | Phone Number |
| Company Name | Company Name |
| Source | Lead Source (hidden field) |
| Notes | Message |
For the Update Contact path, use the same field mapping, but also map the Contact ID from the Search Contacts response so GoHighLevel knows which contact should be updated.
The Source field is important. Mapping the hidden field “WordPress Website” to the GoHighLevel Source field helps tag every contact with its origin. This keeps pipeline reporting accurate, so you can filter contacts by source and see how many leads came from your WordPress form.
Click + → select GoHighLevel → Add Opportunity.
Configure the opportunity:
| GoHighLevel Opportunity Field | Value |
| Opportunity Name | {{First Name}} – {{Service Interested In}} |
| Pipeline | Your sales pipeline |
| Stage | New Lead or Consultation Requested |
| Source | WordPress Website |
| Contact | Contact from the previous step |
Sarah – Sales Funnel Setup
A specific opportunity name makes the pipeline scannable at a glance. Your sales rep can see who the lead is and what they want without opening the contact record. If your GoHighLevel pipeline uses a monetary value for opportunity tracking, map the Budget field from the Bit Form submission to the Value field in GoHighLevel. This lets you track pipeline value by source and filter by budget range inside GoHighLevel reports.
Click + → select GoHighLevel → Add Task.
The task is what turns this automation from a CRM entry into an actionable sales handoff. Without a task, the contact exists in GoHighLevel, but no one is explicitly assigned to follow up.
Task title:
| Follow up with {{First Name}} about {{Service Interested In}} |
Task description:
| New lead from WordPress. Name: {{First Name}} {{Last Name}} Email: {{Email}} Phone: {{Phone Number}} Company: {{Company Name}} Service: {{Service Interested In}} Budget: {{Budget}} Message: {{Message}} Source: WordPress Website Action: Review the lead and contact them based on the requested service. |
The task description gives your sales rep everything they need without opening five different places. Name, contact details, service interest, budget, and the original message, all in one task.
Due date guidance: Set the due date based on your sales process and the lead’s budget signal. A $3,000+ budget inquiry warrants a same-day callback. A sub-$500 inquiry can follow a standard 1–2 business day response window. You can add a Condition node before the task step to route different budget ranges to tasks with different due dates if your team needs that structure.
Click + → select GoHighLevel → Add Contact to Workflow.
Choose your follow-up workflow — for example: New Lead Follow-up Workflow
This enrolls the lead in your automated follow-up sequence immediately after the form is submitted. Depending on your GoHighLevel workflow setup, this can include:
The contact enters the workflow at the same time the task is created for your sales rep. The automated sequence runs in parallel, the rep gets a task to call, and the lead gets a follow-up email and SMS automatically.
Bit Form trigger: Captures the lead’s name, email, phone, company, service interest, budget, message, and source in a structured format. The hidden source field tags every submission as WordPress Website, so GoHighLevel can track where the lead came from without manual work.
GoHighLevel Search Contacts: Checks the submitted email before creating a new contact. This helps avoid duplicate records when the same lead submits the form again, keeping contact history and pipeline data clean.
GoHighLevel Add Task: Turns the lead into a follow-up action. The sales rep gets a task with the lead’s details, service interest, budget, message, and due date, so they know exactly who to contact and what to discuss.
Before, the operations manager had to copy each WordPress form submission into GoHighLevel, create a contact, open an opportunity, and assign a sales task. With Bit Flows, every new form submission can create the contact, add the opportunity, assign the task, and start the GoHighLevel workflow automatically. The team works from the pipeline instead of sorting through form emails.
A consultant can use the same workflow for discovery call requests. Once a lead submits the form, Bit Flows sends the details to GoHighLevel, creates the consultation opportunity, adds a follow-up task, and places the lead into a pre-call workflow. This keeps the handoff consistent, even when the consultant is away from the dashboard.
For agencies that receive mixed-budget inquiries, a Condition node can route leads based on the selected budget range. High-value leads can move into a priority pipeline stage with a same-day task, while smaller-budget leads can enter a nurture stage with a slower follow-up workflow. This helps the team respond to the right leads first without manually sorting submissions.
The real value is not just sending form data to GoHighLevel. It is removing the manual gap between a new lead and the first sales action.
Once the form is submitted, Bit Flows can create the contact, open the opportunity, assign the task, and start the GoHighLevel follow-up workflow automatically. Your sales team does not need to process form emails one by one. They can open GoHighLevel and see a clean task queue, staged opportunities, and source-tagged WordPress leads ready for follow-up.
The same workflow can also grow with your process. You can route leads by service type, move high-budget leads into a priority stage, add AI-based lead classification, or send a Slack alert to the team, all from the same Bit Flows canvas.
Yes. For this OAuth connection, create a private GoHighLevel Marketplace app. You will use its Callback URL, Client ID, and Client Secret to connect WordPress with GoHighLevel.
Include the lead’s name, email, phone, company, service interest, budget, message, and source so the sales rep has enough context before following up.
Yes. Add a Condition node to route leads by budget, service interest, or source before creating the opportunity or task.
Yes. Add GoHighLevel → Add Contact to Workflow as the final action to start the selected follow-up sequence.
Submit a test form entry, then check GoHighLevel for the contact, opportunity, task, and workflow enrollment. Review the automation logs if any step fails.
Check the OAuth scopes, Callback URL, Client ID, Client Secret, and GoHighLevel connection, then reconnect the app if needed.
Yes. Choose Sub-Account when creating the private Marketplace app if the workflow should connect to a specific GoHighLevel location.
Yes. Bit Flows also supports other form triggers like Contact Form 7, WPForms, and Elementor Forms, but this guide uses Bit Form as an example.
Yes. Bit Flows lets you connect Bit Form submissions to GoHighLevel actions like Search Contacts, Add Contact, Add Opportunity, Add Task, and Add Contact to Workflow without writing custom API code.
Use the form submission success trigger from your selected WordPress form plugin. If you are using Bit Form, choose Bit Form → Submit Success.
Yes. Search contacts by email before creating a new contact. If the contact already exists, update the existing record instead of creating a duplicate.