If you collect leads with Elementor Forms, you already know the pain. New entries land in the email. Someone has to open messages, copy details, and paste them into a sheet. Then a lead gets missed. Or a name is typed wrong. Or your team cannot see the latest submissions in one place.
But there is a perfect solution. You can connect Elementor Forms to Google Sheets for free using Bit Flows. It gives you Elementor Form as a free trigger and Google Sheets as a free action. It also supports unlimited workflows and unlimited task runs. That means no monthly fee and no submission limit.
This guide shows the best way to connect Elementor Forms to Google Sheets. It also gives you a clear step-by-step setup using Bit Flows, with a real workflow you can keep forever.
Connecting Elementor Forms with Google Sheets is not just a nice idea. It fixes daily workflow problems.
Elementor Forms can collect submissions and send them to your site and email. But email is not a great database. It is hard to sort, filter, share, or track follow-ups when data is scattered across inboxes. Google Sheets makes the same data easy to store, organize, and share with your team.
When you set up Elementor Forms to Google Sheets, you get practical wins:
This is why Elementor Forms with Google Sheet automation is one of the most useful Google Sheets integrations for a WordPress site.
Elementor Forms is a form widget that lets website owners collect information from visitors. Submissions can be delivered through the website database or email.
The Elementor Form widget is an Elementor Pro advanced capability. So why does Elementor Forms integration need automation?
Elementor’s default form actions focus on email, webhooks, and common marketing tools. Google Sheets is not listed as a default built-in action. That is why users often end up using a webhook plus custom code, or they pay for a connector tool.
A dedicated Google Sheets connector for Elementor Forms solves that gap. It turns your form submissions into rows in a spreadsheet, without custom development.
Yes. You can connect Google Sheets to Elementor Forms for free with Bit Flows.
Bit Flows is developed by and is designed to run automations inside your site. In Bit Flows, Elementor Form is available as a free trigger, and Google Sheets is available as a free action.
This matters because it removes the usual pricing traps. Many automation services charge per task or limit how many runs you can do. Bit Flows takes a different approach. Its free plan includes unlimited workflows and unlimited task execution, so your Elementor Forms to Google Sheets setup does not stop after a fixed number of submissions.
Bit Flows also publishes guides that describe Google Sheets connectors as free and unlimited, with no limits on form entries flowing into Sheets once the workflow is live.
In plain terms, this means you can build a Google Sheets connector for Elementor Forms and let it run daily, without paying a monthly bill and without watching a usage counter.
There are several ways to move data from Elementor Forms to Google Sheets. But most options fall into one of these buckets.
Bit Flows is built around the trigger-and-action workflow model. You pick a trigger like Elementor Form, then add an action like Google Sheets, then map fields so each form value lands in the right column.
You can also expand later. Bit Flows supports multi-step workflows and workflow tools, so you can start with Elementor Forms to Google Sheets, and later add email alerts, CRM sync, send notifications to WhatsApps/Telegram/Slack, or advanced logic when you need it.
A quick best practice before you build the flow is to prepare your Google Sheet. Add clear column headers that match your form fields. This makes mapping faster and reduces confusion later. The mapping screen in Bit Flows is built around matching a sheet column to a value from your captured trigger data.
This is the exact process to connect Elementor Forms to Google Sheets for free, using Bit Flows as your Google Sheets connector for Elementor Forms. The steps follow the simple pattern: create a flow, select a trigger, capture data, add an action, connect Google Sheets, map fields, and then test.
Go to your WordPress dashboard. Navigate to Plugins, then Add New. Search for Bit Flows. Click Install now, then Activate.

After activation, you will see Bit Flows in your WordPress plugin list and in the dashboard menu.
From your WordPress dashboard, navigate to the Bit Flows menu. Go to Flows. Click the Create Flow button.
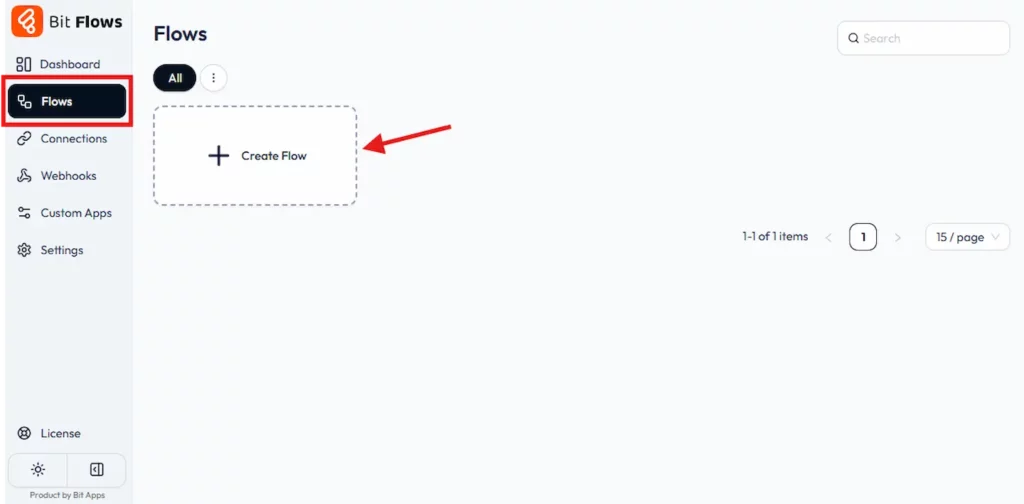
Give your flow a clear name, like Elementor Forms to Google Sheets. Click Create.

You will now see the powerful Bit Flows visual canvas builder.
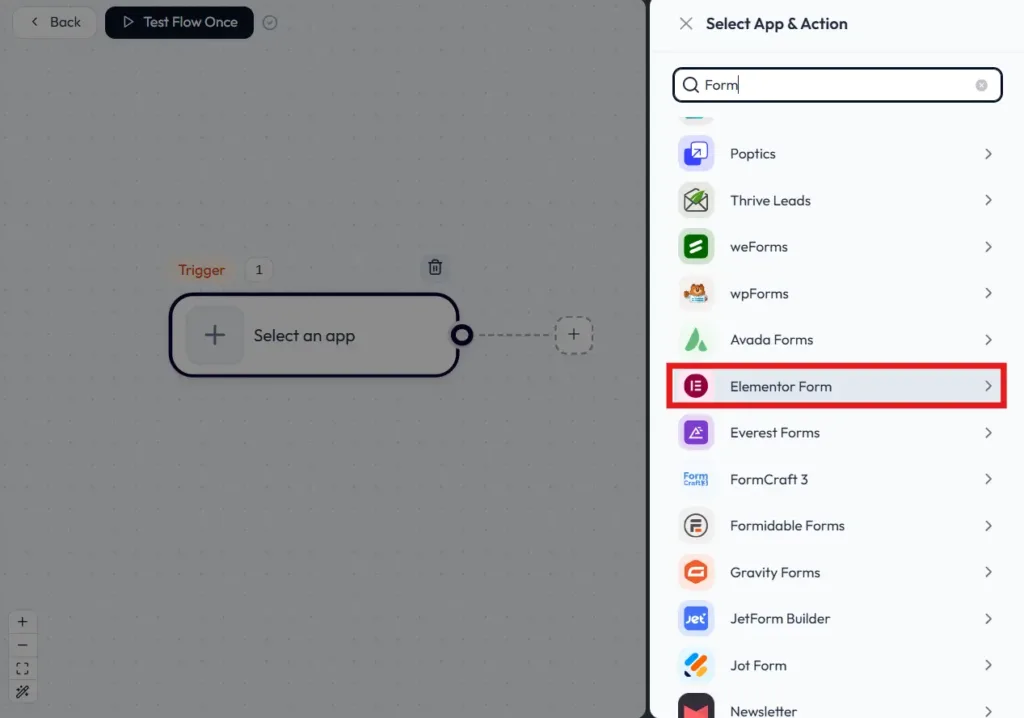
In the Flow Builder, look for the Trigger area. Click the trigger. Then select an app.
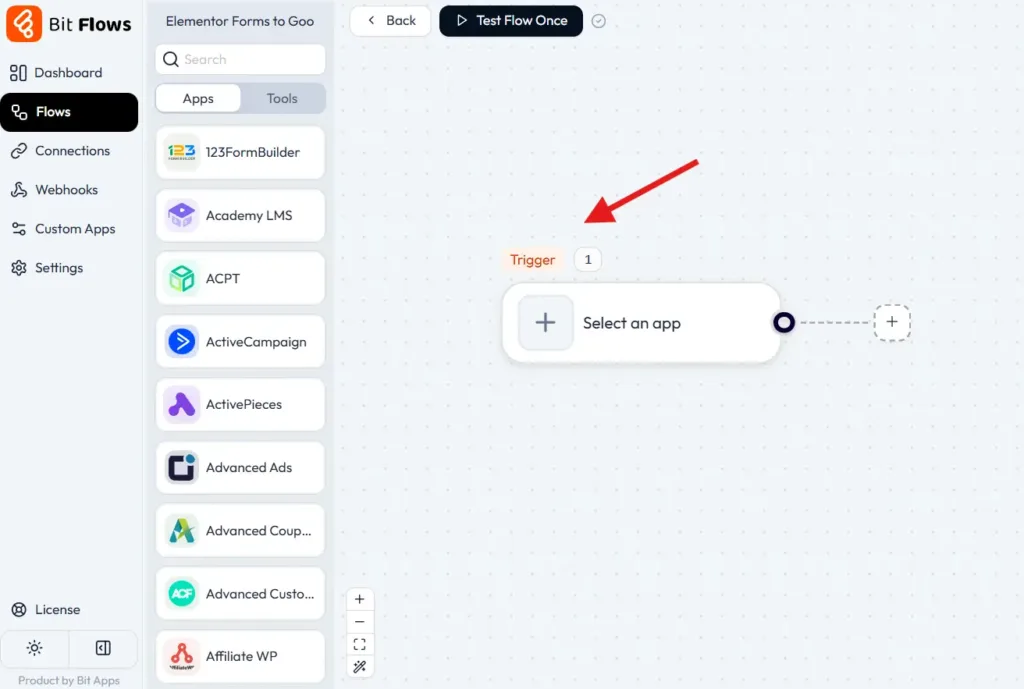
Choose Elementor Form from the trigger list.
Then choose the trigger event “Forms New Record”.

After you pick the event, select the specific Elementor form you want from the list.
This is the core of the Elementor Forms integration. It tells Bit Flows which form submission should start the workflow.
Bit Flows needs sample data to understand your form fields. This step is important for field mapping. Click Listen Response in the Elementor Form trigger setup.

Now submit a test entry through your Elementor form on the front end of your site. Return to Bit Flows. You should see that the form data was captured successfully.
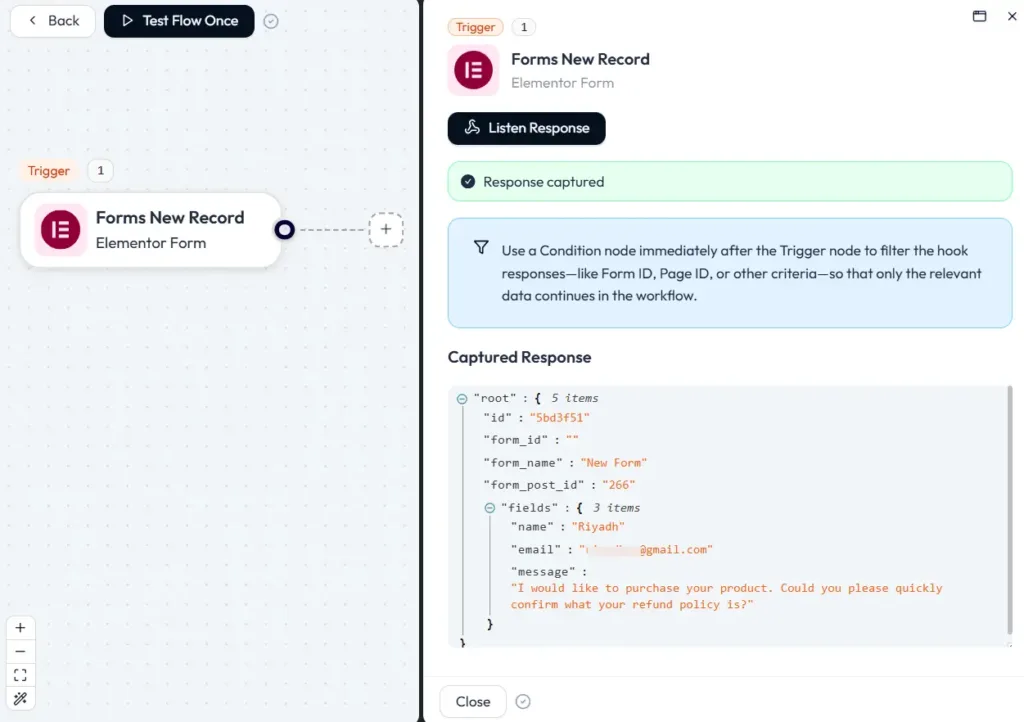
If you do not capture a response, you usually will not see your fields clearly during mapping, because Bit Flows has nothing to map if the captured data is not received.
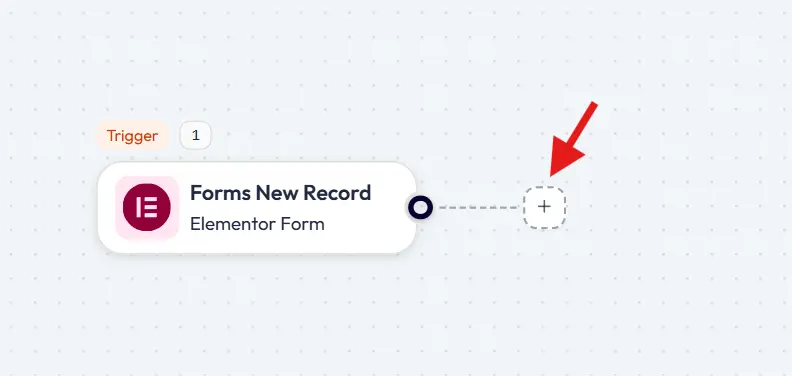
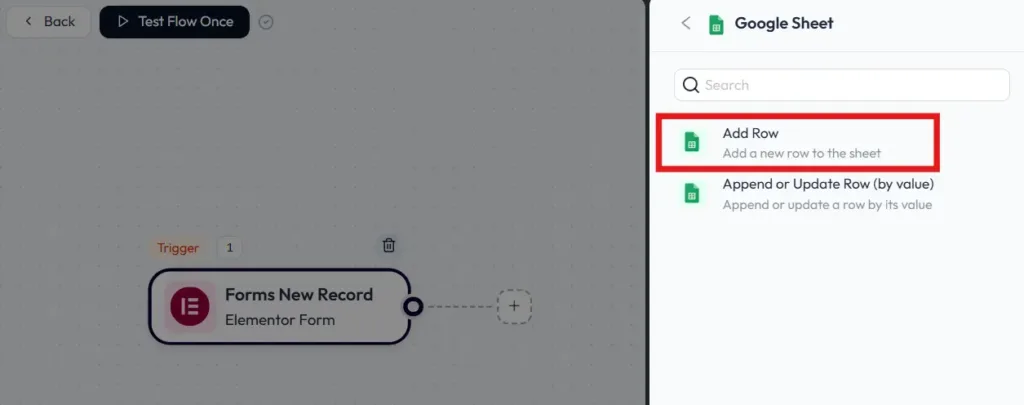
Now, click the plus icon after your trigger to add an action step.
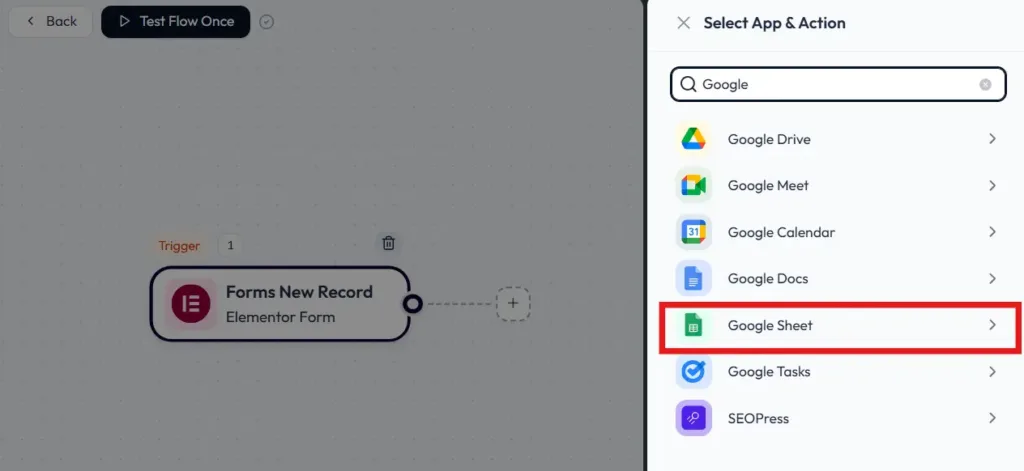
From the action app list, select Google Sheets. Choose the event.
In Bit Flows, the common Google Sheets action event is Add Row. This adds a new row when the trigger runs.
Next, connect Google Sheets with WordPress. Bit Flows uses a connection that requires a Google Client ID and Client Secret from your Google Cloud setup. Once you add them, the connection can be reused later for the same Google account.
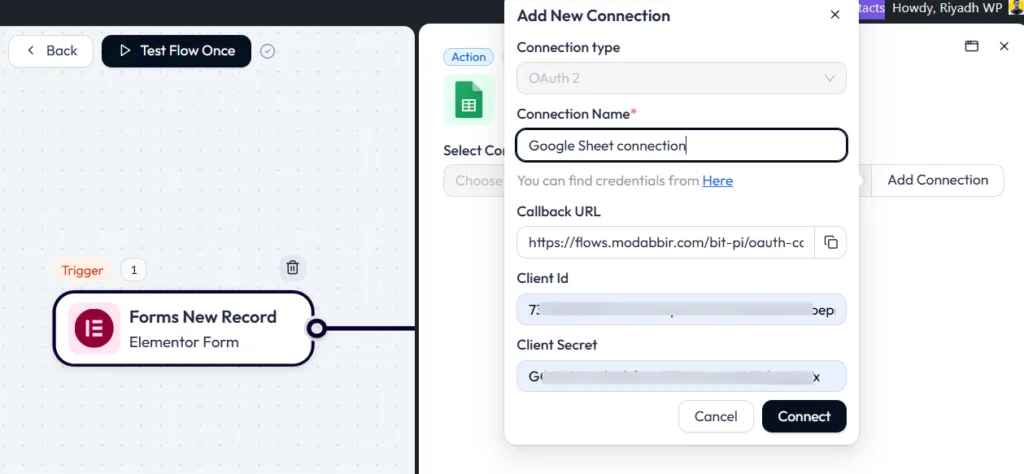
Bit Flows documentation walks through the Google Cloud steps, including enabling the Google Drive API and Google Sheets API, configuring the OAuth consent screen, creating OAuth credentials, and adding authorized redirect URIs shown in the Bit Flows integration screen.
This sounds long, but it is usually a one-time setup. After the connection, you simply pick the connection from the dropdown for future workflows.
After you connect to Google Sheets, Bit Flows lets you pick the spreadsheet you want. The specific sheet tab inside that spreadsheet.
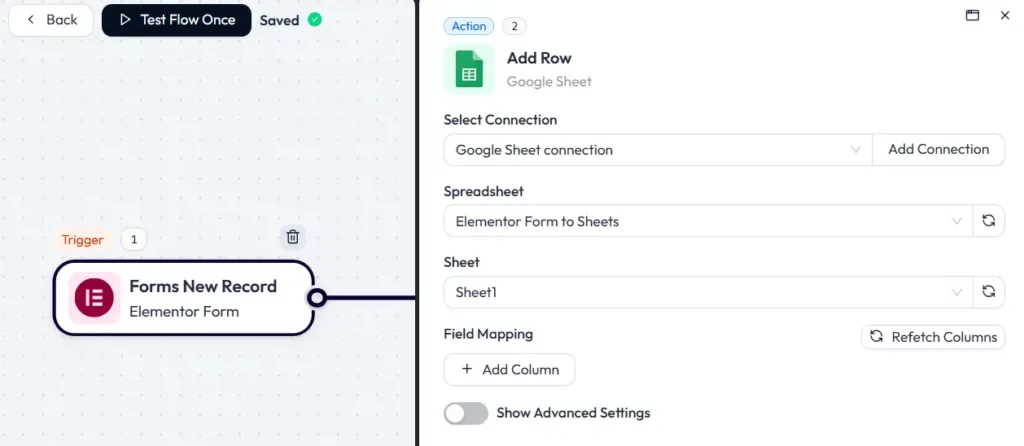
This selection tells Bit Flows exactly where Elementor Forms data should be stored.
Now you will map form fields to sheet columns. For field mapping, click on the “+ Add Column” button, then add as many columns as you need.
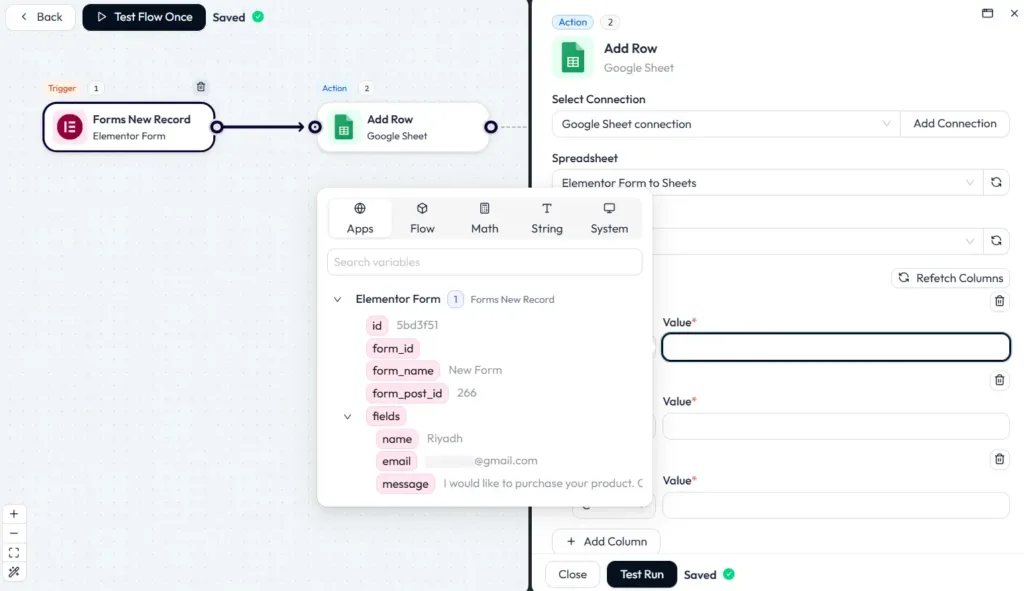
In Bit Flows, the Add Row mapping uses two key inputs: Column, which is the Google Sheet column name. Value, which is the field value from the trigger response.
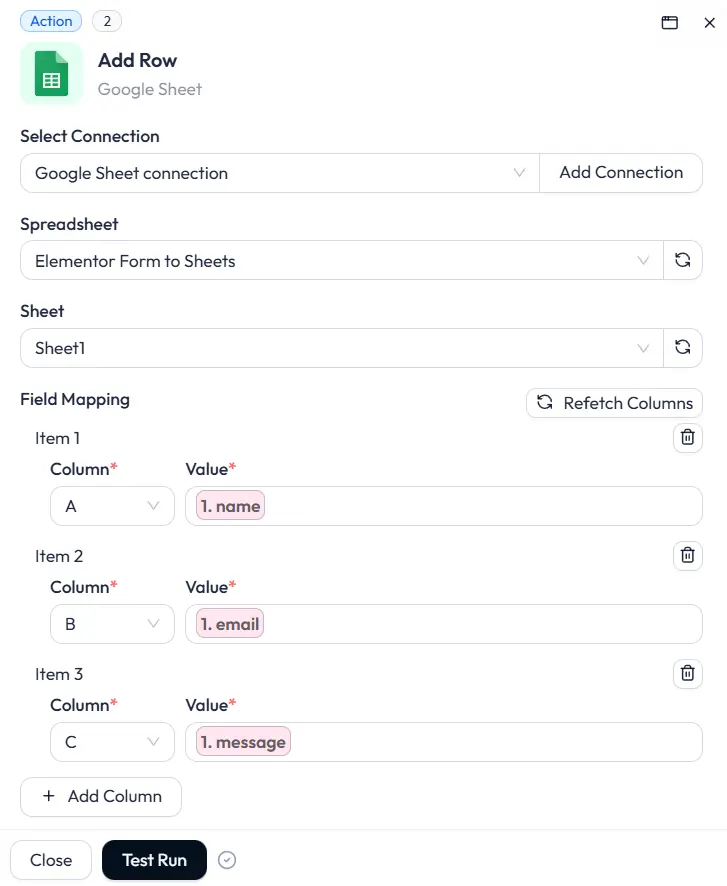
You need to match each Elementor form field to the correct column. For example:
Take a minute to check the mapping. This ensures data lands in the right place.
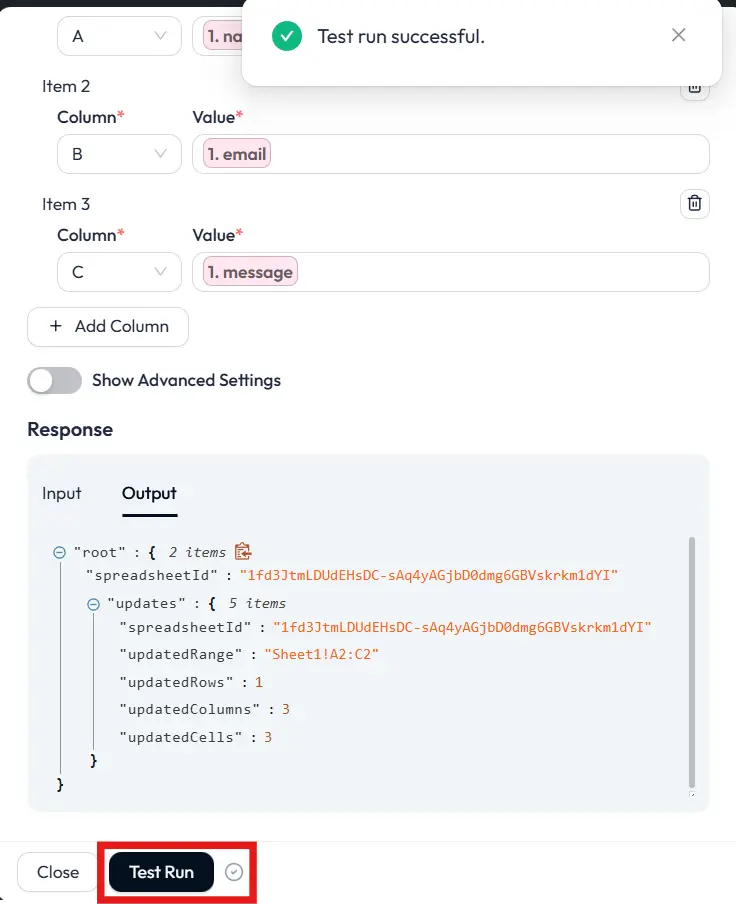
After mapping, run a test.
Bit Flows supports a test run flow, so you can confirm the integration is working before you rely on it. You can test by running the action step and checking whether a new row appears in your sheet.
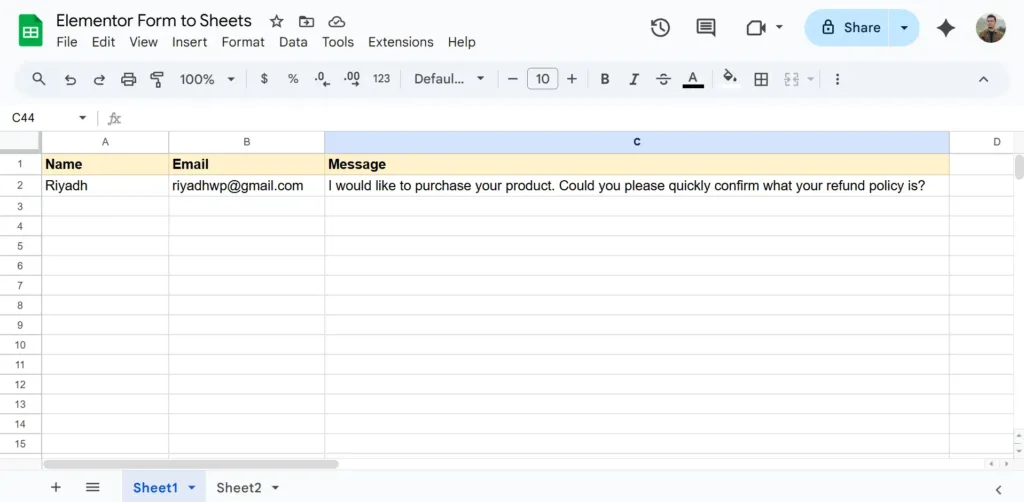
Once the test works, you are done. Here is the Elementor Forms data added to the Google Sheets.
From now on, every Elementor submission will add a new row to your chosen sheet automatically. That is the easiest way of Elementor Forms to Google Sheets integrations.
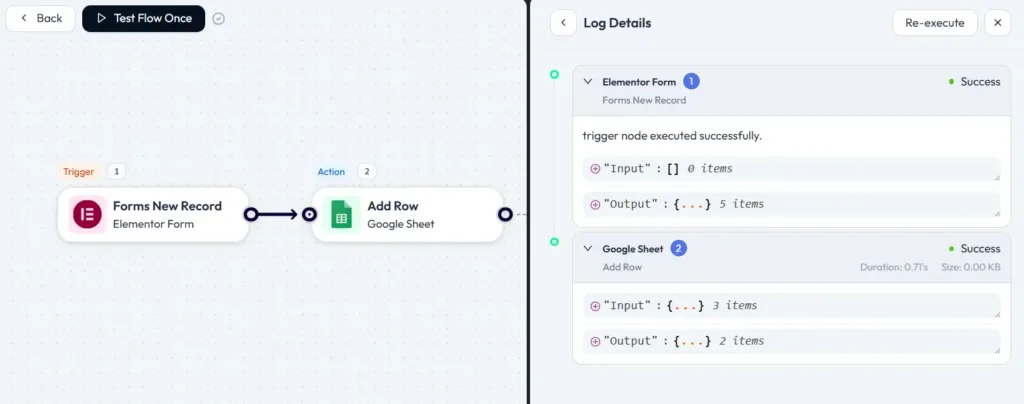
Bit Flows provides detailed logs so you can review workflow runs and troubleshoot if something fails.
You can also set up notifications for failed tasks, so you’ll be alerted if something goes wrong. Plus, you can re-run the flow to fix the issue. This makes your data flow more reliable and easier to troubleshoot if something doesn’t work as expected.
That’s it, you’re done! From this point on, every time a visitor submits your Elementor Form, the data will automatically go to Google Sheets.
If your goal is simple, reliable lead logging, connecting Elementor Forms to Google Sheets is one of the smartest automations you can set up.
With Bit Flows, you can build this workflow for free, with no submission limits. You install the plugin, create a flow, choose Elementor Form as your trigger, capture a test submission, then add Google Sheets as your action and map fields. After a successful test run, every new submission becomes a new row in your sheet, automatically.
This is the best way to run Elementor Forms integration when you want something fast, no-code, and scalable. It keeps your data organized, improves team visibility, and removes the daily grind of manual copy-paste.
Yes. Bit Flows offers Elementor Form as a free trigger and Google Sheets as a free action. It also supports unlimited workflows and unlimited task runs in the free version.
Yes. Bit Flows works as a Google Sheets connector for Elementor Forms through its trigger-and-action flow builder.
Yes. Elementor developer documentation marks the Form widget as an Elementor Pro advanced feature.
Elementor includes default form actions like email and webhook, but Google Sheets is not listed as a default action. Automation fills that gap and sends data to a spreadsheet automatically.
Bit Flows positions this type of Google Sheets integration as free and unlimited, and its free plan supports unlimited workflows and task execution.
Capture a sample submission first. In Bit Flows, this is done using Capture Response or Listen Response, then submitting a test form so the fields can be mapped.
Yes. Bit Flows is built around a visual workflow builder where you select apps, select events, and map fields instead of writing code.