Um formulário do WordPress não deve criar outra tarefa manual para sua equipe.
Muitos sites coletam leads através de um formulário, enviam uma notificação e deixam o resto para alguém da equipe de vendas. Essa pessoa tem que abrir a entrada do formulário, copiar o nome e o e-mail, pesquisar no CRM, criar ou atualizar o contato e, em seguida, decidir o que fazer a seguir.
Esse processo funciona quando os leads são raros. Ele quebra quando as submissões aumentam.
O problema real não é a forma. O problema é a lacuna entre o envio do formulário e o registro do CRM.
Neste tutorial, você aprenderá a conectar um formulário de leads do WordPress ao HubSpot usando o Bit Flows. O fluxo de trabalho verificará se o lead possui os dados necessários e, em seguida, criará ou atualizará o contato no HubSpot.
Para integrar o WordPress a plataformas de automação de CRM, use o Bit Flows para enviar formulários preenchidos corretamente para o HubSpot.
Aqui está o fluxo de trabalho:
Envio de Formulário Bem-sucedido → Verificação de Lead Válido → HubSpot Criar ou Atualizar Contato
Aqui está o processo:
Esta configuração é ideal quando o HubSpot é seu CRM de vendas principal e você deseja que todos os leads válidos do WordPress apareçam lá automaticamente.
Antes de construir o fluxo de trabalho, certifique-se de que a configuração básica esteja pronta.
Você precisará de:
Antes de construir as etapas, veja o fluxo de trabalho completo.
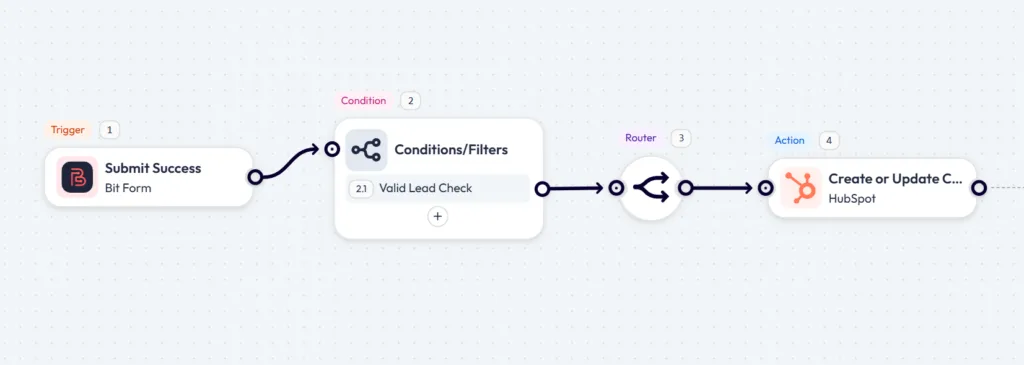
Cada parte tem uma função clara:
| Passo | O que faz |
| Envio de Formulário Bem-sucedido | Inicia o fluxo de trabalho quando alguém envia o formulário de lead |
| Verificação de Lead Válido | Confirma que o lead tem os detalhes necessários |
| HubSpot Criar ou Atualizar Contato | Envia o lead válido para o HubSpot |
Esse fluxo de trabalho mantém o processo bem direcionado. O WordPress coleta o lead, o Bit Flows verifica o envio e o HubSpot armazena o contato para acompanhamento de vendas.
Primeiro, crie um formulário de leads no WordPress. Para este tutorial, crie um Bit Form e nomeie-o como: Formulário de Leads de Automação de CRM. Adicionei os seguintes campos:
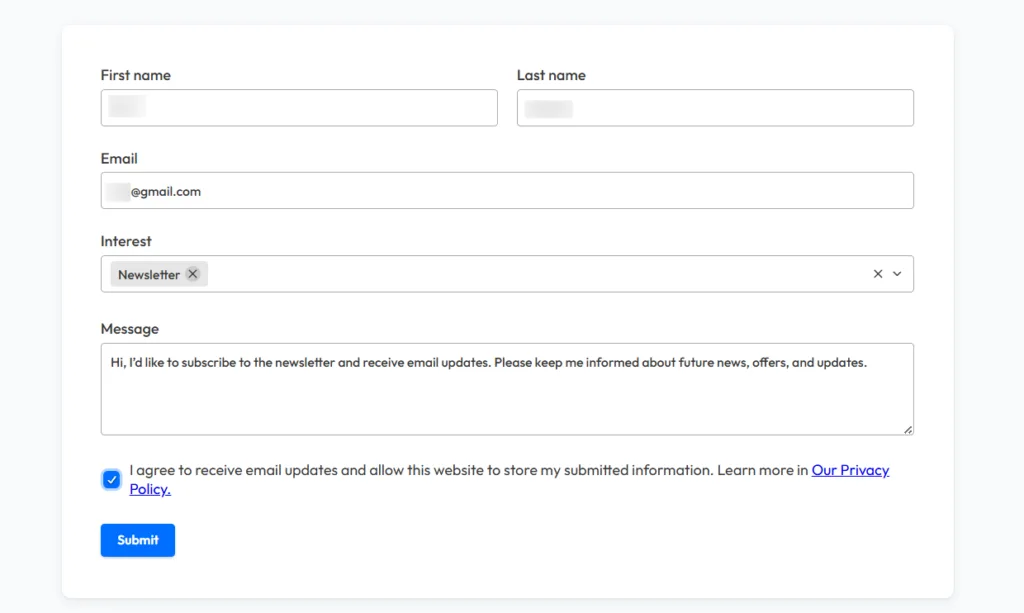
This is enough for a practical CRM lead workflow. The form gives your team contact details, context, and consent before the lead enters HubSpot.
At this stage, only create and publish the form. Do not submit a test entry yet. You will submit it in the next step after selecting the trigger and clicking Listen Response.
Now create a new workflow in Bit Flows. Choose Bit Form as the trigger, select Submit Success, and choose the Formulário de Leads de Automação de CRM you created.
After selecting the form, click Listen Response. Now open the CRM lead form on your website and submit it once with test data.
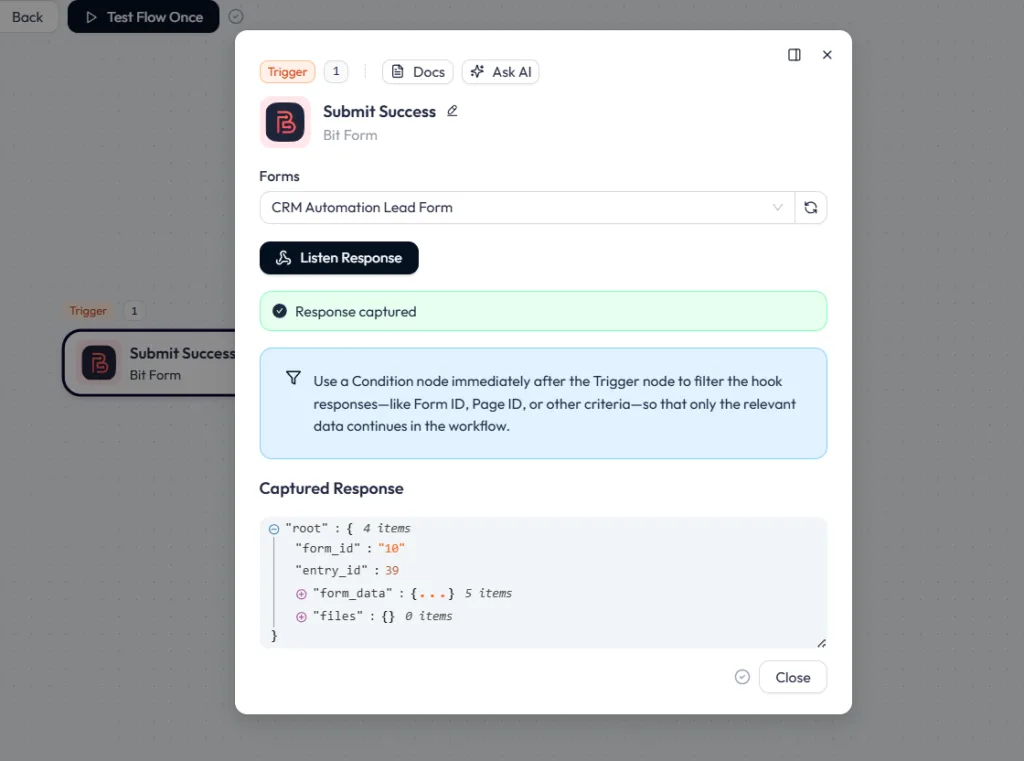
Return to Bit Flows and check the Captured Response section. You should see the submitted lead details, such as name, email, interest, message, and consent.
Once the captured data appears, the trigger is ready. You can continue with the Valid Lead Check.
Add a condition after the trigger and rename it: Valid Lead Check. This step prevents incomplete or unapproved submissions from entering HubSpot.
Use checks like this:
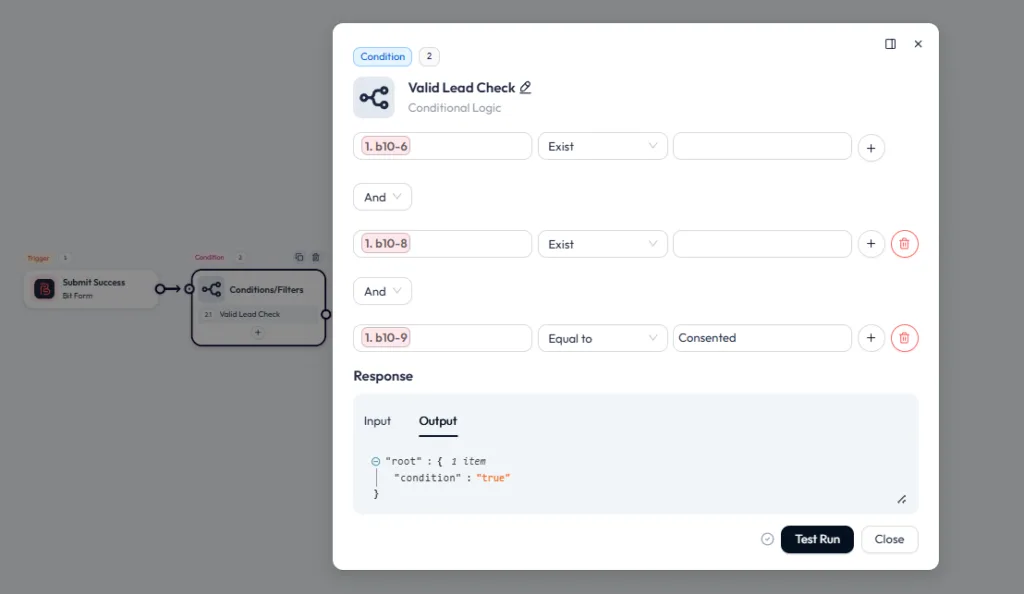
For example, if your consent field sends the value Consented, use that exact value in the condition.
This step matters because not every form submission should become a CRM contact. A missing email, empty message, or unchecked consent field can create poor records and waste sales time.
If the lead passes the check, the workflow continues to HubSpot. If the lead fails the check, the HubSpot action should not run.
After the Verificação de Lead Válido, the next step is to send the approved lead to HubSpot.
In Bit Flows, click the + icon after the condition step and select HubSpot as the action app. Then choose: Criar ou Atualizar Contato
This action is useful for lead forms because the same person may submit your form more than once. Instead of creating a new contact every time, the workflow can use the submitted email address to create a new contact or update the existing one.
To connect to HubSpot, click Add Connection inside the HubSpot action.
You will see a connection pop-up where you need to add a connection name and value. For the connection name, use something clear, such as: HubSpot connection
For the value field, use a HubSpot Service Key.
To create the key, go to your HubSpot account and open:
Development → Keys → Service Keys
Then create a new service key for this workflow. Give it a clear name, such as: WordPress CRM Lead Workflow
When adding scopes, include the contact permissions needed for this workflow:
crm.objects.contacts.read
crm.objects.contacts.write
These scopes allow the workflow to read existing contact records and create or update HubSpot contacts.
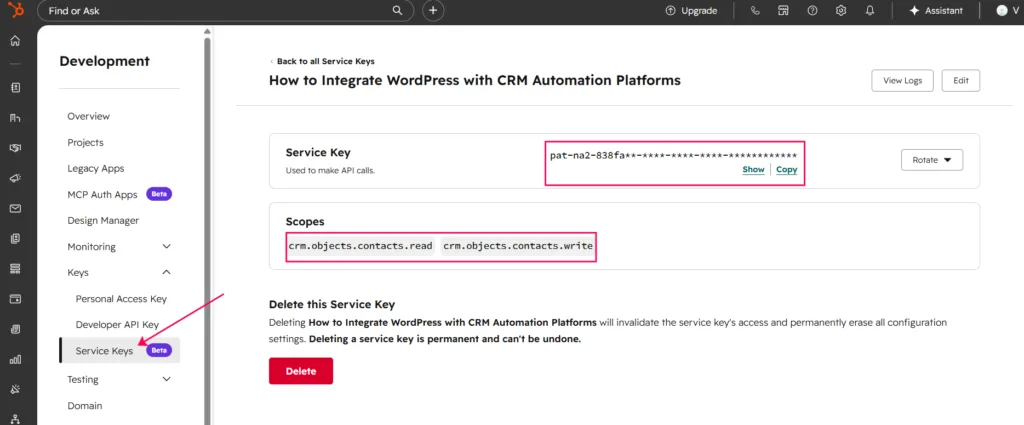
After the service key is created, click Show, copy the key, and paste it into the Value field in Bit Flows. Then click Conectar.
For more details, you can check HubSpot’s official guide on Service Keys e HubSpot scopes.
Important: Do not show your real service key in screenshots or public blog images. If the key is ever exposed, rotate it from HubSpot and update the connection in Bit Flows.
After the connection is added, select it in the HubSpot action. Now map the submitted form values from the captured response to match the HubSpot inputs:
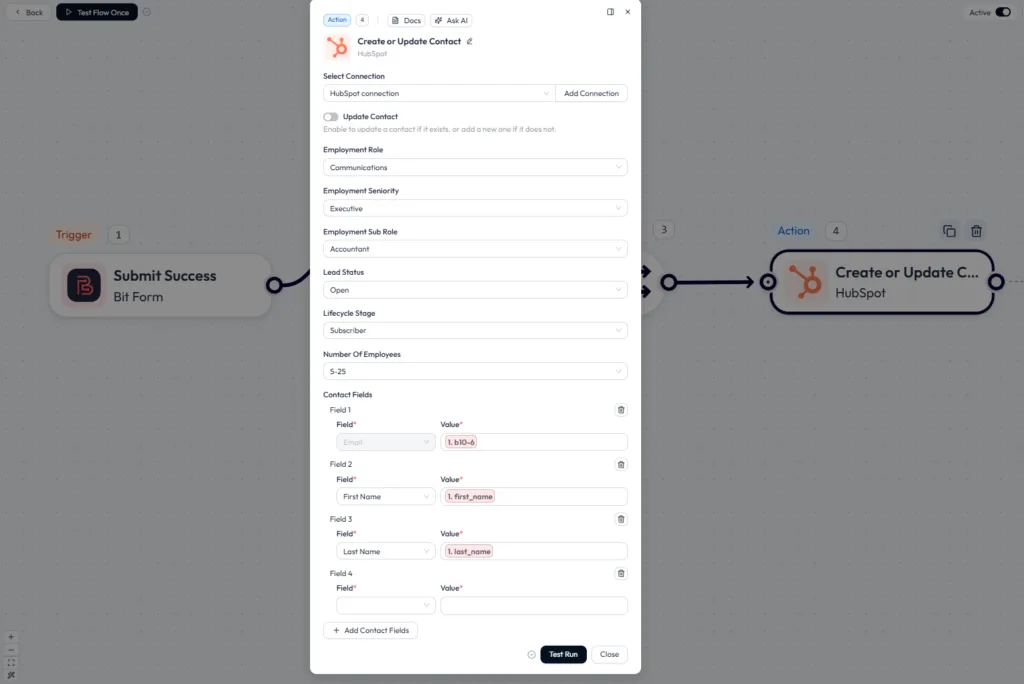
You can also add fixed values that help your sales team understand where the lead came from.
| HubSpot field | Example value |
| Lead Status | Open |
| Lifecycle Stage | Subscriber |
| Lead Source | WordPress Lead Form |
Keep this step focused. Only send the fields your sales team will actually use during follow-up. A clean contact record is more useful than a record filled with unnecessary data.
After setting up the HubSpot action, click Test Run. Then open HubSpot and check whether the contact was created or updated correctly.
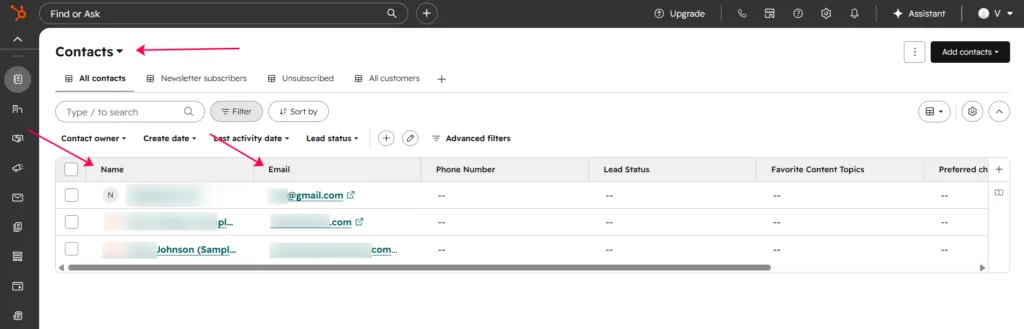
If the test works, this step is ready. From now on, every lead that passes the Valid Lead Check can move from your WordPress form into HubSpot automatically.
Run one full test before using the workflow with real visitors.
Submit the CRM lead form with a fresh test email address. Then check these points:
Also test one incomplete submission. For example, submit a form without consent if your form allows it during testing. The workflow should stop before the HubSpot action.
After this workflow is active, your lead process becomes more consistent.
Before automation, someone had to open the form entry or notification, copy the contact details, search HubSpot, and create or update the contact manually. That process depends on timing, memory, and accuracy.
After automation, every valid lead follows the same path.
| Before automation | After automation |
| Leads stay inside form entries or inbox notifications | Valid leads move into HubSpot |
| Sales team copies contact details by hand | HubSpot receives the contact through the workflow |
| Incomplete submissions may enter the CRM | The Valid Lead Check filters weak submissions |
| Lead source can be unclear | HubSpot can store the source as WordPress Lead Form |
| Follow-up starts late | Sales can work from the HubSpot contact record sooner |
For the sales team, this means less time spent copying data and more time spent reviewing real leads. They can open HubSpot, check the contact record, read the submitted message, and decide the next action.
For the business, the main benefit is cleaner CRM data. Every valid lead enters HubSpot with the same structure, which makes reporting and follow-up easier.
This is the real value of CRM automation. It does not make your workflow more complicated. It removes the small manual steps that often cause missed leads, duplicate records, and slow follow-up.
Bit Flows is not limited to HubSpot. The screenshot below shows several CRM integrations available in Bit Flows for WordPress users, including Brevo, FluentCRM, HubSpot, JetPackCRM, Pipedrive, Salesforce, SuiteDash, and WP ERP.
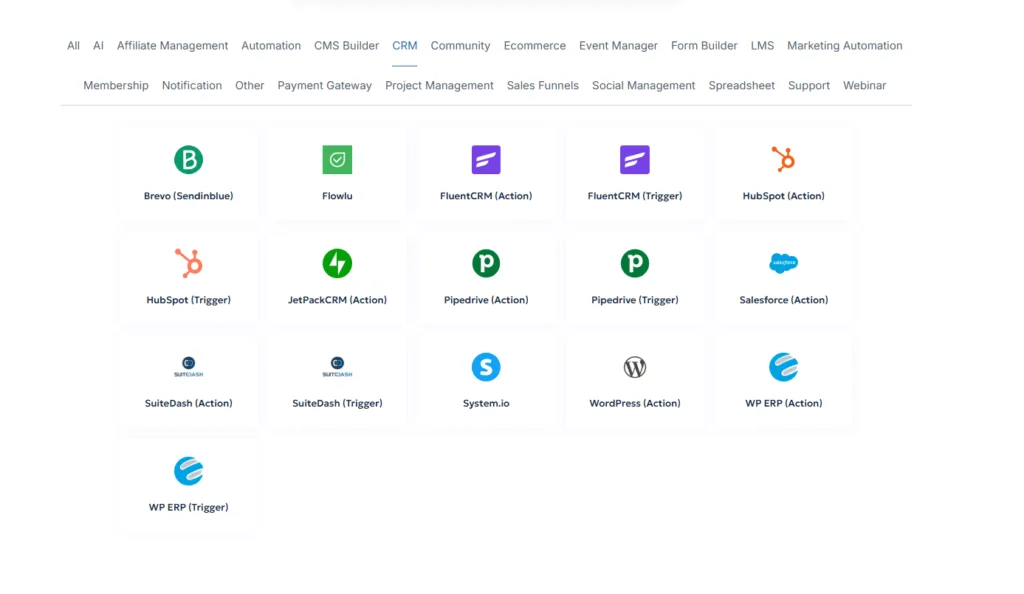
The HubSpot workflow in this tutorial is a simple starting point. Once that works, you can build similar workflows with other CRM or contact-management tools based on your sales and marketing process. Two practical examples are:
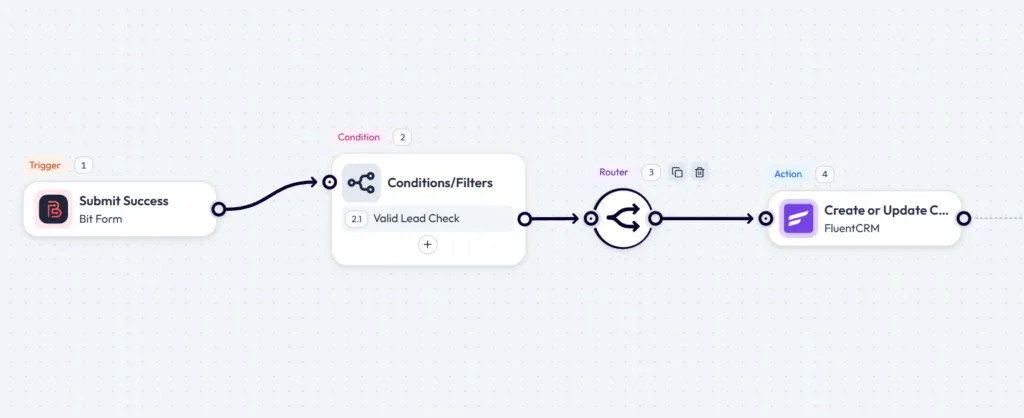
Use this when you want to keep leads inside WordPress. FluentCRM is useful for organizing contacts with lists, tags, and segments. For example, every valid form submission can be added to a list like Website Leads and tagged as CRM Inquiry.
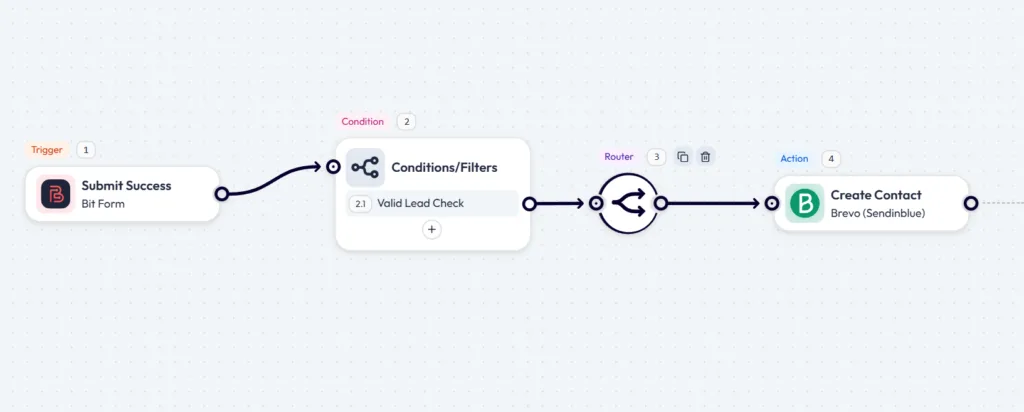
Use this when the form is mainly for newsletter signups or email marketing. Brevo can store the subscriber in a selected list, such as Marketing Leads or Newsletter Subscribers, so your team can follow up with campaigns later.
Start with one CRM workflow first. After the main setup works, add FluentCRM or Brevo only when each tool has a clear job in your process.
A CRM workflow does not need to be complicated to be useful. The goal is simple: make sure every valid WordPress lead reaches HubSpot without waiting for someone to copy details by hand.
With Bit Flows, your form submission becomes the start of a reliable sales process. The workflow checks the lead first, sends the right contact details to HubSpot, and gives your team a cleaner record to work from. That means fewer missed leads, fewer duplicate contacts, and less time spent fixing CRM data later.
Start with the basic setup from this tutorial. Once it works, improve it based on how your team actually follows up. You can add lead source tracking, task creation, deal creation, or priority alerts when those steps become useful.
If your WordPress forms already collect leads, connecting them with HubSpot through Bit Flows is a practical next step toward faster follow-up and cleaner CRM management.
Você pode conectar os envios de formulários do WordPress ao HubSpot usando o Bit Flows. Defina o envio do formulário como o gatilho do fluxo de trabalho, adicione uma verificação de lead válido e, em seguida, envie o lead aprovado para o HubSpot usando a ação de contato disponível na sua configuração do Bit Flows.
Sim. O Bit Flows é compatível com vários plug-ins de formulários do WordPress, incluindo o Bit Form, o Contact Form 7, o WPForms e o Elementor Form. Este tutorial usa o Bit Form como exemplo, mas o mesmo conceito de fluxo de trabalho pode ser aplicado a qualquer outro plug-in de formulários compatível.
Uma Verificação de Lead Válida ajuda a manter submissões incompletas fora do seu CRM. Por exemplo, você pode verificar se os campos de e-mail, mensagem e consentimento estão presentes antes da etapa do HubSpot ser executada.
Comece com os campos que sua equipe de vendas precisa para o acompanhamento: e-mail, nome, sobrenome, mensagem, interesse e origem do lead. Você também pode adicionar número de telefone, nome da empresa, tipo de serviço ou orçamento se o seu formulário coletar esses detalhes.
Usar Criar ou Atualizar Contato quando estiver disponível na sua ação Bit Flows do HubSpot. Geralmente, isso é mais adequado para formulários de leads, pois a mesma pessoa pode enviar o formulário mais de uma vez, e o endereço de e-mail pode ajudar a identificar o contato já existente no HubSpot.
Se o mesmo endereço de e-mail for usado e sua ação no HubSpot estiver configurada para criar ou atualizar contatos, o contato existente poderá ser atualizado em vez de criar um registro separado. Isso ajuda a reduzir registros duplicados no CRM, mas você ainda deve testar o fluxo de trabalho com envios repetidos antes de usá-lo em produção.
Os motivos mais comuns são a falta de um endereço de e-mail, uma falha na conexão com o HubSpot ou um campo obrigatório do HubSpot que não foi preenchido. Verifique primeiro a resposta capturada no Bit Flows; em seguida, teste a etapa do HubSpot novamente e confirme se o contato aparece no HubSpot.
Sim. O Bit Flows é compatível com ferramentas de CRM e gerenciamento de contatos, como o FluentCRM e o Brevo. Use o FluentCRM quando quiser gerenciar contatos diretamente no WordPress e use o Brevo quando o formulário for destinado principalmente a assinantes de boletins informativos ou contatos de marketing por e-mail.
Sim. Após o fluxo de trabalho básico do HubSpot funcionar, você pode adicionar ações como criar um negócio, atribuir uma tarefa, enviar um alerta interno ou rotear leads de alta prioridade para um caminho diferente. Comece primeiro com o fluxo de trabalho simples de contatos, e então adicione etapas extras apenas quando seu processo de vendas as necessitar.





 PT
PT  EN
EN  DE
DE  ES
ES  NL
NL  IT
IT  JA
JA