
Are you tired of manually copying Contact Form 7 submissions into Google Sheets? Does managing form entries by hand eat up your time or lead to missed inquiries?
Contact Form 7 is a fantastic free form builder, but it doesn’t automatically save your form data outside of email. Many users find themselves wishing for an easy way to send Contact Form 7 data straight to a spreadsheet.
The good news is that a solution exists: a Google Sheets connector for Contact Form 7 that’s free, unlimited, and code-free.
In this guide, we’ll introduce Bit Flows, a powerful yet simple WordPress plugin that connects Contact Form 7 with Google Sheets in just a few clicks.
Say goodbye to tedious copy-paste work and hello to an automated workflow that sends Contact Form 7 entries to Google Sheets instantly. Let’s explore why this integration matters and how to set it up step by step.
Integrating Contact Form 7 with Google Sheets can dramatically optimize your workflow. Here are a few key reasons to connect your form to a Google Sheet:
Yes, absolutely. While Contact Form 7 doesn’t have a built-in Google Sheets integration, you can easily connect Google Sheets to Contact Form 7 using a WordPress plugin. In the past, people might resort to writing custom scripts or paying for services like Zapier to bridge the gap.
Fortunately, there are now free plugins that act as Google Sheets connectors for CF7. Using a tool like Bit Flows, you can set up the integration in minutes without any coding. This means whenever someone submits your Contact Form 7 form, their data will automatically appear in your chosen Google Sheet. It’s a simple, reliable, and cost-free solution to link Contact Form 7 with Google Sheets.
There are a few ways to get Contact Form 7 talking to Google Sheets, but the best way is to use a dedicated integration plugin that is both free and easy to use. Some website owners try solutions like third-party automation services or custom Google Apps Scripts, but those can be complicated or come with monthly fees and limits. Instead, using a WordPress plugin like Bit Flows is the ideal approach:
In summary, Bit Flows stands out as the best Google Sheets integration for Contact Form 7 because it’s cost-effective (free), powerful, and straightforward. Now, let’s walk through the exact steps to get this integration up and running on your site.
Follow these simple steps to connect your Contact Form 7 form to a Google Sheet using the Bit Flows plugin. In just a few minutes, you’ll have an automated workflow sending form data to your spreadsheet:
First, install the Bit Flows plugin on your WordPress site. From your WordPress dashboard, navigate to Plugins > Add New and search for “Bit Flows”. Click Install and then Activate.

Once activated, you’ll notice a new Bit Flows menu item in your WordPress sidebar. Bit Flows is a trusted WordPress automation plugin, so you can install it directly from the plugin repository for free.
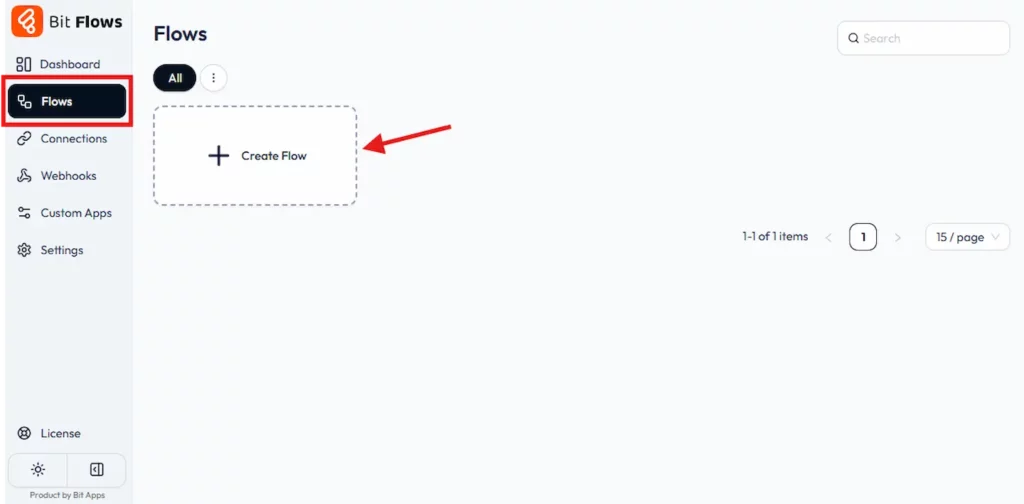
Now you’ll set up an automation flow for the integration. Click on the Bit Flows menu and then select Flows. On the Flows page, click the Create Flow button.
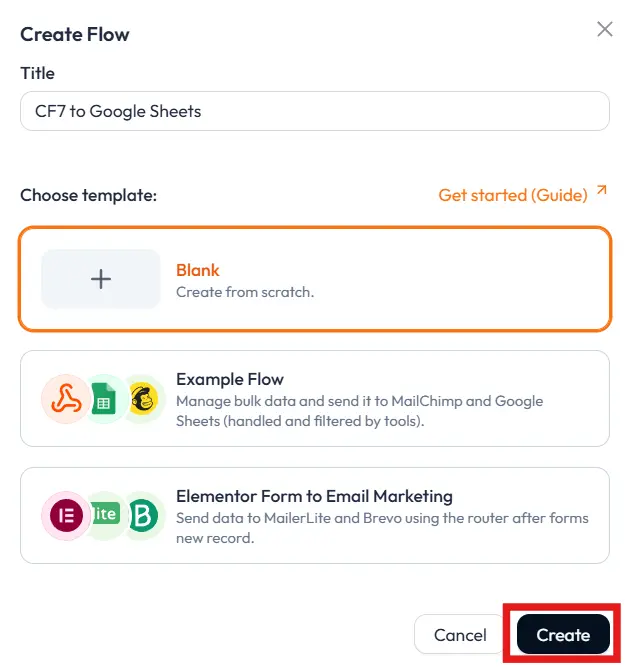
Give your flow a name that’s easy to remember, for example, “CF7 to Google Sheets”, and click Criar.
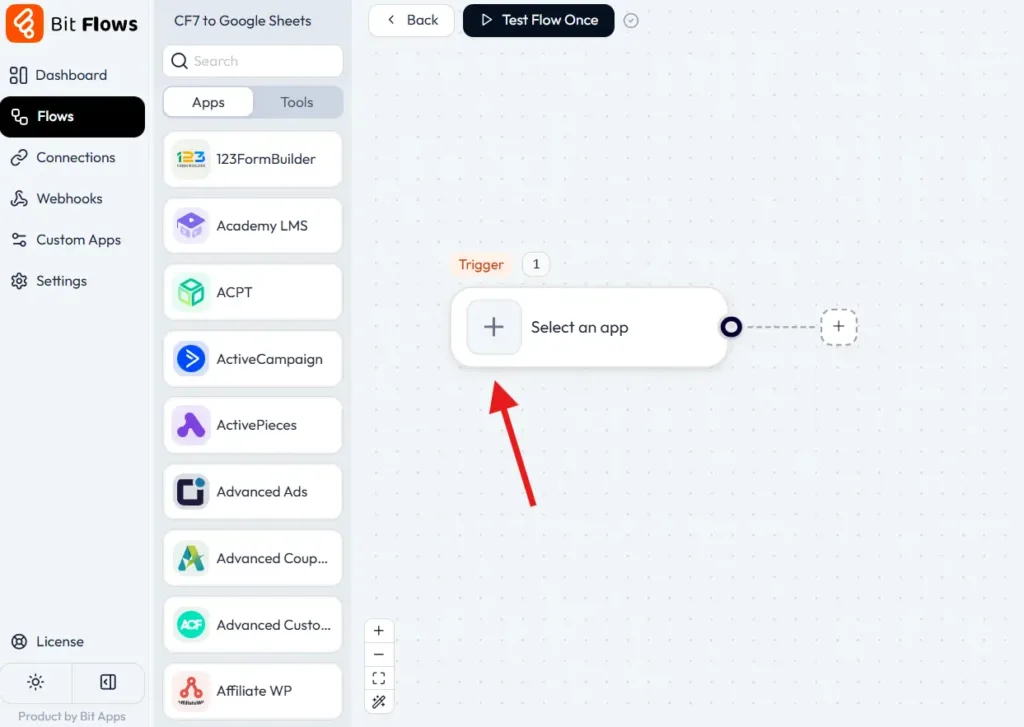
This will open the Bit Flows visual workflow builder, where you can design your trigger-action sequence.
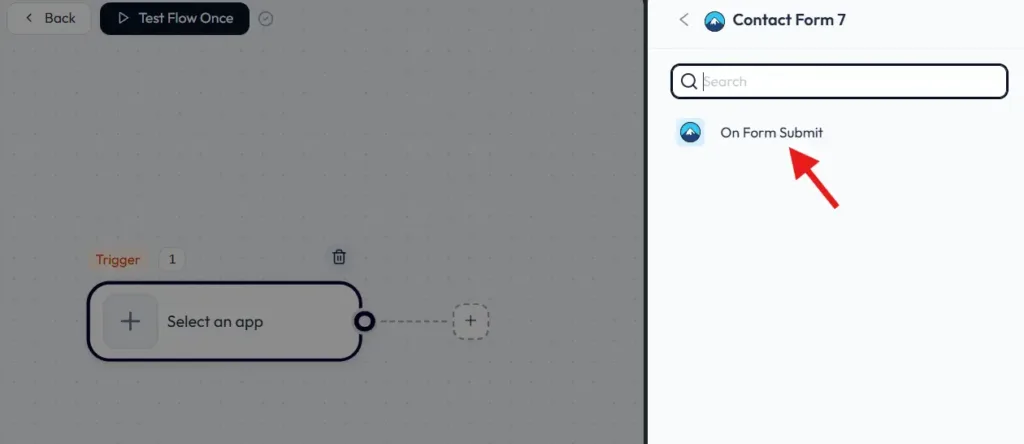
In the flow builder, you’ll start by configuring the trigger – this is what starts the automation. Click on the trigger (+) node (usually labeled “Select an App” under the Trigger section).
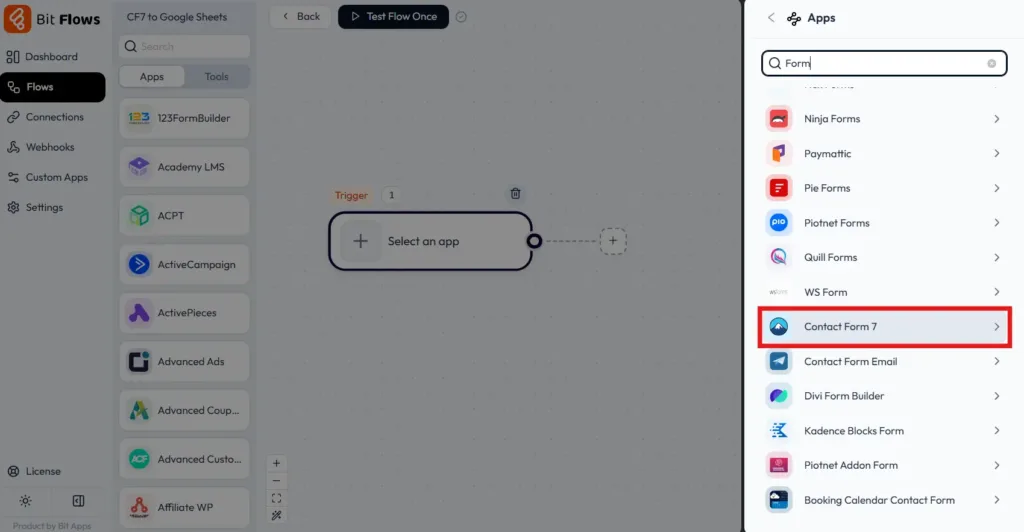
From the list of available trigger apps, choose “Contact Form 7”.
Next, you’ll be prompted to select an event. Choose the “On Form Submit” event (this ensures the workflow runs whenever your form is successfully submitted).
After selecting the event, pick the specific form you want to connect. If you have multiple Contact Form 7 forms, you can choose the one you need (for example, “Contact Us Form”).
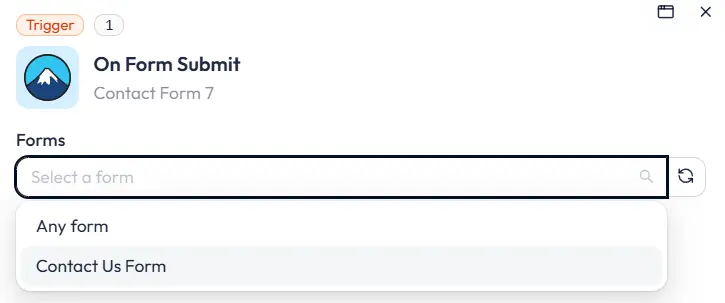
💡Tip: You also have an option to select “Any Form” if you want the trigger to fire on submissions from any Contact Form 7 form on your site. For this tutorial, select your single form for clarity.
Before connecting to Google Sheets, Bit Flows needs to know what fields your form has. To do this, you’ll capture a sample response. In the Bit Flows interface, after selecting your form, click on the “Listen Response” button. This puts Bit Flows in listening mode.
Now, go to the frontend of your website and submit the Contact Form 7 form once (fill it with dummy data and send it). After submitting, return to the Bit Flows builder screen. You should see that the form data was captured successfully.
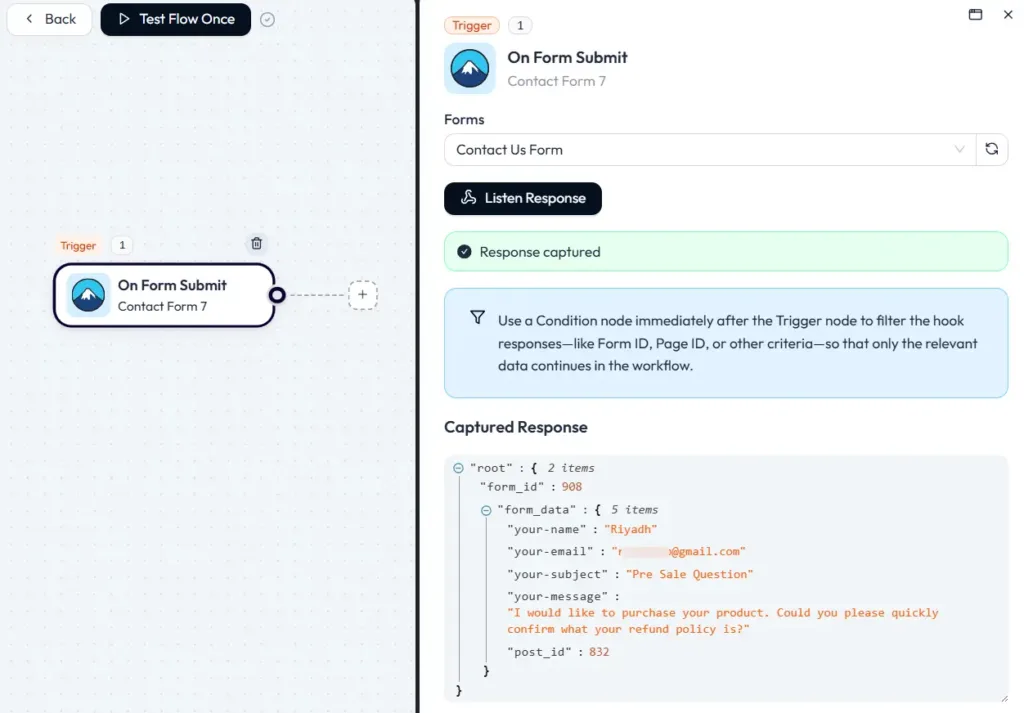
This means Bit Flows now recognizes all the form fields (like Name, Email, Message, etc.) from your Contact Form 7. Capturing this response is crucial because it lets you map those fields to Google Sheets in the next steps.
With the trigger set up, it’s time to configure the action that should happen after the form is submitted. Click on the plus icon (+) or the “Add Action” node in the flow builder (usually connected to the trigger node).
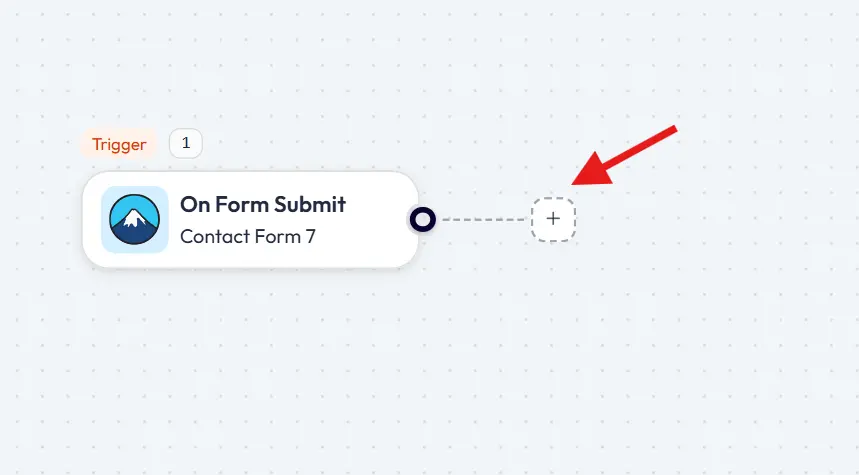
From the list of action apps, select “Google Sheets”.
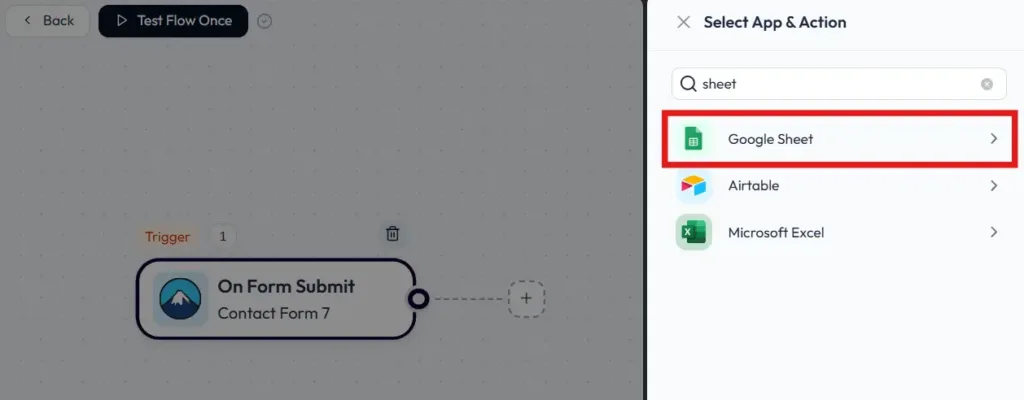
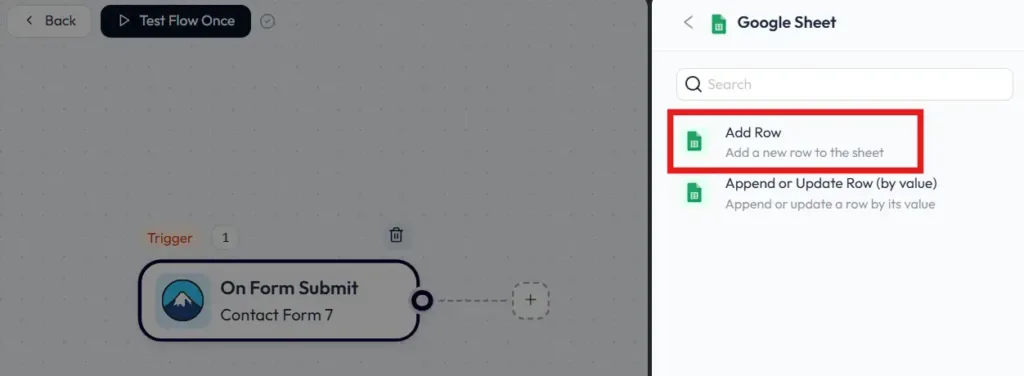
Now select the Add Row event. This will add a row for each form submission.
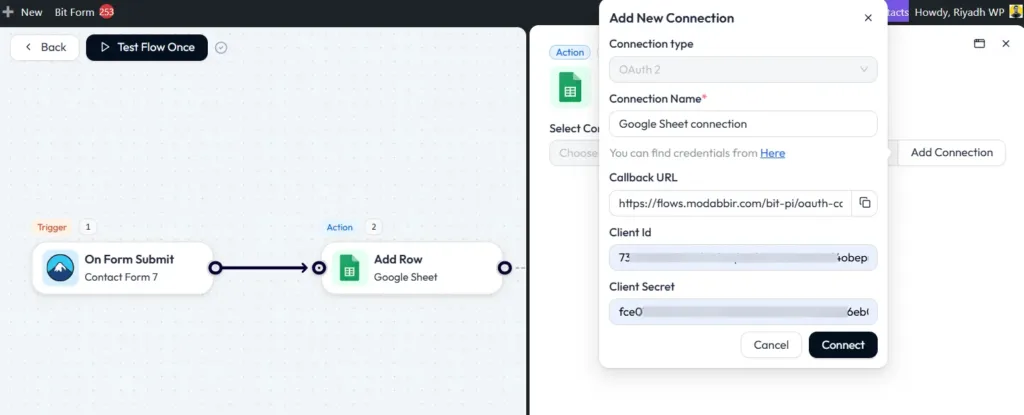
Bit Flows will prompt you to connect your Google Sheets with Bit Flows. A pop-up will appear where you can log in with your Google account and allow Bit Flows to access your Google Sheets. This is a secure OAuth authentication, and it’s needed so the plugin can send data to your sheets. You need to get the ID do Cliente e Segredo do Cliente from the Google Cloud Console.
Once authorized, you’ll return to the Bit Flows setup. Now you can choose which spreadsheet and worksheet to use. From the dropdown menu that appears, select the Google Sheet file you want to send the Contact Form 7 data to.
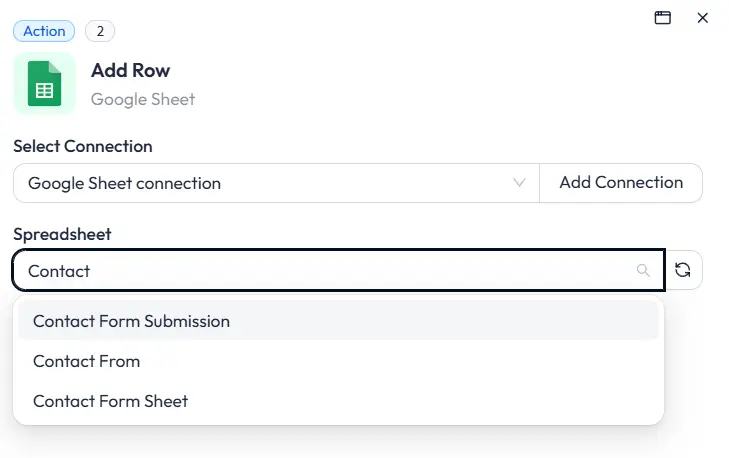
If your spreadsheet has multiple tabs (worksheets), also select the specific sheet/tab where the data should go. For example, you might pick a spreadsheet called “Website Leads” and then the worksheet “Sheet1”.
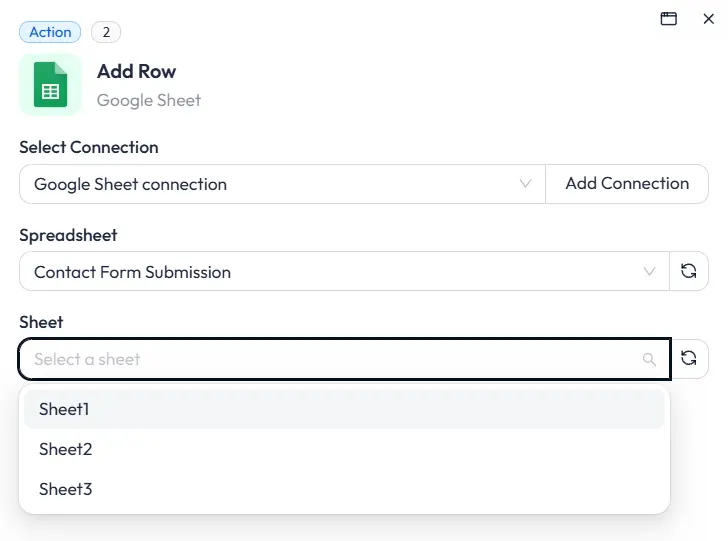
By selecting these, you’re telling Bit Flows: “Add a new row in this spreadsheet whenever the form is submitted.”
Now that your trigger and action are connected, the last configuration step is field mapping. Mapeamento de campos means aligning each form field from Contact Form 7 to the correct column in your Google Sheet.
Bit Flows will display the fields it captured from your form (e.g., Name, Email, Message) and will also list the columns available in the Google Sheet you selected. Simply match each form field to the corresponding spreadsheet column.
For instance, map the “Name” field to the “Name” column in your sheet, “Email” to “Email”, and so on. This step ensures that when data is sent, it lands in the right place under the correct headers.
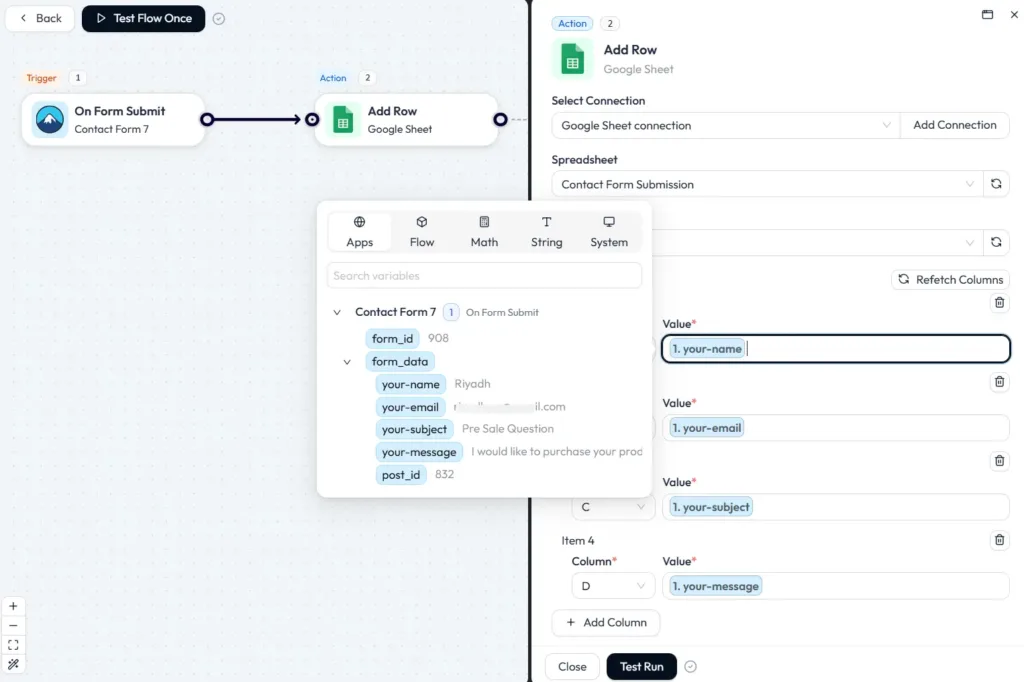
Take a moment to verify all fields are mapped properly. It’s usually a straightforward one-to-one match if your sheet columns are labeled similarly to your form fields.
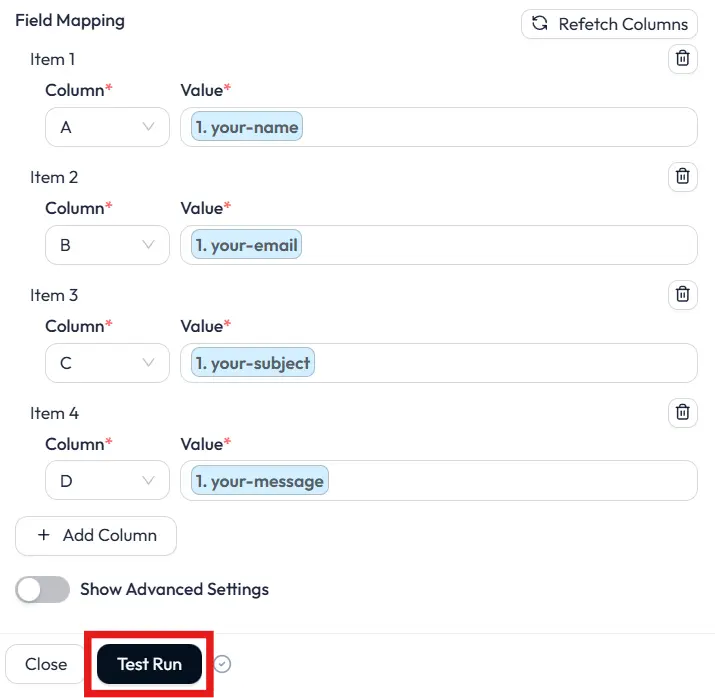
After mapping the fields, everything is set. Now it’s time to test the integration. Click on the Test Run button. This will trigger the workflow as if a form submission happened, using the sample data you captured earlier.
Head over to your Google Sheet and check if a new row has been added with the test form data. If you see the data in your Google Sheet columns, congrats! The connection is working perfectly! If not, double-check your field mapping and make sure you captured the response correctly in Step 4.
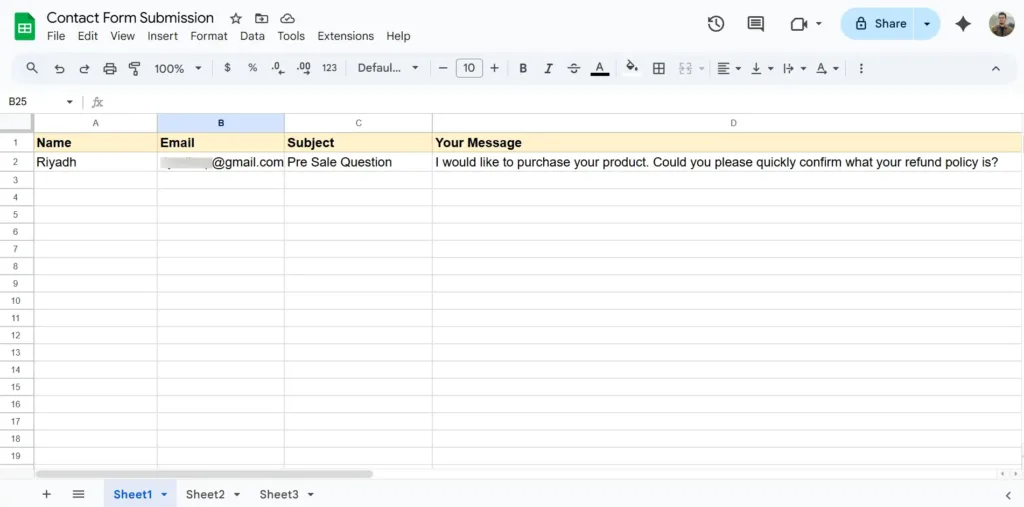
Bit Flows usually auto-save the flow, and it remains active once created. Now the automation is live.
That’s it, you’re done! From this point on, every time a visitor submits your Contact Form 7 form, the data will automatically go to Google Sheets.
You can open your spreadsheet at any time and watch new entries appear in real time as form submissions come in. No more manual exporting or missed emails, your form and spreadsheet are now automatically connected.
Integrating Contact Form 7 with Google Sheets is a game-changer for managing form data, and it doesn’t have to cost a dime. By using the Bit Flows plugin as your Google Sheet connector for Contact Form 7, you’ve created an efficient, automated workflow without writing any code.
Now, you can enjoy the benefits of having all your contact form entries neatly saved in a spreadsheet: easier tracking, sharing, and analysis of your leads or messages.
This free Contact Form 7 to Google Sheets integration helps eliminate errors, saves you time, and ensures you respond to inquiries more effectively (since all data is organized and accessible in one place).
Bit Flows makes the process incredibly smooth in just a few clicks. We set up a no-code integration that runs with unlimited submissions. You don’t need to worry about any monthly fees or limits on the number of entries. Plus, you’ve future-proofed your setup with a tool that can expand to other integrations as your needs grow.
Give yourself a pat on the back for optimizing your workflow! By automating Contact Form 7 with Google Sheets, you’ve taken a step toward a more productive and organized WordPress website. Happy automating!
Você pode conectar o Contact Form 7 ao Google Sheets gratuitamente usando o plugin Bit Flows. Basta instalar o Bit Flows, definir o Contact Form 7 como gatilho e o Google Sheets como ação, e então mapear os campos do seu formulário para a planilha. Esta configuração sem código enviará envios de formulário para o Google Sheets sem custo algum.
Sim, existem plugins que servem como Conectores do Google Sheets para o Contact Form 7. O Bit Flows é uma das melhores opções, oferecendo uma maneira gratuita e fácil de integrar o CF7 com o Google Sheets. Ele atua como uma ponte entre o seu formulário e a planilha, para que os dados fluam automaticamente a cada envio.
Integrating Contact Form 7 with Google Sheets lets you automatically save and organize form entries. This is useful for keeping a backup of inquiries, sharing data with team members, and analyzing responses. It saves you the hassle of manual data entry and helps ensure you never miss or lose a lead from your website.
Not at all. The method described here requires no coding. Using a plugin like Bit Flows, you can set up the integration through a visual interface. Just point and click to select Contact Form 7 and Google Sheets, then map fields. It’s designed so that anyone, even non-technical users, can do it in minutes.
Yes. With Bit Flows, connecting Contact Form 7 to Google Sheets is completely free and has no limits on form submissions. Unlike some third-party services that might charge per submission or impose quotas, Bit Flows allows unlimited data transfers between your form and Google Sheets. You can collect as many entries as you want without worrying about hitting a cap or paying extra.






 PT
PT  EN
EN  DE
DE  ES
ES  NL
NL  IT
IT  JA
JA