Most WooCommerce stores treat a $600 buyer the same way they treat a $40 buyer. At first, that may not feel like a big problem. But once you start sending the same follow-up emails, discount offers, and customer journey to every buyer, your best customers get mixed into the same list as everyone else.
A high-value customer may deserve a VIP offer, a better retention campaign, or a more personal follow-up. But if your store does not tag customers properly, your CRM cannot separate those buyers for you. Manual tagging also gets messy fast.
You check the WooCommerce order total, copy the customer details, open your CRM, find the right audience, create or update the subscriber, and add the correct tag. Then you repeat the same process for the next order. That is too many small steps for something that can run automatically.
Build a no-code workflow with Bit Flows that checks a WooCommerce order total and automatically adds a tag when the customer qualifies as high value. The workflow looks like this:
Use this workflow when you want WooCommerce and CRM to handle customer segmentation without manual tagging.
In this guide, we will use MailChimp as the marketing CRM. So before building the workflow, make sure these items are ready:
For this tutorial, the example order total is greater than or equal to 500. You can change the value based on your store. For example, a clothing store may treat $200 as high-value, while a B2B store may use $1000 or more.
Here is the final Bit Flows workflow we are going to build.
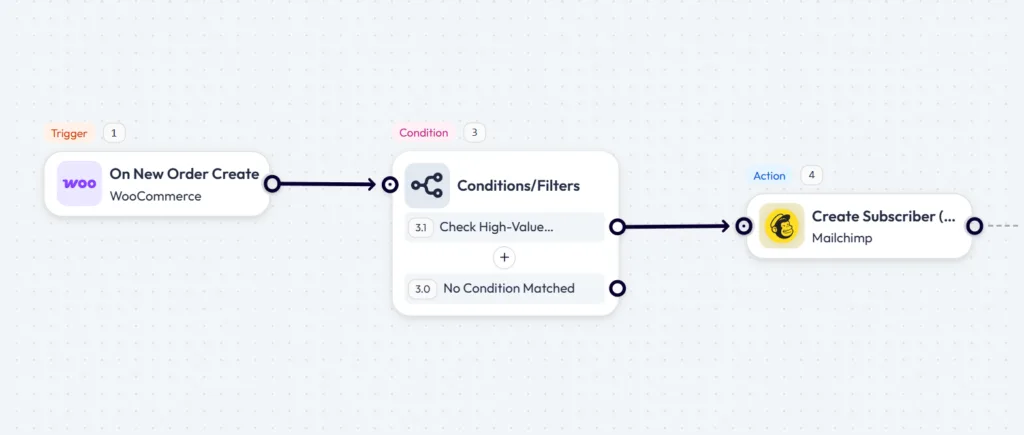
The flow starts when a new WooCommerce order is created. Then Bit Flows gets the order details, checks whether the order total is greater than $500, and sends the customer to Mailchimp with the High-Value Customer tag.
Go to your WordPress dashboard. In the Bit Flows Builder, select WooCommerce as the trigger app. Choose the trigger event: On New Order Create
This trigger starts the workflow when a new order is created in WooCommerce. After selecting the trigger, click Escuchar la respuesta and place a test order from your WooCommerce checkout.
Bit Flows needs this sample response so the next steps can access real order fields.
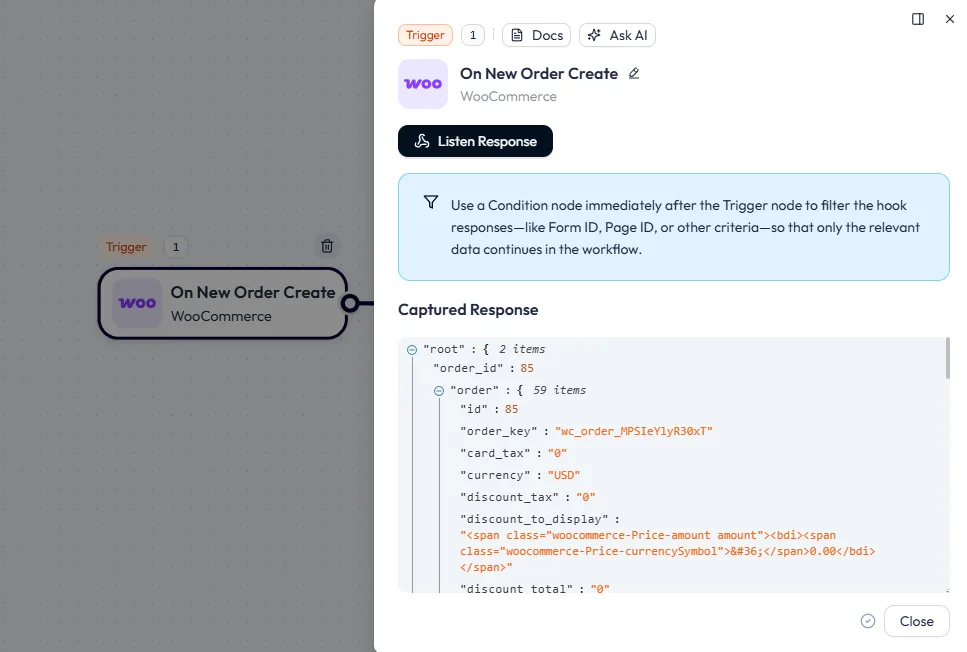
That captured response confirms that Bit Flows can now use WooCommerce order data inside later nodes.
The trigger is the starting point of the whole workflow. If the trigger does not capture the order response, the next steps will not have order data to map. For this workflow, make sure the order response includes the order ID and total amount field, as the next condition action requires it.
If you only want to tag paid or confirmed customers, add an order status condition before the Mailchimp action. For example, check that the order status is Processing or Completed. Otherwise, a high-value pending or failed order may still receive the High-Value Customer tag.
After the trigger event node, add a Condición node. Set the condition like this:

This condition acts like a gate. If the order total is greater than 500, the customer moves to the Mailchimp action and receives the High-Value Customer tag.
For a simple tutorial, you can end the workflow when no condition matches. For a more complete setup, add another Mailchimp action under No Condition Matched and tag the customer as a Regular Customer.
After the high-value condition path, add a Mailchimp action. This action will run only when the WooCommerce order total matches your condition, such as a total greater than 500.
First, select your Mailchimp connection. If you have not connected Mailchimp yet, click Añadir conexión. Keep the connection type as OAuth 2, copy the URL de devolución de llamada from Bit Flows, then open Mailchimp’s registered app page and create a new app. Paste the Bit Flows Callback URL into the Redirect URI field in Mailchimp.

After creating the app, copy the ID de cliente y Secreto de cliente from Mailchimp and paste them back into Bit Flows. Then click Conectar.
Once the connection is ready, configure the Mailchimp action like this:

Now, map the WooCommerce customer fields to Mailchimp. Start with the email field because Mailchimp uses it to identify the subscriber.
Set Double Opt-in based on your email consent process. Choose No only if your WooCommerce checkout already collects proper marketing consent. Set Update Subscriber a Sí so returning customers can be updated instead of failing when the same email already exists in Mailchimp.
Finally, click Prueba de funcionamiento. Use a WooCommerce test order above $500, then open Mailchimp → Audience → Contacts and check whether the customer appears with the High-Value Customer tag.
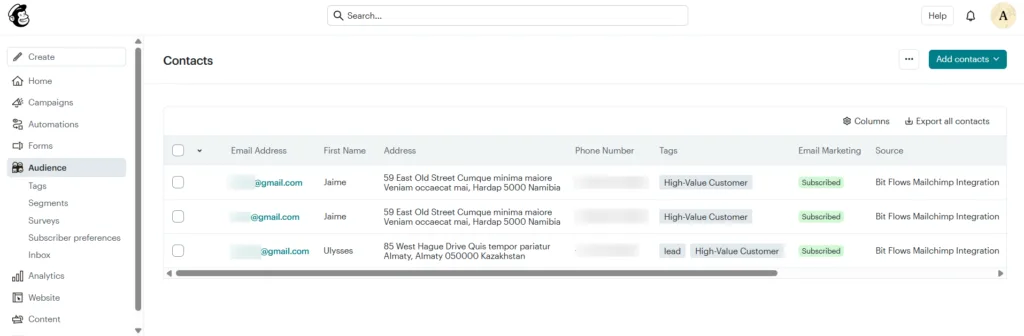
If the tag appears, your Mailchimp connection, field mapping, and condition path are working correctly.
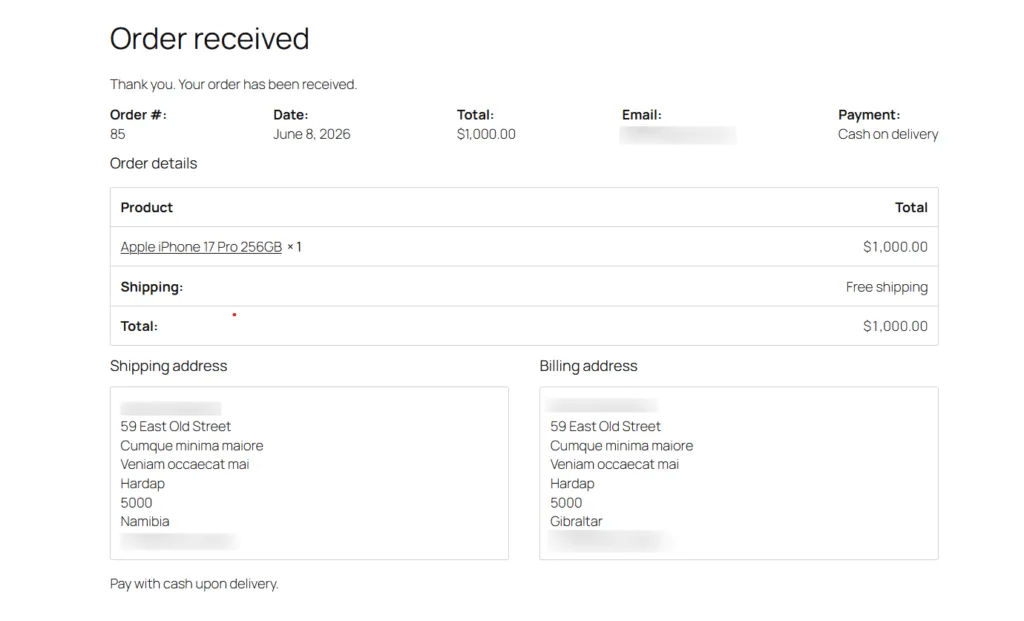
Before publishing the workflow, test it with two WooCommerce orders.
First, create a test order above your high-value limit. For example, use a $1,000 order. Since the condition is set to total greater than 500, this customer should move to the matched path and receive the High-Value Customer tag in Mailchimp.
Then create another test order below the limit, such as $120. This customer should not receive the high-value tag. If you added a regular customer path, they should receive the Regular Customer tag instead.
After each test, open Mailchimp → Audience → Contacts and check the customer email, mapped fields, and tag.
This confirms that Bit Flows is not just sending data to Mailchimp. It is sending the right customer through the right path based on order value.
Before publishing the workflow, test the full setup once with clean sample data. Make sure the WooCommerce trigger captures a fresh order response, because old or missing sample data can break the field mapping later. Use the customer details from WooCommerce trigger event when sending data to Mailchimp, especially the email field, since Mailchimp needs it to create or update the subscriber.
Also, check that the correct Mailchimp audience and tag are selected before running the test. For returning customers, keep Update Subscriber enabled so the workflow can update an existing contact instead of failing.
Finally, match the Double Opt-in setting before testing. Turn it on if you want customers to confirm by email before joining your Mailchimp list. Turn it off only if your WooCommerce checkout already collects permission to send marketing emails.
Manual tagging works when orders are low. But as sales grow, it becomes easy to miss high-value buyers or send them into the wrong Mailchimp segment.
With this workflow, WooCommerce creates the order, Bit Flows checks the order value, and Mailchimp receives the customer with the right tag. Once tested, the process runs without repeating the same task after every sale.
Start with one condition and one High-Value Customer tag. After that, you can expand the same setup for regular customers, repeat buyers, product-based segments, or lifetime spending.
Ready to try it? Build this workflow in Bit Flows and let your WooCommerce store tag customers automatically while your email campaigns focus on the right buyers.
Yes, you can tag WooCommerce customers automatically by using Bit Flows to check order value and apply the right Mailchimp tag.
Create a Bit Flows workflow with a WooCommerce order trigger, an order total condition, and a Mailchimp action that applies a high-value customer tag.
Yes, Bit Flows lets you connect WooCommerce to Mailchimp inside WordPress, so you can automate customer tagging without using Zapier.
Use a new order trigger for instant tagging, or use an order status trigger when you only want confirmed orders to update Mailchimp.
The customer can either leave the workflow or move through another path where Mailchimp applies a Regular Customer tag.
Use order total for simple one-purchase tagging, and use lifetime value when repeat purchases matter more for WooCommerce customer segmentation.
The tag may not show if the condition path did not match, the wrong tag was selected, or the email field was mapped incorrectly.
Yes, enable Update Subscriber so Bit Flows can update returning customers instead of failing when the same email already exists in Mailchimp.
Use Double Opt-in when customers should confirm by email before joining your Mailchimp list, or turn it off only when checkout already collects consent.
Yes, the High-Value Customer tag can help you build VIP campaigns, loyalty emails, product recommendations, and retention flows in Mailchimp.
Bit Flows is better when you want a WordPress-native workflow, while Zapier fits teams that already run most automations outside WordPress.