WooCommerce sends the same order notification for every order, even when each order needs different attention.
A paid order that is ready to ship may look the same as a pending check payment, a failed transaction, a high-value Cash on Delivery order, or an order with an urgent customer note.
The store team then has to open each order, check the status, verify the payment method, read the customer note, review the order total, and decide what to do next.
This may work when you only have a few orders. But when orders come in at different times with different statuses and payment terms, important orders can easily get missed.
This workflow uses Bit Flows to build a WooCommerce AI Agent that helps manage new orders without letting AI send customer emails on its own.
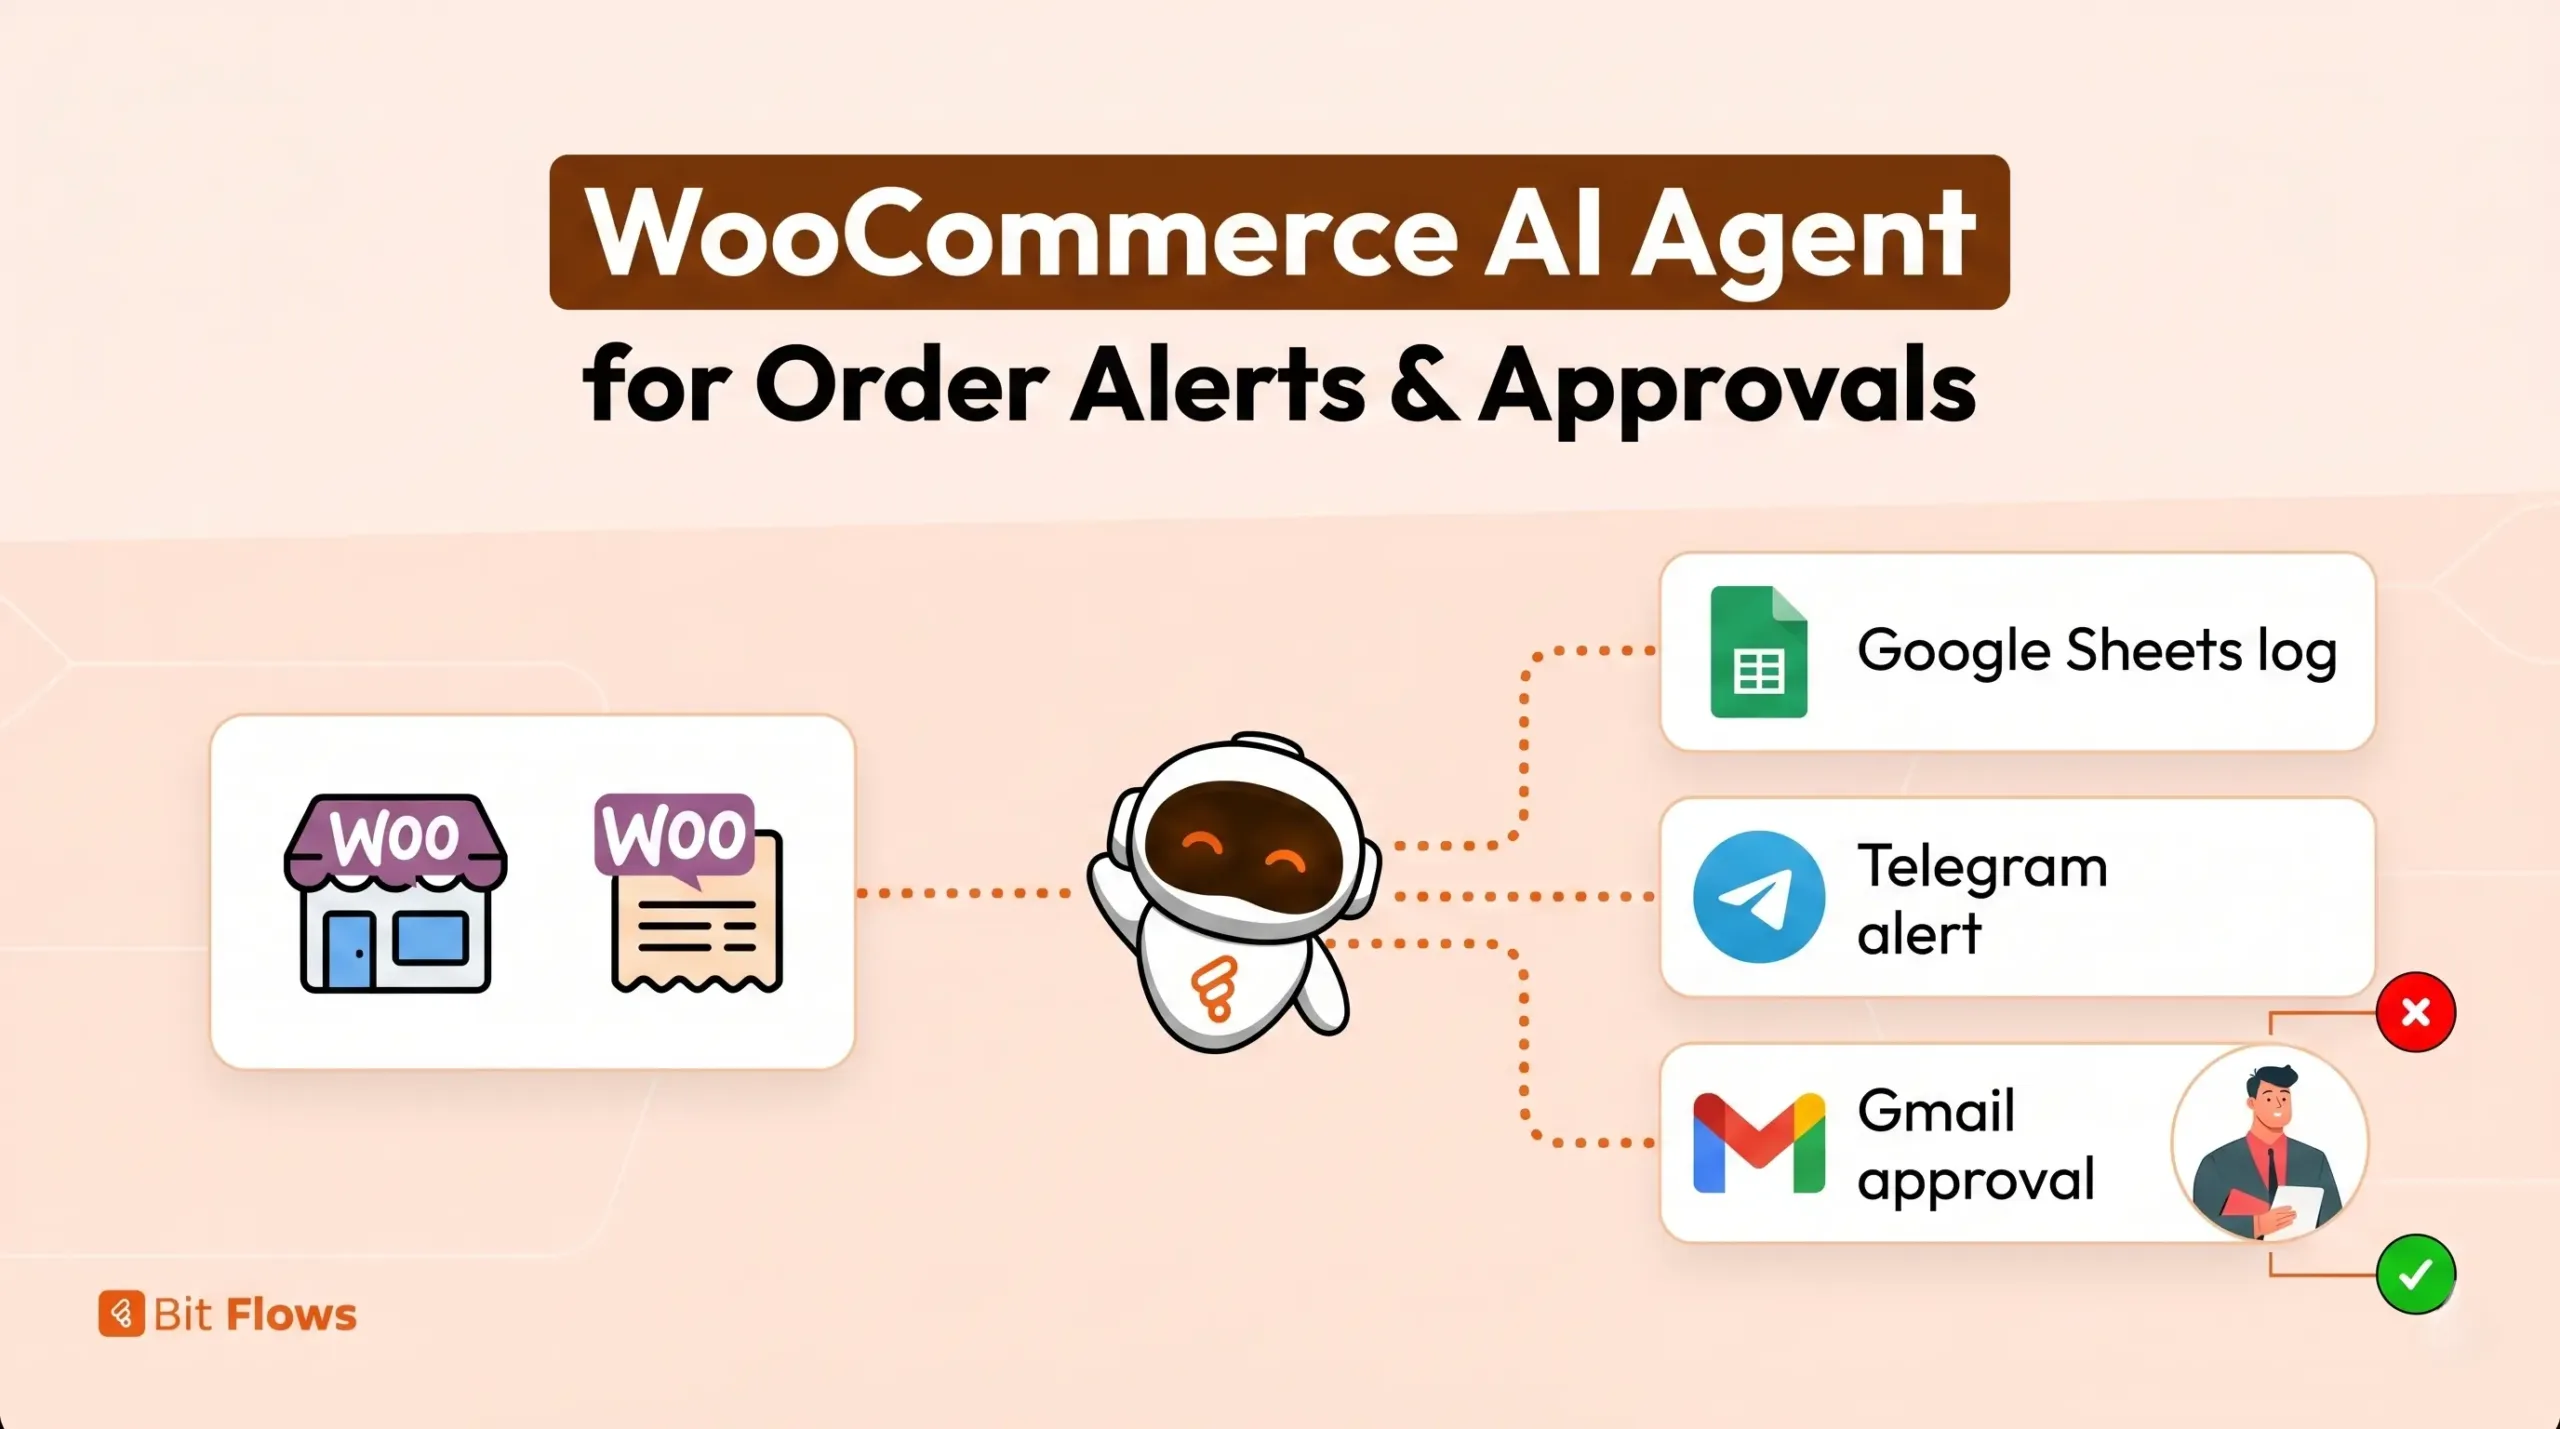
The workflow starts when a new WooCommerce order is created. Bit Flows captures the order data, logs the raw order details in Google Sheets, and sends the same order information to an AI Agent for review.
The AI Agent checks the order status, payment method, order total, customer note, and customer contact details. It returns a structured JSON response with the order summary, priority level, recommended action, Telegram alert message, and customer email draft.
A Router reads the AI output and sends the workflow to the right path. Orders that need attention trigger an internal Telegram alert. If a customer reply is needed, the AI-written email draft goes to Gmail Human-in-the-Loop for review.
The customer email is sent only after a reviewer approves it. This keeps the workflow useful for order management while preventing AI from sending sensitive customer messages on its own.
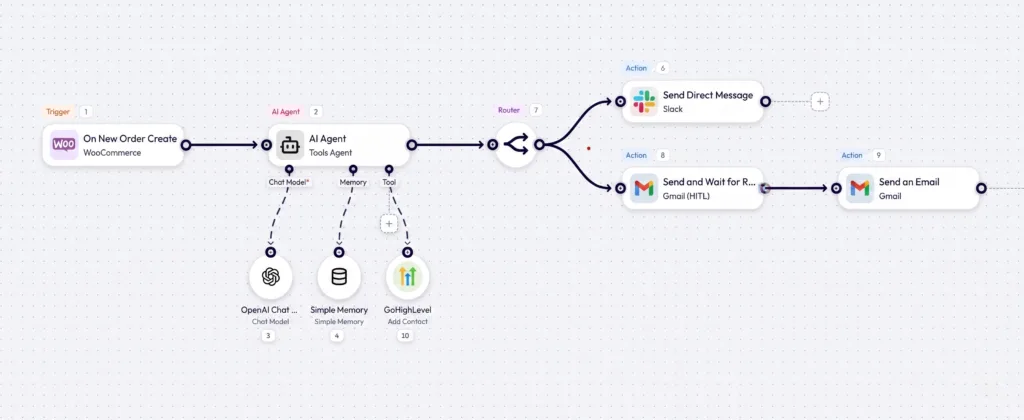
Before building the workflow step by step, it helps to see how the full flow is connected.
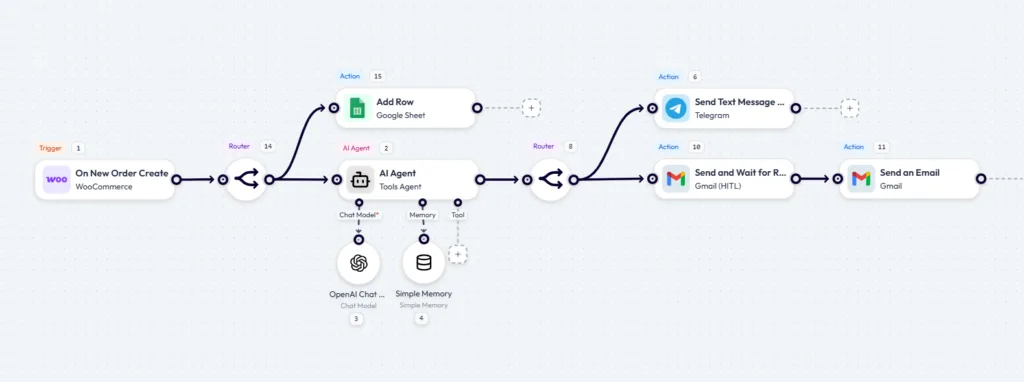
The workflow starts when a new WooCommerce order is created. Bit Flows logs the order in Google Sheets, sends the order data to the Agente de IA, and then routes the result to Telegram or Gmail based on the AI output.
If the order needs team attention, Telegram sends an internal alert. If a customer email is needed, Gmail Human-in-the-Loop sends the draft for review before the final email goes to the customer.
| Workflow Step | What It Does |
|---|---|
| WooCommerce: On New Order Create | Starts the workflow when a new WooCommerce order is placed |
| Router 1: Split Order Data | Sends the same order data to Google Sheets and the AI Agent path |
| Google Sheets: Add Row | Saves the raw order details before any AI processing |
| Agente de IA | Reviews the order status, payment method, total, customer note, and contact details |
| OpenAI Chat Model | Powers the AI Agent and returns a structured JSON decision |
| Router 2: Route AI Output Data | Routes the order based on priority, alert need, and email requirement |
| Telegram: Send Text Message | Sends an internal alert to the store or admin team |
| Gmail Human-in-the-Loop | Sends the AI-written customer email draft to a reviewer for approval |
| Gmail: Send Email | Sends the approved email to the customer |
Open Bit Flows → click Create New Flow → name it: WooCommerce AI Order Workflow
Click the trigger node and configure:
Click Listen Response. Go to your WooCommerce store and place a test order. Use a payment method that creates a Pending or On Hold status. Check payment or Cash on Delivery works well for testing because they require manual review.
Return to Bit Flows and confirm these fields appear in the captured response:
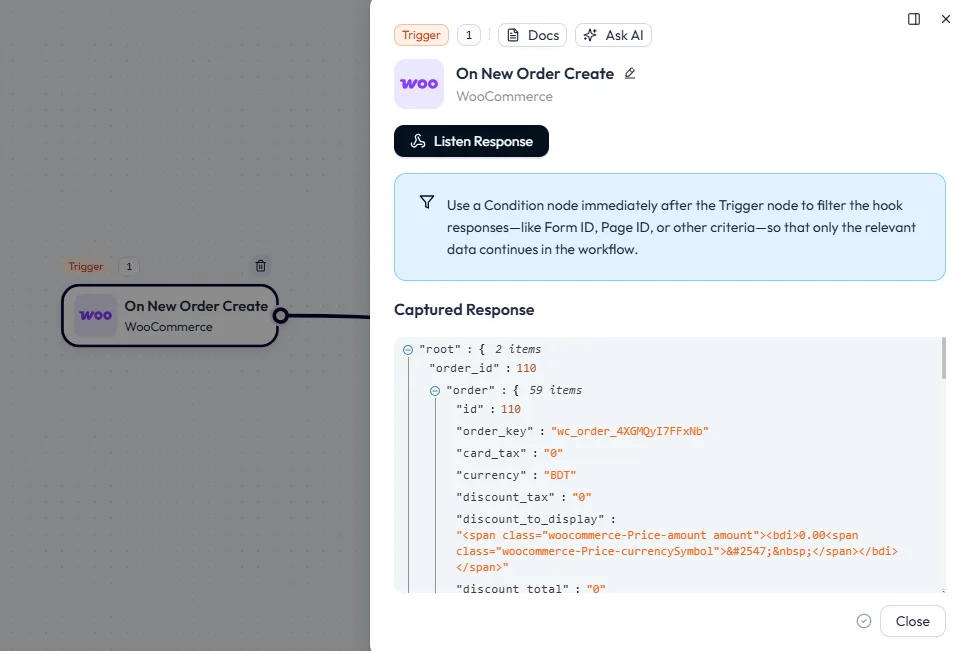
Do not move to the AI step until the trigger returns all the fields you need for mapping.
After the WooCommerce trigger captures the new order data, add a Router before adding Google Sheets or the AI Agent. This Router sends the same order data into two paths.
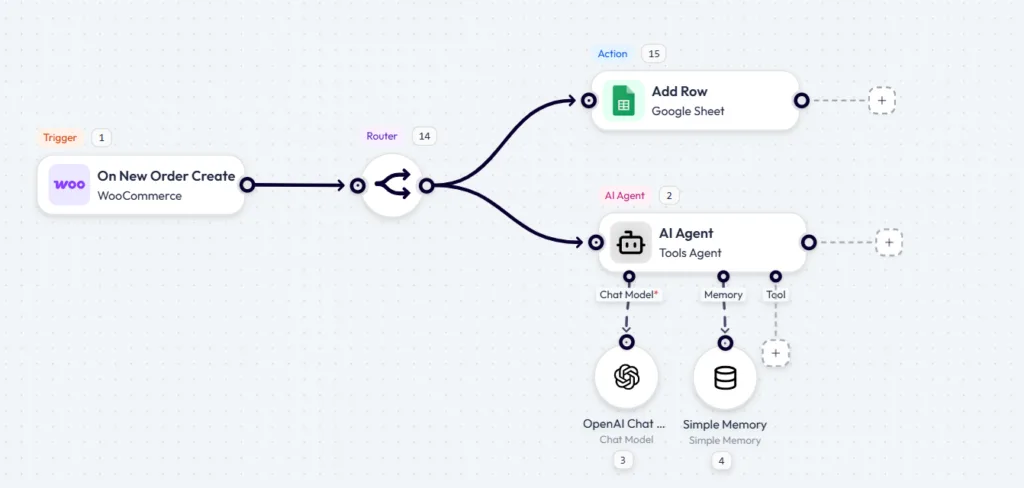
In the first Router path, add: Google Sheets → Add Row
Connect Google Sheets using a Google OAuth connection. If you have not connected Google Sheets to Bit Flows before, follow the same OAuth setup used in other Bit Flows Google integrations, create a Google Cloud project, enable the Google Sheets API, Gmail API, and Google Drive API, and generate a Client ID and Secret.
Before adding the Google Sheets action in Bit Flows, create a Google Sheet for your WooCommerce order log. After the sheet is ready, go back to Bit Flows.
Select your Google Sheet connection, choose the spreadsheet you created, select the correct sheet tab, and click Refetch Columns if the headers do not appear. Map the WooCommerce trigger fields into the matching columns.
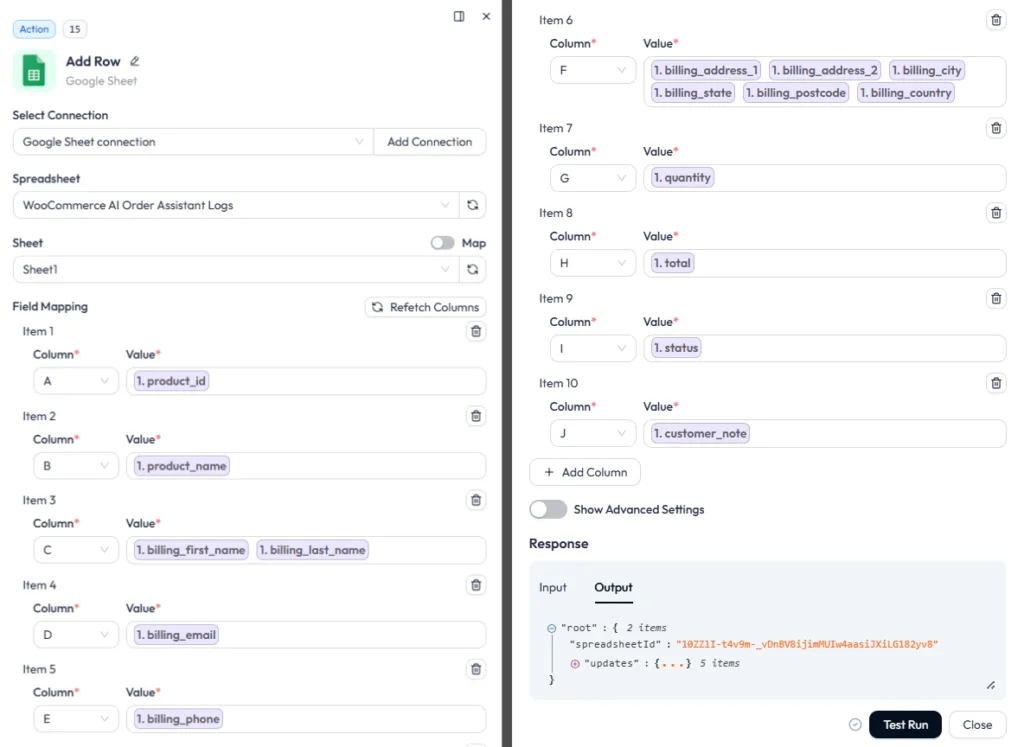
This first log stores the raw order data before the AI Agent processes it, so even if the AI step fails, the order is already recorded in the sheet.
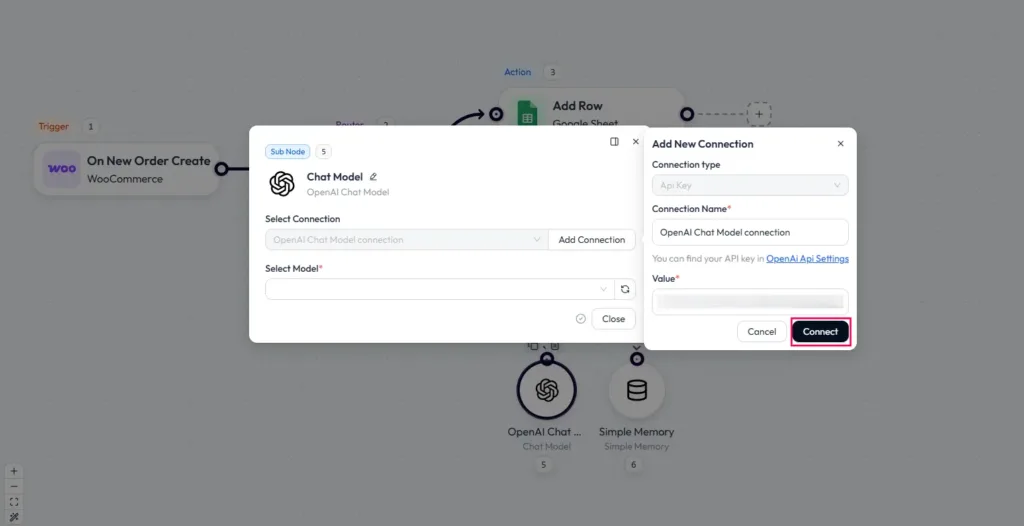
In the second Router path, add Tools → AI Agent. Connect the chat model: select OpenAI Chat Model → click Añadir conexión → paste your OpenAI API key → and then save it.
Use a model that can return reliable JSON output. Check the model’s Precios API before using it on live orders.
Conectar Memoria simple to the AI Agent if you want it to retain context about the same order across multiple steps. For this workflow, set the memory key to the WooCommerce order_id so each order stays isolated.
Set the AI Agent output format to JSON Object. This is critical; the Router, Telegram, and Gmail steps all depend on reading specific fields from the AI output. A plain text response cannot be mapped reliably.
The prompt decides how the AI Agent reviews each order. Keep it specific, because the Router, Telegram alert, and Gmail approval step will depend on the JSON fields returned by the AI.
Use the prompt to give the AI three things:
You can write the prompt based on your own store rules, payment methods, order value, and customer support process.
Start by passing the important WooCommerce fields into the prompt, such as order ID, order status, total, payment method, customer name, email, address, and customer note.
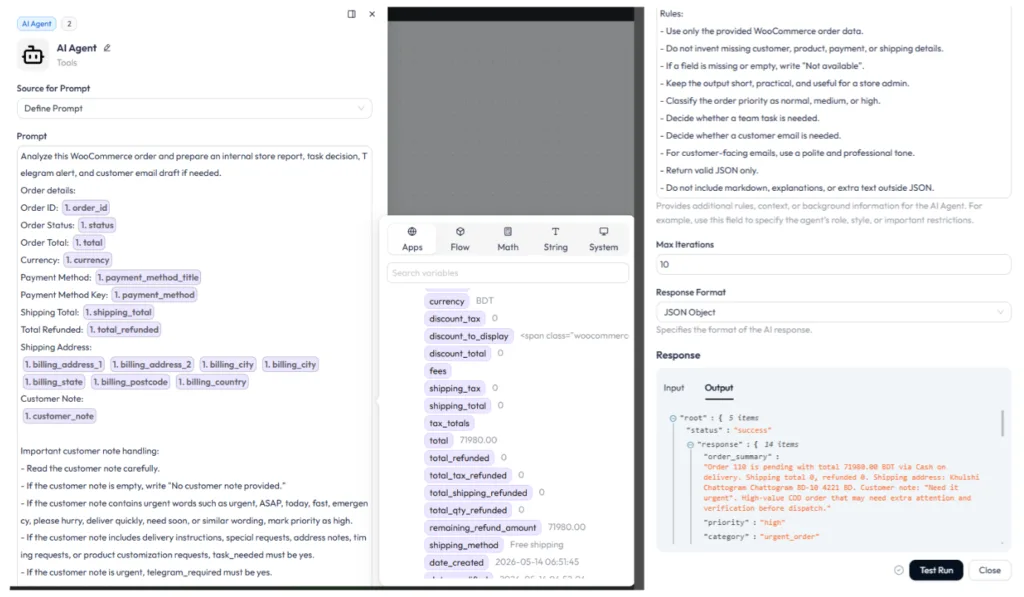
Then add decision rules that match your business.
Finally, ask the AI Agent to return a structured JSON response:
Return valid JSON only:
{
"order_summary": "",
"priority": "normal | medium | high",
"task_needed": "yes | no",
"recommended_action": "",
"telegram_required": "yes | no",
"telegram_message": "",
"customer_email_required": "yes | no",
"email_subject": "",
"email_body": "",
"gmail_label": "WooCommerce AI Review"
}Keep the Telegram message short. It is for quick internal scanning, not a full order report. The full report lives in Google Sheets. After mapping the Telegram message, click Prueba de funcionamiento to check whether the action is working correctly.
If everything is configured properly, Bit Flows will return a successful response in the output panel, and you will also see the test message appear in the Telegram group or channel where you added the bot.
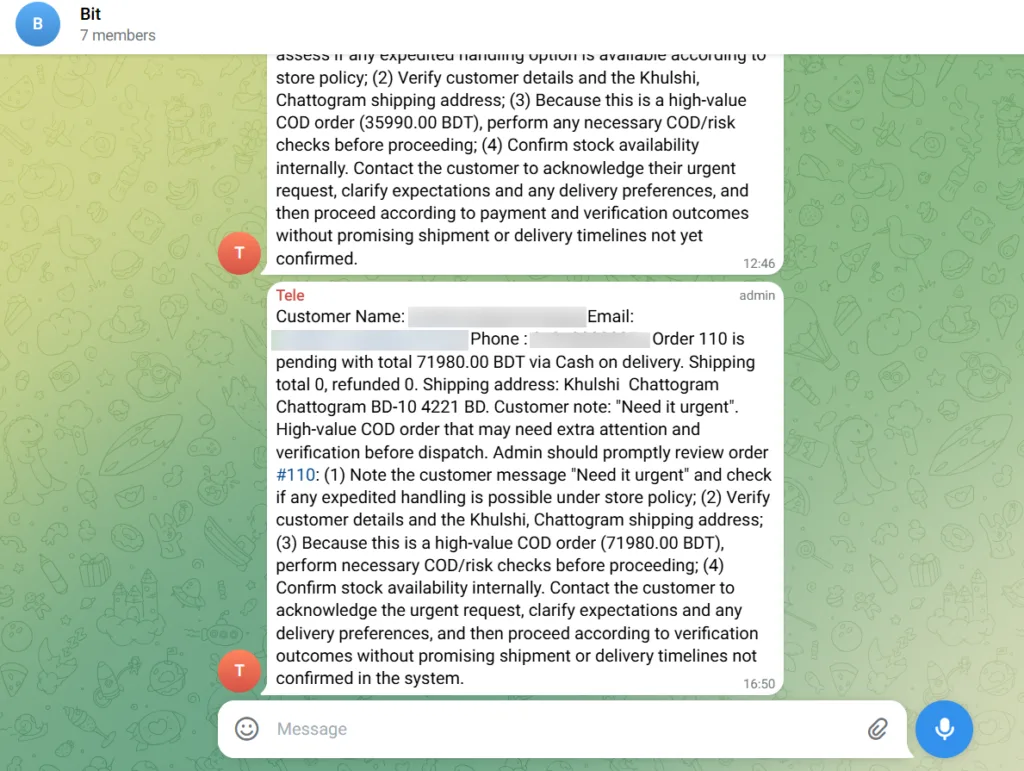
This is the quickest way to confirm that your Telegram bot connection, Chat ID, and message mapping are all working as expected.
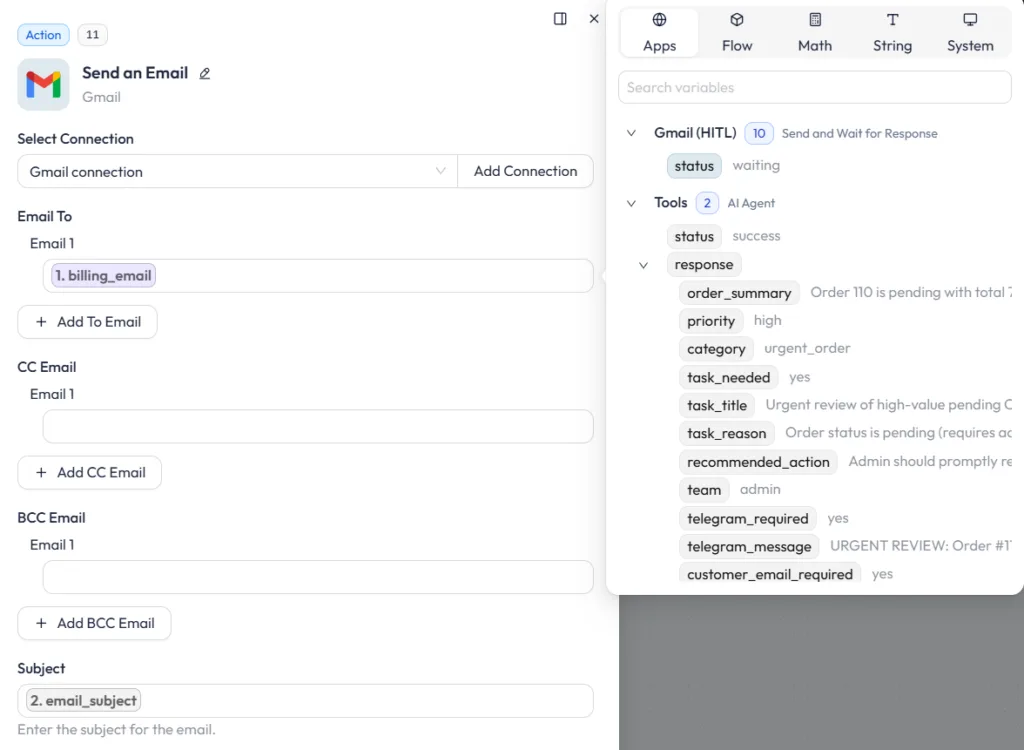
After router, click + on the email path → select Gmail → Send and Wait for Response.
This is the Human in the Loop step. Bit Flows pauses the workflow here, sends the AI-drafted email to a reviewer, and waits for approval before continuing. The customer does not receive anything until the reviewer approves.
After mapping the Subject and Message fields from the AI Agent output, click Prueba de funcionamiento to check whether the Gmail Human in the Loop step is working correctly.
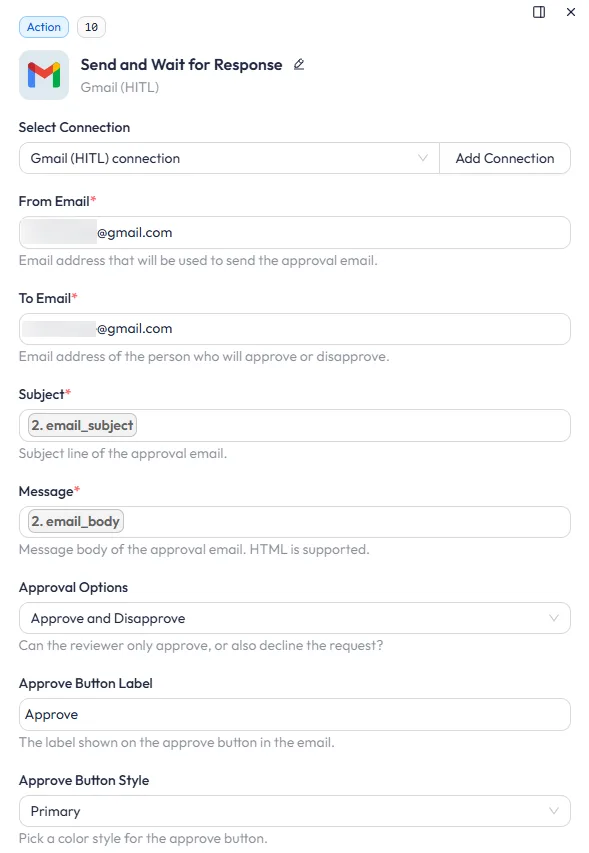
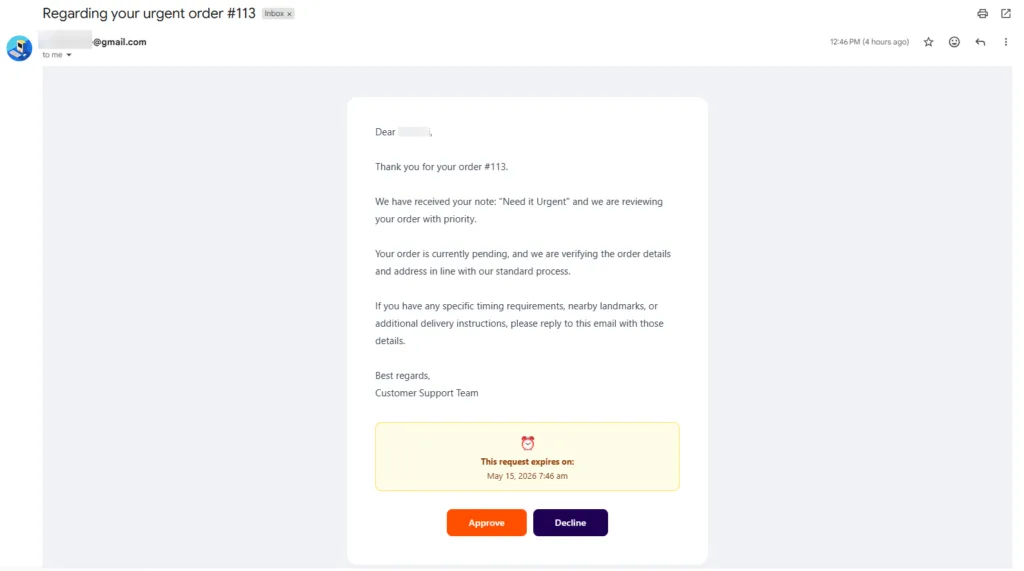
If everything is configured properly, the reviewer will receive an approval email in Gmail with the AI-written customer message, along with Approve y Decline buttons.
Here is the output of the Human in the Loop approval message, where the reviewer can check the email content before allowing the workflow to send it to the customer.
Check that payment and wire transfer orders do not change status automatically. If the AI sends a customer email saying their order is confirmed before payment is verified, it creates a false expectation that is difficult to walk back. The Human in the Loop step ensures the reviewer can catch this before the email reaches the customer.
After the reviewer approves, click + → select Gmail → Send Email. This step sends the customer-facing email only after approval. Map the customer email address from the WooCommerce trigger, then use the approved subject and message from the previous Gmail Human in the Loop step.
Configure the fields:
Test the workflow with different WooCommerce order types, not just one successful order. Use pending payment, failed, on-hold, high-value COD, urgent note, normal processing, refunded, and empty-note orders to check whether the AI Agent returns the right priority and action.
After each test, review the Bit Flows logs and confirm that the trigger, Google Sheets row, AI JSON output, Router path, Telegram alert, Gmail approval, and final email step all worked correctly before using the workflow on live orders.
The workflow above is one example of what a WooCommerce trigger and AI Agent can do inside Bit Flows. Once a new order starts the flow, the AI Agent can review the order data and route it to different actions based on your store’s needs. Here are some practical ideas.
This workflow uses a WooCommerce new order trigger to let an AI Agent review each order, decide whether the customer needs sales follow-up, update or create the contact in GoHighLevel, alert the team in Slack, and prepare a customer email that waits for approval before sending.
This workflow starts when a WooCommerce product status is updated. For example, when a product moves from draft to published, out of stock to available, or gets updated before a launch.
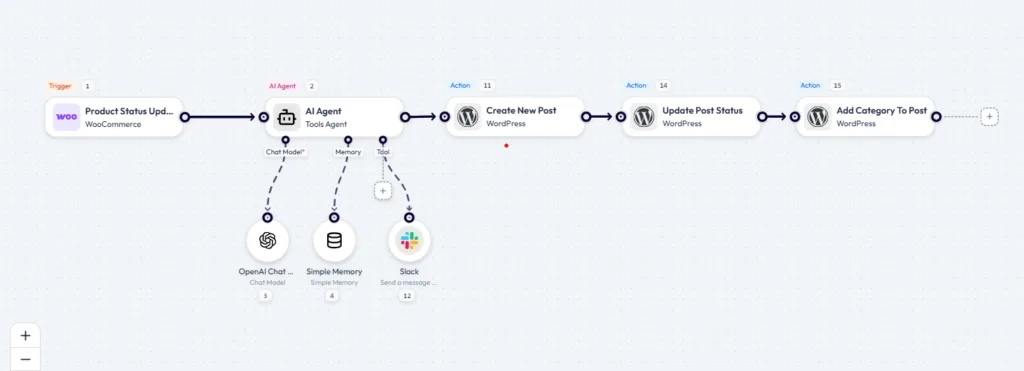
Bit Flows sends the product data to the AI Agent. The AI Agent reviews details like product title, status, price, category, stock status, and description. It can also use the connected Slack tool to send a short internal update to the marketing team, so they know a product is ready for review or promotion.
After that, the workflow creates a new WordPress post using the AI-generated launch content. Then it updates the post status and adds the correct category to keep the content organized inside WordPress.
Most store owners worry about one thing when they use AI in an order workflow: what if the AI gives the wrong answer and sends something to a customer?
This workflow avoids that risk. Nothing is sent to the customer automatically. The AI only prepares the draft. A reviewer checks it first, then decides whether to approve it.
The safest way to start is with the WooCommerce trigger, Google Sheets log, AI Agent, Router, and Telegram alert. Run the workflow on real orders for a few days and review the AI output in Bit Flows logs.
Once the JSON output is consistent and the alerts match your order review process, add the Gmail Human-in-the-Loop step and the final Send Email action.
Later, you can expand the workflow by routing different order types to different team members. You can also skip the approval step for low-risk processing orders. These changes can be added inside the same Bit Flows canvas without rebuilding the workflow from scratch.
Yes, the AI Agent can read WooCommerce order data, classify priority, prepare internal alerts, and draft customer emails based on your store rules.
Google Sheets stores the raw order data first, so your team still has a clean order record if the AI Agent or another node fails.
JSON makes the AI output easier to map, so the Router, Telegram alert, and Gmail approval steps can read the correct fields.
Failed orders, on-hold orders, urgent customer notes, and high-value Cash on Delivery orders should usually trigger a high-priority alert.
Not for sensitive orders; pending payments, failed orders, COD orders, and urgent notes should go through Human in the Loop before emailing customers.
Yes, you need an OpenAI API key if you use OpenAI as the chat model for the AI Agent.
Yes, you can stop after Google Sheets logging and Telegram alerts if you only need internal order tracking and team notifications.
Check the WooCommerce trigger data, AI prompt rules, JSON response format, Router conditions, field mapping, and Bit Flows logs.
You should test pending, failed, on-hold, high-value COD, and urgent-note orders before using the workflow on real customers.