
A lead form is useful only when the data moves somewhere after submission.
Most WordPress lead forms collect names and emails inside the dashboard. Then someone has to copy the subscriber details, add the contact to Mailchimp, repeat the same step in Brevo, and send a confirmation reply. That may work at first. Once submissions increase, it becomes easy to miss a lead, delay a follow-up, or enter the wrong data.
The real issue is reliability. Manual follow-up depends on someone remembering to do it. If that person is busy or unavailable, the subscriber stays in WordPress without being added to your email list or receiving a confirmation.
A better setup is to let the form submission start the full sequence automatically. With Bit Flows, a Form submission can add or update the subscriber in Mailchimp, create the contact in Brevo, and send a confirmation email from inside WordPress.
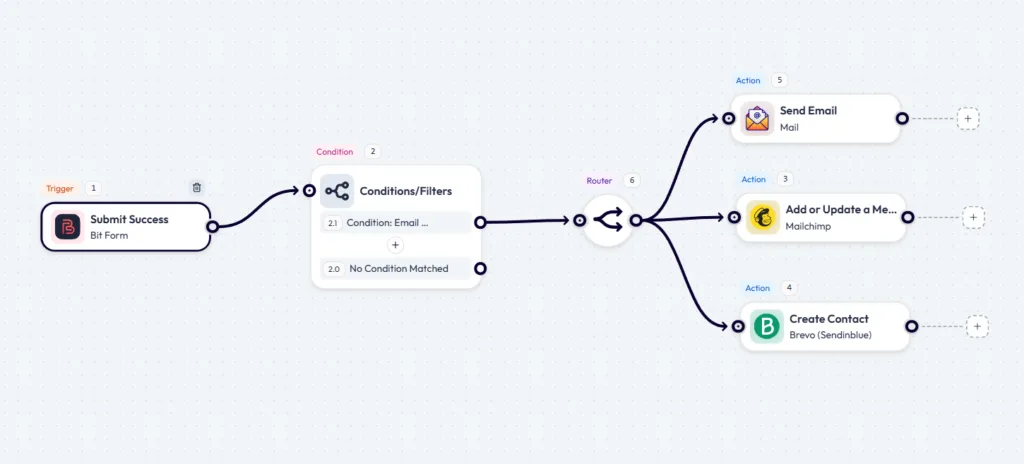
You can connect WordPress with email marketing automation tools by using a Form submission as the trigger, checking that the email field is not empty, then sending the subscriber data to Mailchimp, Brevo, and a confirmation email action.
Basic workflow:
When someone submits the lead form, Bit Flows first checks whether the email field is valid or not. Once the lead passes that check, the workflow adds or updates the subscriber in Mailchimp, creates the contact in Brevo, and automatically sends a confirmation email.
Use this workflow when you want every valid WordPress form subscriber to be added to your email lists without manually copying form entries.
This workflow starts when someone submits your email marketing lead form.
After the form is submitted, Bit Flows checks whether the email field has a value. If the contact passes the condition, the workflow sends the same subscriber data to Mailchimp and Brevo. Then it sends a confirmation email to the subscriber.
The simple version looks like this:
Before you create the automation, make sure the basic setup is ready. You do not need a complex system, but each part should be prepared so the workflow can run and be tested properly.
You’ll need:
It also helps to prepare one test form submission before mapping fields. That way, Bit Flows can capture real form data and show the correct fields in the Mailchimp, Brevo, and Mail steps.
Start with the form because the workflow needs real submitted data to map fields later.
Create a Bit Form lead form with these fields:
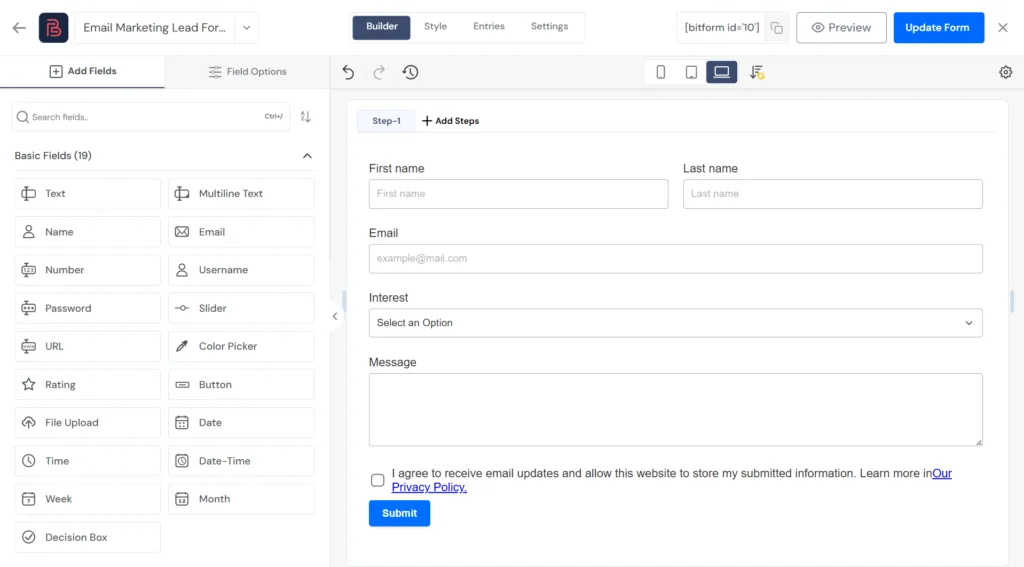
For the Interest field, keep the options simple, such as Newsletter, Product Updates, or CRM Automation. After saving the form, place it on a test page and keep that page ready.
Do not submit the test entry yet. In the next step, you’ll open the Bit Form trigger inside Bit Flows and click Escuchar la respuesta. Once the listener is active, submit the form from the test page so Bit Flows can capture real form data for field mapping.
Open Bit Flows and create a new flow for this setup. Use a clear name, such as: Email Marketing Lead Form Automation
A clear flow name helps later when you check logs or manage multiple workflows.
Elegir Bit Form as the trigger app and select Envío Exitoso.
Then choose the form you created for this workflow, such as Email Marketing Lead Form.
Next, click Escuchar la respuesta in the Bit Form trigger popup. Once the listener is active, go to the frontend page where you added the Bit Form and submit one test entry.
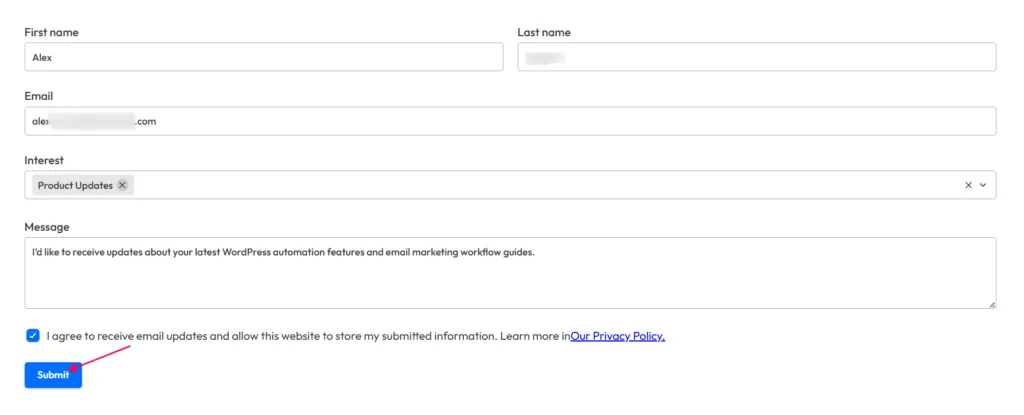
When Bit Flows captures the response, you should see form data such as the form ID, entry ID, and submitted fields.
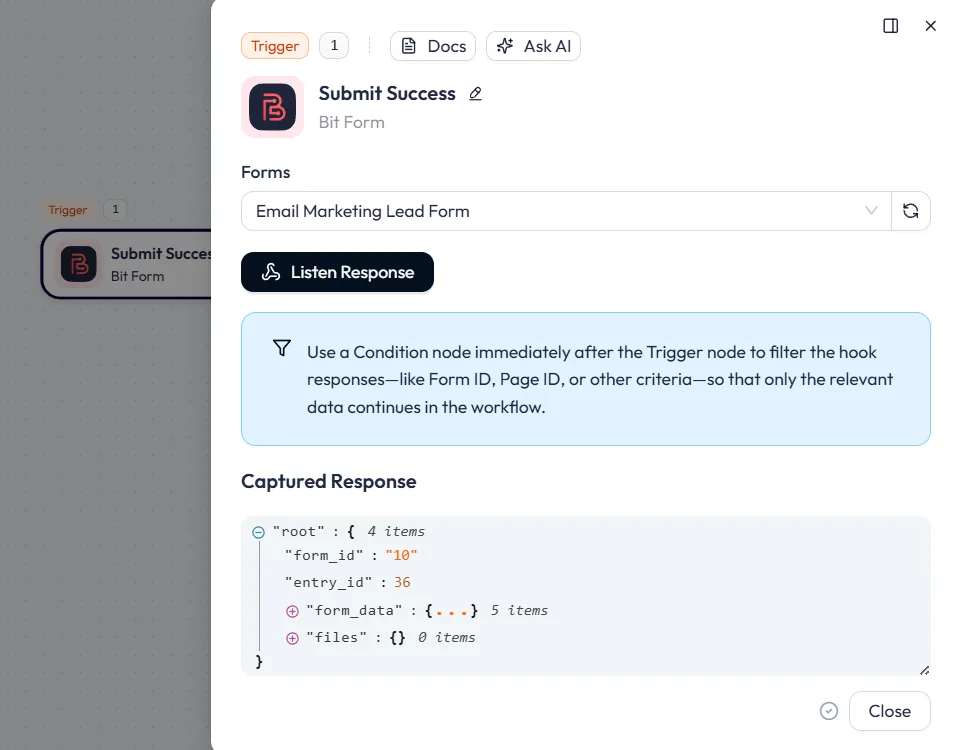
This captured response is important because Bit Flows uses it to show the form fields inside later mapping steps for Mailchimp, Brevo, and the confirmation email.
After the trigger, add a Condition node. Use this condition to stop incomplete or unapproved submissions from entering your email marketing tools.
Recommended condition:
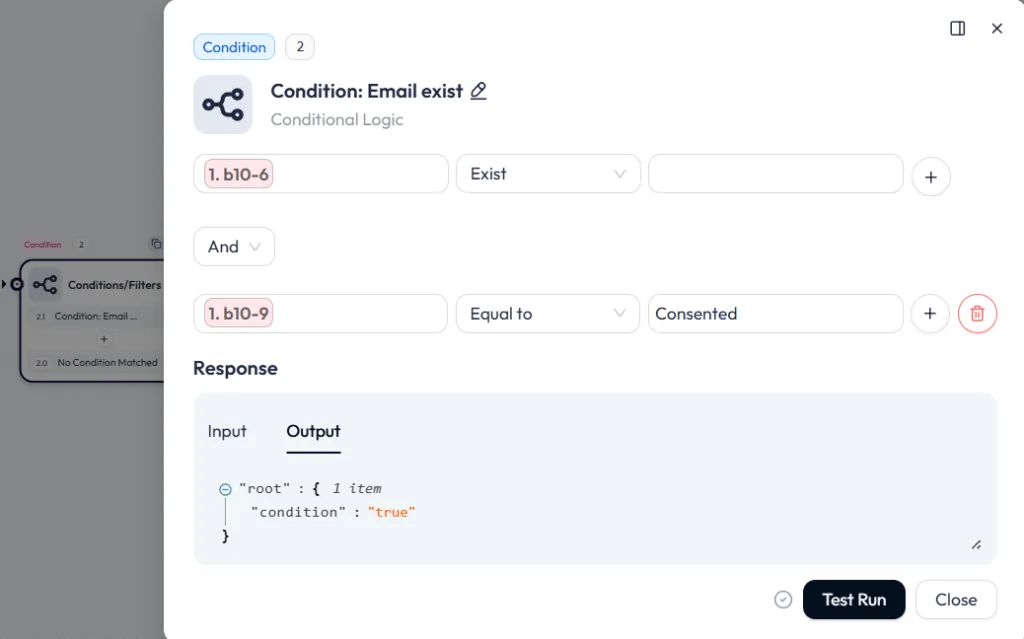
If your form does not have a consent field yet, add one before publishing the workflow. For email marketing, this keeps the workflow cleaner because only users who agreed to receive updates move forward.
This condition also prevents empty test submissions from being sent to Mailchimp or Brevo.
Next, add Mailchimp as an action and choose Add or Update a Member To List.
Haga clic en Añadir conexión to connect your Mailchimp account. Bit Flows will show a URL de devolución de llamada. Copy that URL, then open your Mailchimp OAuth2 settings and paste it into the URI de redireccionamiento field.
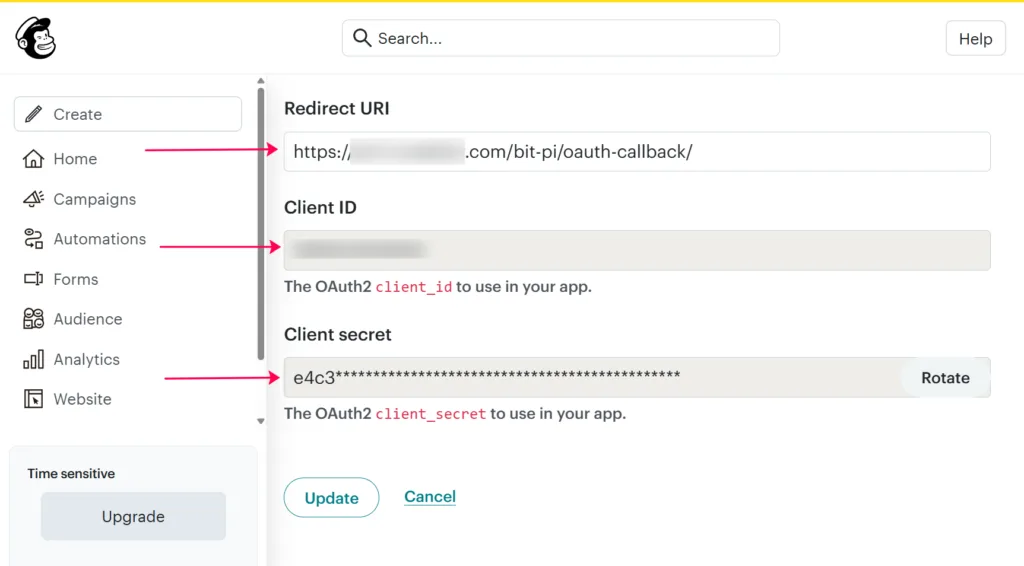
After saving the Redirect URI in Mailchimp, copy the ID de cliente y Secreto de cliente from Mailchimp and paste them into the Bit Flows connection popup. Give the connection a clear name, such as Mailchimp connection, luego haz clic Conectar.
Once the connection is added, select your Mailchimp audience list. In this example, the audience list is Xtreme.
Now map the form fields to Mailchimp:
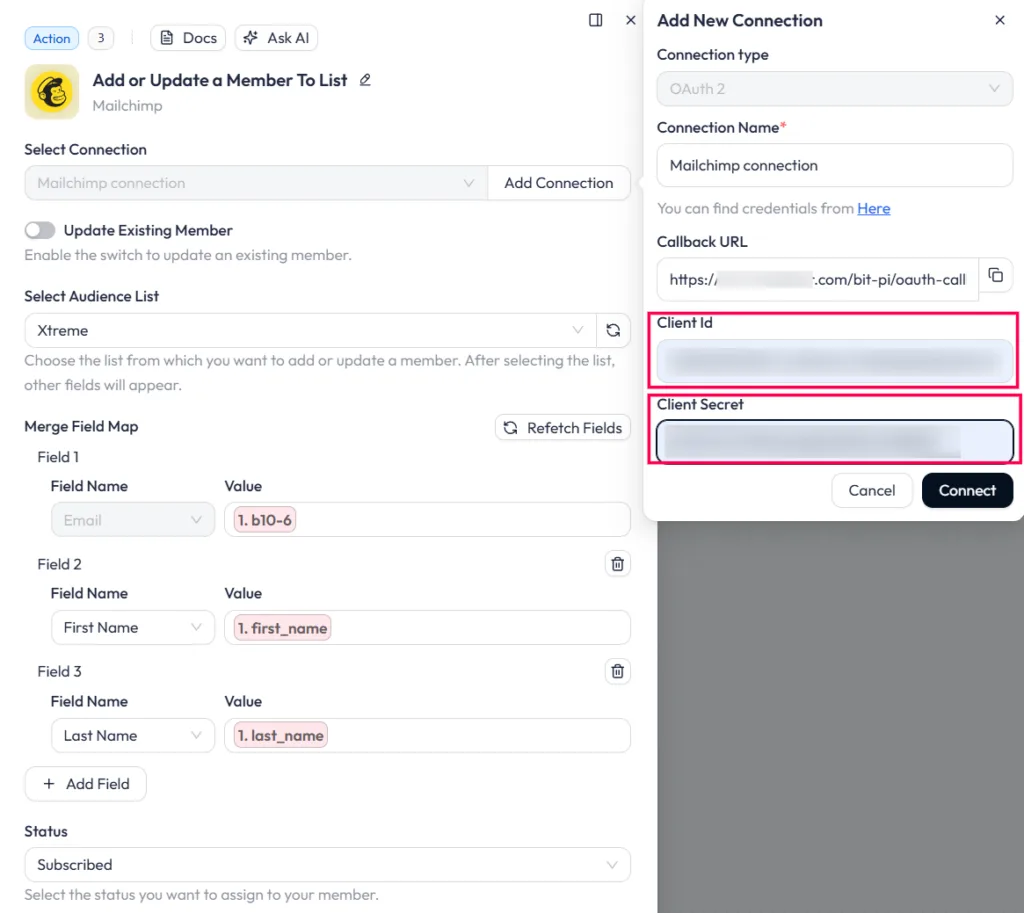
If you want to update existing subscribers when the same email submits the form again, enable Update Existing Member. This helps avoid duplicate issues and keeps the subscriber record updated with the latest form data.
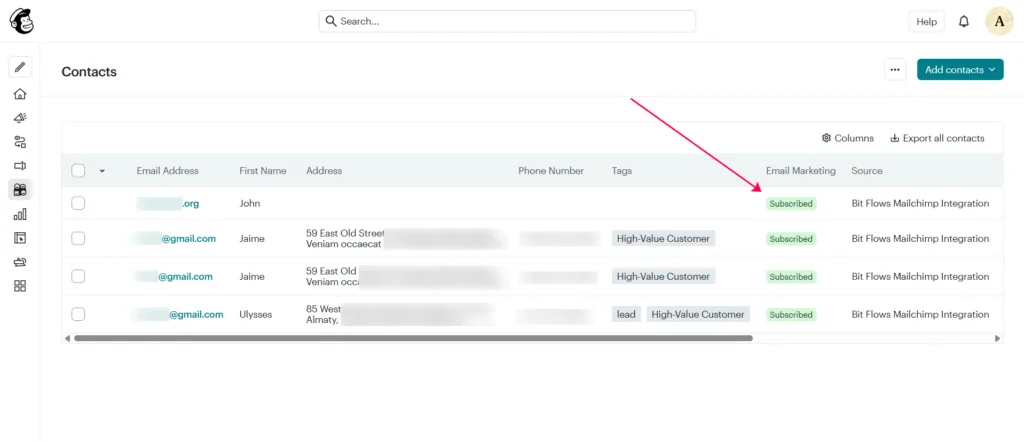
After mapping the fields, click Prueba de funcionamiento. If the setup works, Bit Flows will return a successful response, and the contact should appear in your Mailchimp audience with the subscribed status.
Need more help? Follow this Mailchimp setup guide for Bit Flows.
Next, add Brevo as another action and choose Crear contacto.
Haga clic en Añadir conexión to connect your Brevo account. The connection type will be Clave API. Open your Brevo API key settings, generate or copy an API key, then paste it into the Valor field in Bit Flows. Give the connection a clear name, such as Brevo connection, y haga clic en Conectar.
After the connection is added, map the main email field first. This is required because Brevo uses the email address as the main contact identifier.
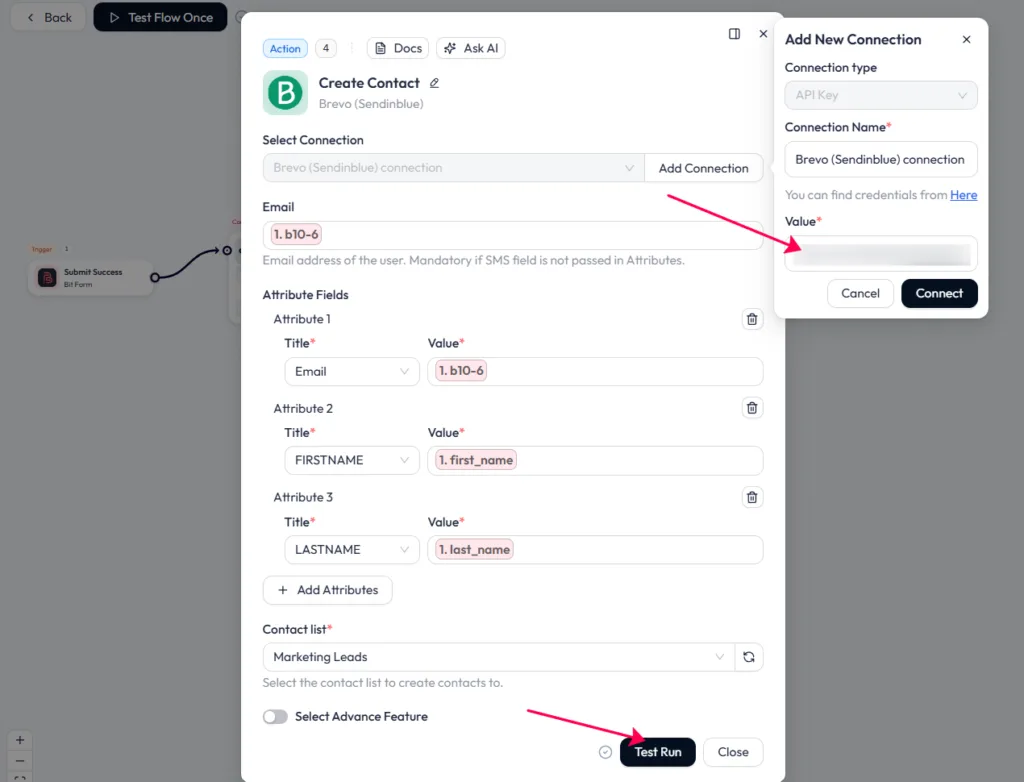
Next, choose the correct Contact list. In this example, the list is Marketing Leads. You can manage or create your list from the Brevo contact lists page.
Once the email, attributes, and contact list are selected, click Prueba de funcionamiento.
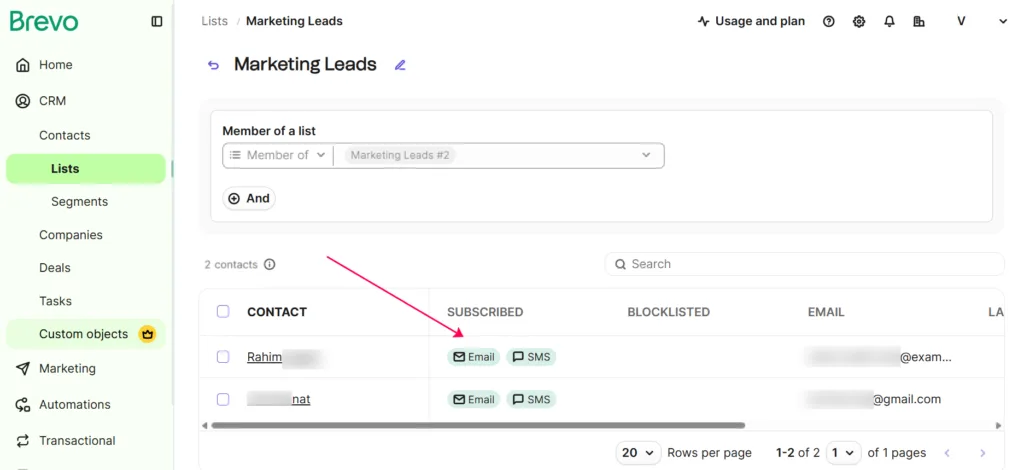
If the setup works, Bit Flows will create the contact in Brevo, and you should see the subscriber inside the selected list.
Nota: You do not have to use both Mailchimp and Brevo in your own workflow. This tutorial uses both to show how the same WordPress form submission can send data to multiple email marketing tools. You can use only one tool, or replace them with another supported email platform.
After Mailchimp and Brevo are configured, add the Correo action and choose Send Email.
This step sends a short confirmation email to the person who submitted the form. It confirms that their subscription request was received and that they will start receiving relevant updates.
Configure the email fields like this:
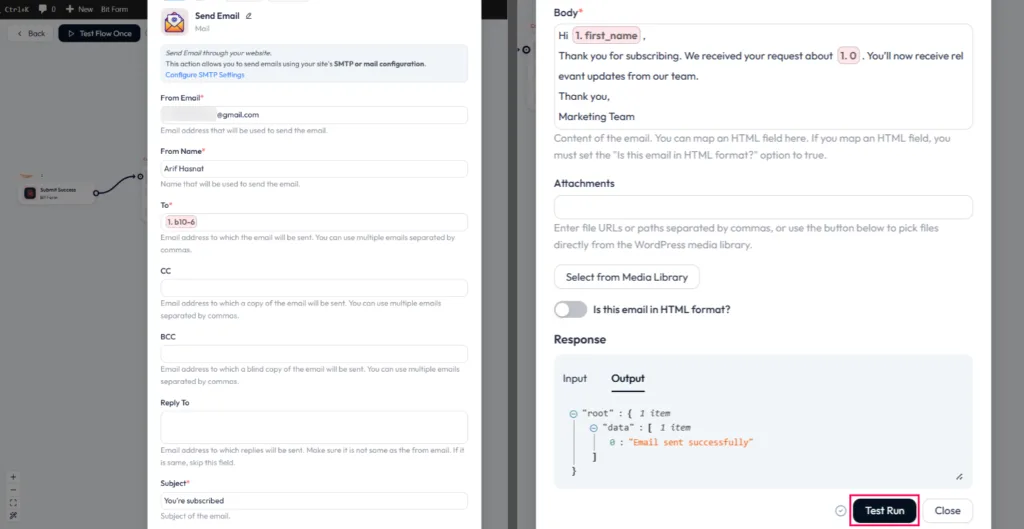
En el A field, map the email address from the Bit Form submission. In the Cuerpo field, use dynamic form values like first name and interest to make the email feel more personal.
Keep this email short. The purpose is to confirm the subscription, not send a full newsletter. After adding the subject and body, click Prueba de funcionamiento. If the setup works, Bit Flows should return a success response, such as Email sent successfully.
Manual lead handling creates three common problems.
First, someone has to check WordPress entries. Second, the same person has to copy the data into email tools. Third, confirmation emails may be delayed or forgotten.
This workflow removes those manual steps.
Before the workflow, a new subscriber may sit inside WordPress until someone checks the form entries. After the workflow, the subscriber is added to Mailchimp and Brevo automatically, and the confirmation email is sent right after submission.
That makes the form more useful for marketing because every valid submission starts the next step on its own.
If you want to start faster, Bit Flows also provides pre-built template integrations for common email marketing workflows. These templates give you a ready-made starting point, so you do not have to build every node from scratch.
You can still customize the form, app connection, field mapping, email list, message body, and workflow logic based on your own setup.
Some available email marketing templates include:
| Template | What it does |
| Lead Form to Mailchimp | Subscribes leads captured through Bit Form to a selected Mailchimp audience. |
| Support Form Auto Reply | Sends an automatic AI-written reply after someone submits a support form. |
| WooCommerce Thank You Email | Sends a personalized AI-generated thank-you email after a WooCommerce order. |
You do not need to automate every marketing process at once. Start with the workflow that protects your most important step: capturing a new subscriber and making sure that subscriber reaches the right email tools.
This setup gives you a clean starting point. A form submission comes in, Bit Flows checks the email and consent, Mailchimp and Brevo receive the contact, and the subscriber gets a confirmation email. From there, you can improve the workflow with tags, Router paths, interest-based emails, or more email marketing tools.
The main goal is simple: every valid lead should move from your WordPress form to your email marketing system without someone copying data by hand.
Sí, Bit Flows puede enviar un formulario de WordPress tanto a Mailchimp como a Brevo ejecutándolos como pasos de acción en el mismo flujo de trabajo.
No, no necesitas Zapier ni Make si Bit Flows es compatible con tu plugin de formularios y tu herramienta de marketing por correo electrónico como aplicaciones de flujo de trabajo.
No, la misma idea puede funcionar con otros complementos de formularios compatibles, pero en esta guía se utiliza Bit Form como fuente de activación del flujo de trabajo.
Una casilla de consentimiento confirma que el suscriptor ha aceptado recibir actualizaciones por correo electrónico antes de que Bit Flows envíe los datos de contacto a Mailchimp o Brevo.
Mapee primero el campo de correo electrónico, luego mapee los detalles útiles del suscriptor, como el nombre, apellido, intereses y consentimiento cuando sea necesario.
Mailchimp can update the existing subscriber when Update Existing Member is enabled, and Brevo can identify existing contacts by matching the email address.
Utilice Subscribed when you want the contact added as an active subscriber, unless your Mailchimp audience uses double opt-in settings.
Yes, your WordPress site should have SMTP or a working mail setup so the confirmation email can be delivered properly.
Yes, you can use the Interest field with a Router, tags, or different lists to segment subscribers based on their form choice.
Yes, add a Router after the condition node if each interest group should receive a different confirmation email or follow-up path.
Check the Test Run response and Bit Flows logs to confirm that the form trigger, Mailchimp action, Brevo action, and Mail action ran successfully.
Check the captured response, email field mapping, selected Mailchimp audience, selected Brevo list, app connection, and Bit Flows logs.
Yes, you can add more supported email marketing actions after Brevo and pass the same submitted form data to each tool.
No, this workflow is for lead forms; WooCommerce customer emails need a WooCommerce trigger, such as an order or customer event.
No, the consent condition helps filter unapproved submissions, but full compliance also depends on your form wording, privacy policy, and data handling process.



 ES
ES  EN
EN  DE
DE  NL
NL  IT
IT