Hiring gets messy when every job application lands in the same inbox. A candidate submits a form. HR opens the entry, checks the role, reads the work experience, reviews the resume, writes notes, updates a spreadsheet, and sends a reply. That works for a few applicants. Once the number grows, good candidates can sit unnoticed while the team repeats the same review steps again and again.
AI can help screen applications faster, but it should not make the final hiring decision by itself. A job application has context. A resume may be incomplete. A candidate may have strong experience but a weak written answer. That is why the better workflow is not “AI rejects candidates automatically.” The better workflow is AI reviews the application, prepares a score and summary, sends it to HR for approval, and only then sends the right email to the candidate.
Connect a job application form to an AI Agent that scores the candidate, send that result to HR via Human-in-the-Loop for approval or rejection, store the record in Google Sheets, and send the right email to the candidate after HR decides. No code required.
Basic flow:
A no-code AI job application screening workflow automates the first-stage review process. Instead of checking every form entry manually, HR gets a clean summary of the candidate, their role, experience, AI score, and CV link. HR can then approve or disapprove the candidate from the review email.
Here is the full workflow:
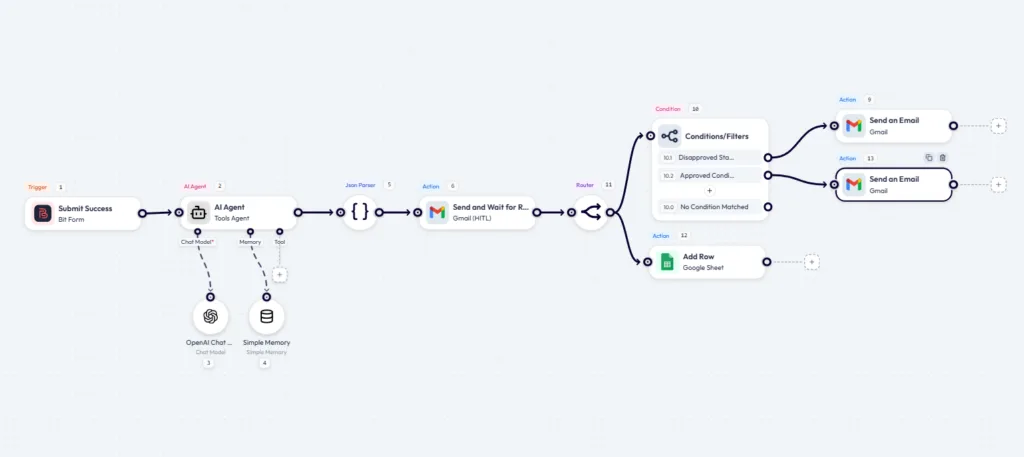
| Paso | Node | Qué hace |
| 1 | Envío de formulario exitoso | Starts the workflow when a candidate submits the job application form |
| 2 | Agente de IA | Reviews the form answers and returns a structured screening result |
| 3 | Parser JSON | Converts the AI response into usable fields |
| 4 | Gmail Humano en el Ciclo | Sends the candidate profile to HR and waits for approval |
| 5 | Router | Splits the workflow after the HR review step |
| 6 | Condición | Checks whether HR approved or disapproved the candidate |
| 7 | Google Sheets Add Row | Saves the application record |
| 8 | Gmail Send Email | Sends the right email to the candidate |
This is useful for HR teams, small businesses, agencies, and WordPress site owners who collect job applications through a form.
Before building the workflow, make sure these tools are installed, activated, and connected.
To install a plugin in WordPress, go to Plugins → Añadir nuevo, search for the plugin, click Install Now, and then click Activar. If you have a ZIP file, use the Upload Plugin to upload the file, then install and activate it.
Create a job application form using your form builder. Here, I have used the Bit Form plugin and built the form in 4 steps.
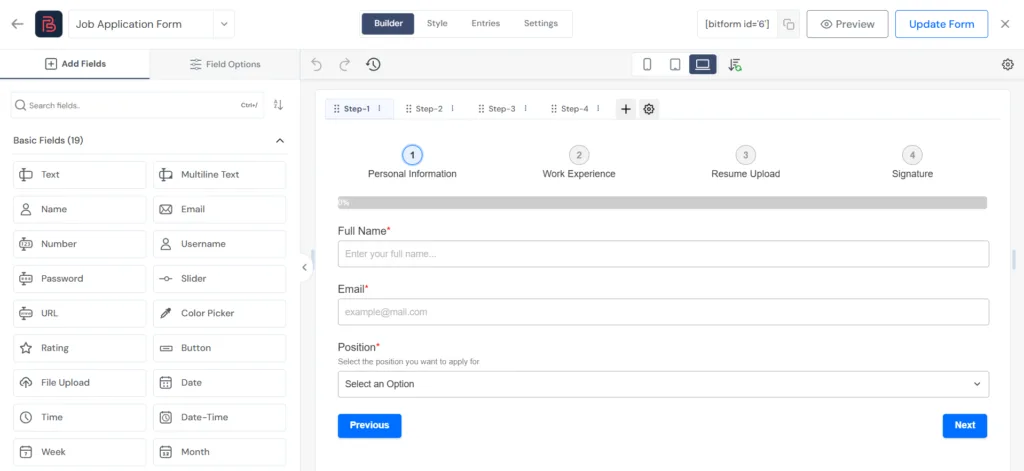
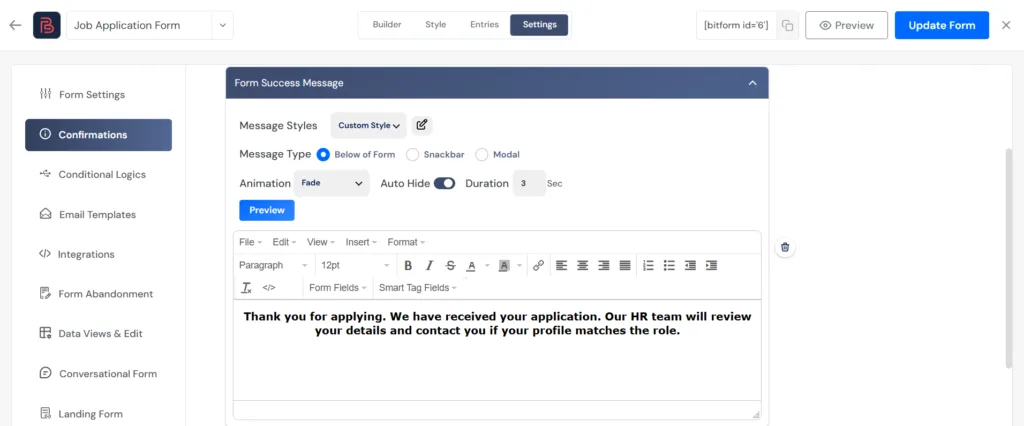
Set the resume upload field to accept PDF, DOC, or DOCX files. Keep the file size limit reasonable, such as 5 MB or 10 MB. Add this confirmation message after submission:
Create a new flow and name it: No-Code AI Job Application Screening Workflow. Add the Bit Form node: Trigger – Submit Success.
Haga clic en Capture Response, then submit a test application.
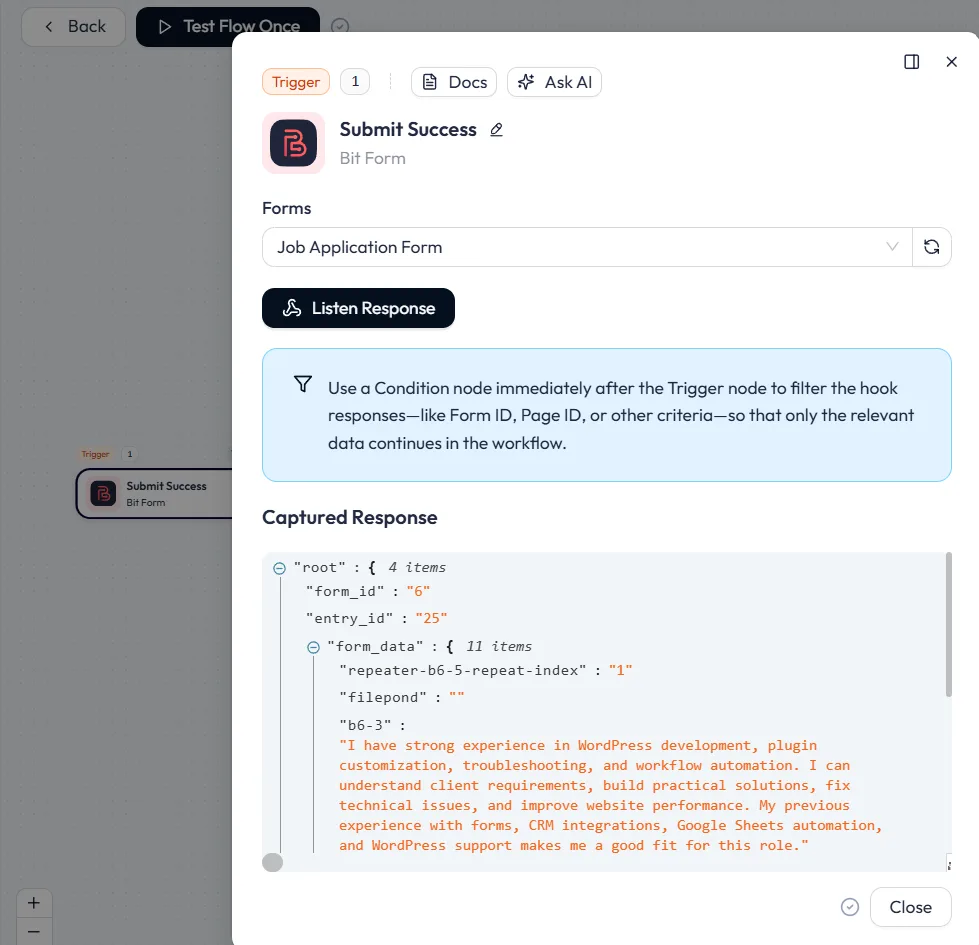
Real sample data helps you map the fields correctly in later nodes.
After the form trigger, add the Agente de IA node. This step reviews the candidate’s submitted form data and creates a screening result for HR. First, configure the Modelo de chat. Add your OpenAI, DeepSeek, Claude, Gemini, or other supported AI model API key in the connection settings.
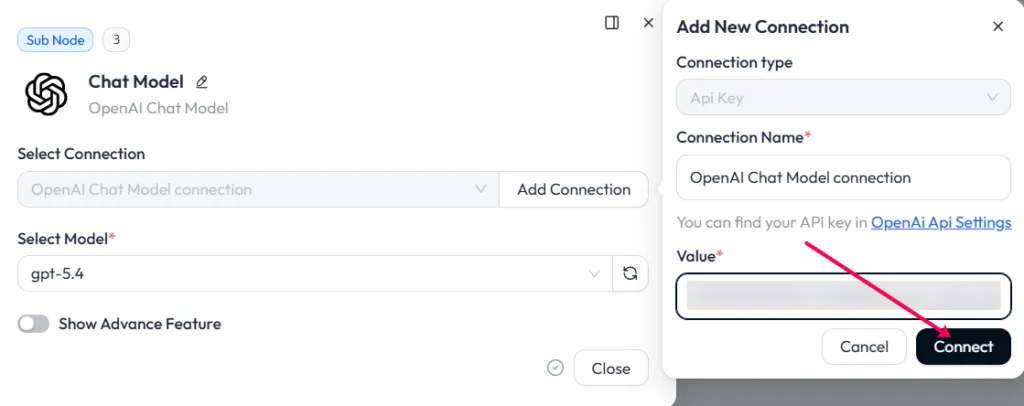
Then select the model you want to use for the screening.
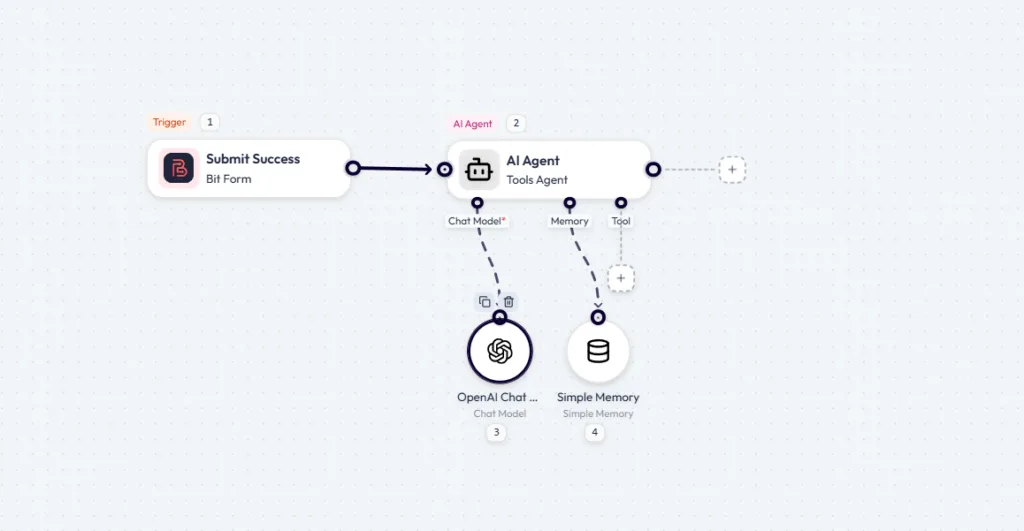
A continuación, agrega Memoria simple. Use a unique key such as the candidate email, form entry ID, or submission ID. Keep the Context Window Length around 5 so the AI Agent can keep the current form data, role requirements, and scoring instructions together while processing the application.
In the AI Agent settings, use:
Nota: Update the AI prompt based on your own job description, required skills, experience level, and hiring criteria before testing the workflow.
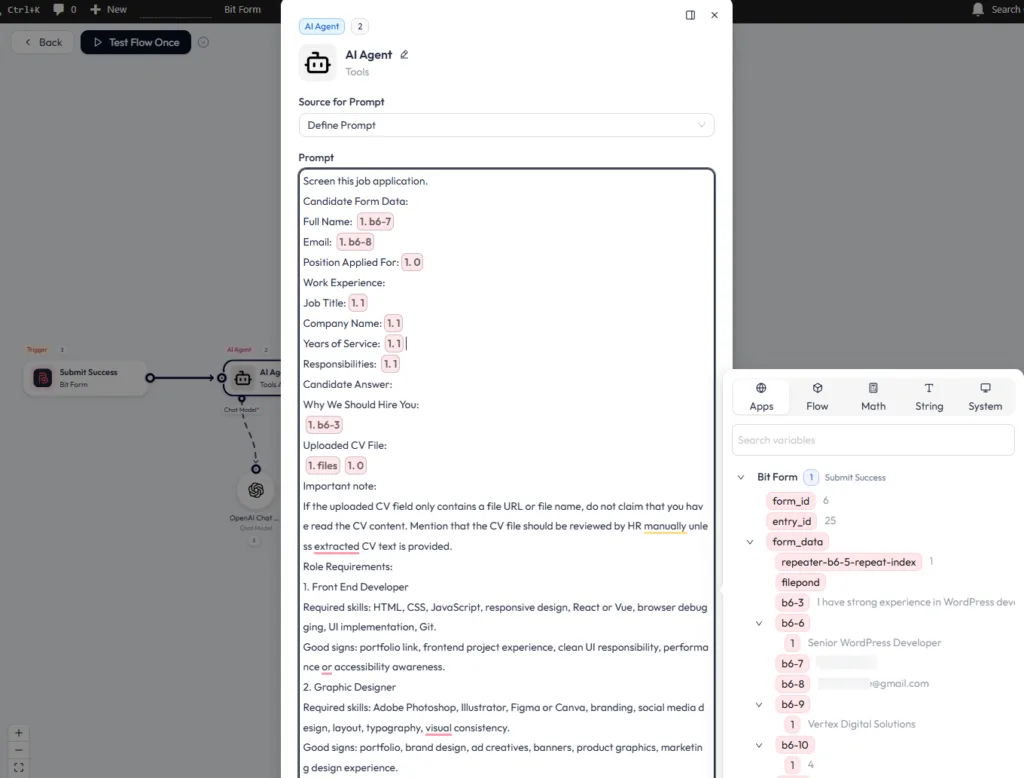
Use this short system prompt:
You are an HR screening assistant.
Review only the submitted job application data. Do not invent skills, experience, education, company names, achievements, or certifications.
Do not make the final hiring decision. Do not reject any candidate automatically.
Score the candidate only as an internal HR review signal. Return valid JSON only. Do not include markdown, explanation, or extra text outside the JSON.Use this in the main Scoring Rules prompt:
Scoring Rules:
- Role skill match: 40 points
- Relevant work experience: 20 points
- Responsibilities quality: 15 points
- Candidate answer quality: 10 points
- Communication clarity: 10 points
- CV or proof availability: 5 points
Recommendation Rules:
- 80 to 100: Shortlist
- 60 to 79: Manual Review
- 0 to 59: Not Matched
Return only valid JSON in this format:
{
"candidate_summary": "",
"matched_skills": [],
"missing_skills": [],
"experience_note": "",
"score": 0,
"recommendation": "",
"hr_note": "",
"cv_review_note": ""
}This setup is important because the next step, JSON Parser, needs a clean JSON response. If the AI adds extra text before or after the JSON, the parser may not read the result correctly.
Add JSON Parser after the AI agent node: Set the JSON input source to the AI Agent response. Here is the JSON result:
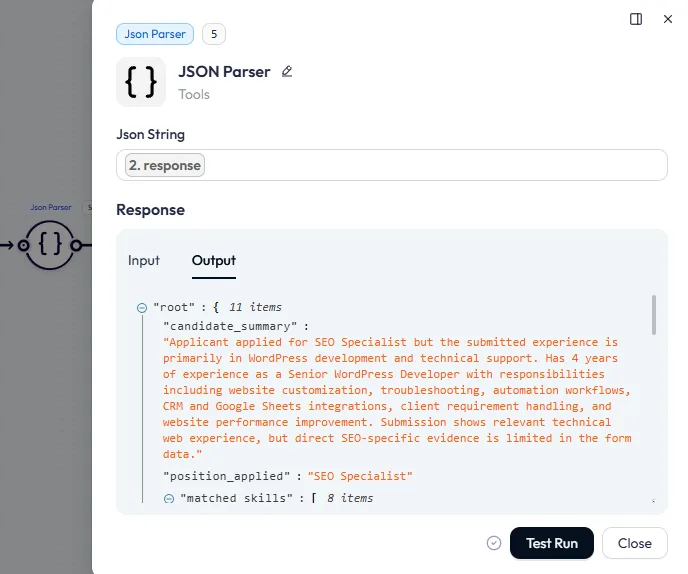
The JSON Parser turns the AI Agent’s JSON response into separate usable fields, such as candidate summary, score, recommendation, and HR note, so they can be mapped in the next workflow steps.
In Bit Flows, add the next node: Gmail → Send and Wait for Response / HITL.
If Gmail is not connected yet, click Añadir conexión, añadir el Google Client ID y Secreto de cliente from Consola de Google Cloud, authorize the account, then select that Gmail connection for this step. For detailed setup, follow the official Bit Flows Gmail integration guide.
Now, map the HR email, subject, and review message fields. This node sends the candidate profile to HR and pauses the workflow until HR clicks a response button. Use this configuration:
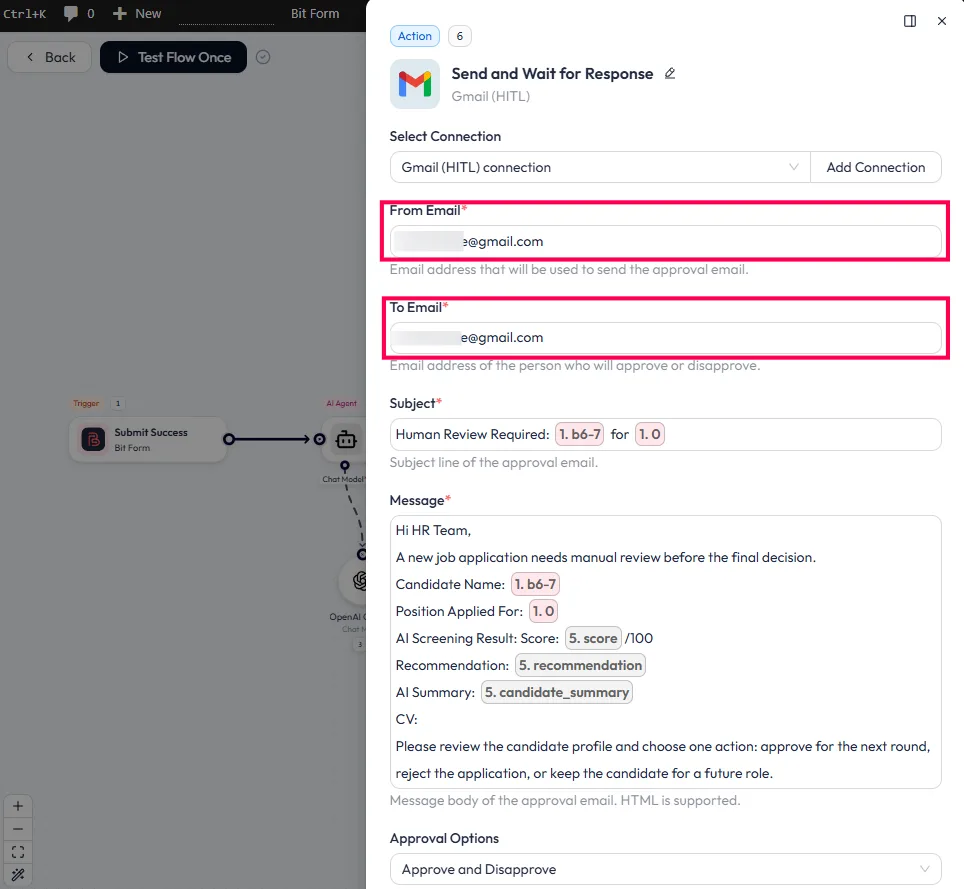
Keep the HR email focused. HR does not need every technical field from the flow. They need the candidate, role, score, summary, notes, and CV link.
The Router separates the Human in the Loop result from other workflow paths.
Create at least two paths:
You can also keep Google Sheets after the approval result if you only want to save the final-reviewed applications.
Now, create a Google Sheet named: Job Applications – AI Screening
Before saving the application record, select your Google Sheets connection, choose the Job Applications – AI Screening spreadsheet, select the worksheet, and map each candidate value to the correct column. For more help, follow the official Bit Flows Google Sheets integration guide.
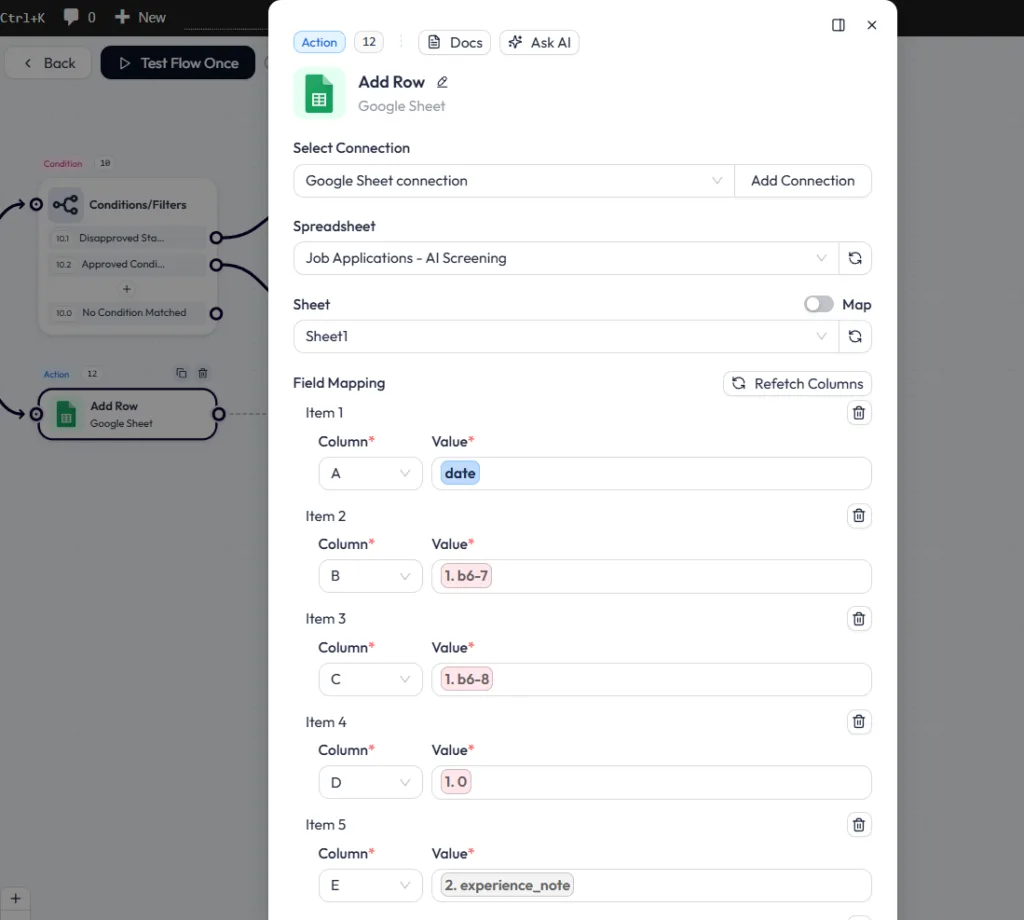
Use a simple sheet first. You do not need too many columns while testing.
Save the record in Google Sheets
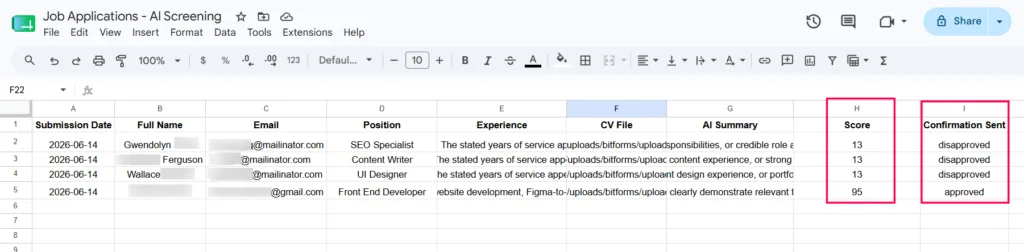
Add a Condition node after the Human in the Loop path.
Condition 1 (approved):
Condition 2 (disapproved):
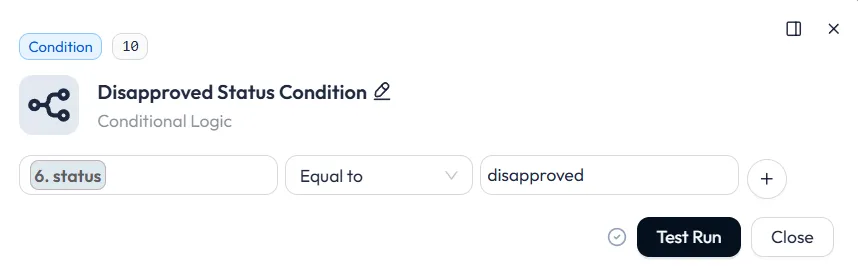
Check the exact value your Human in the Loop node returns before setting these. Copy the value directly from the node output rather than typing it.
On the approved condition path, add: App: Gmail, Event: Send an Email
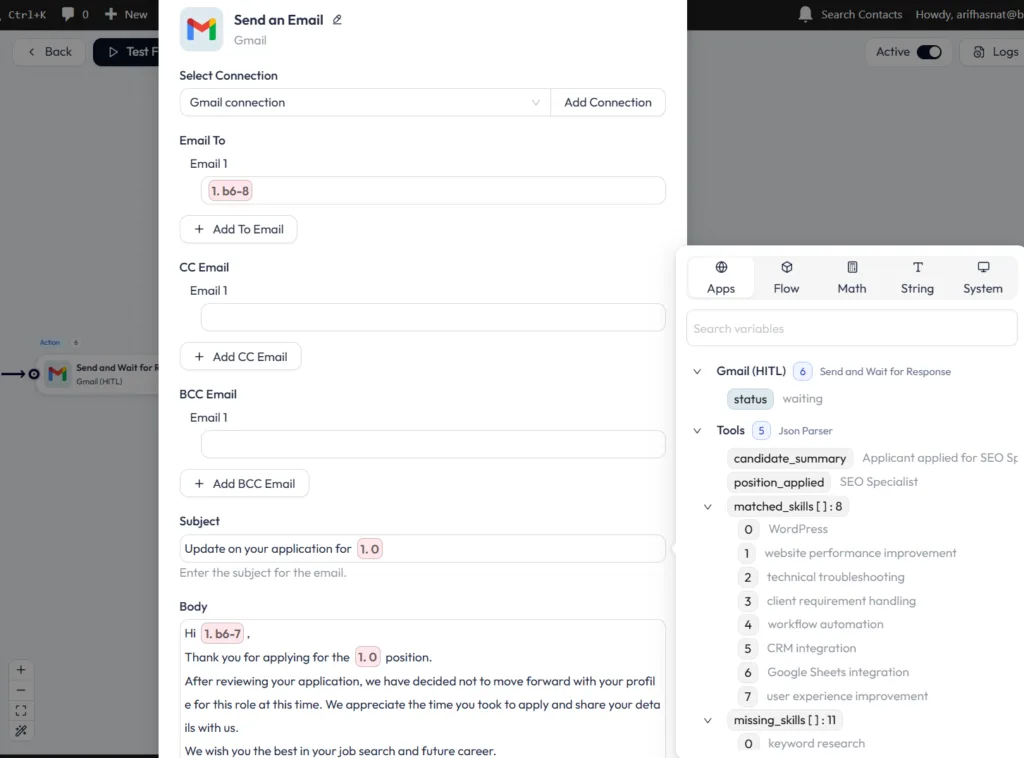
Do not include the AI score in this email. The score is an internal review signal.
On the disapproved condition path, add:
Use this email:
Thank you for applying for the {{Position}} position.
After reviewing your application, we have decided not to move forward with your profile for this role at this time. We appreciate the time you took to apply and share your details with us.
We wish you the best in your job search and future career.
Send this email only after HR disapproves of the application from the Human in the Loop step. Do not let AI send rejection emails automatically.
After setting up the workflow, test it with different candidate types. This helps you confirm that the AI score, HR approval step, Google Sheets row, and candidate emails are working correctly.
Test the workflow with three types of candidates.
| Test Candidate | Expected AI Result | Expected HR Action | Expected Email |
| Strong Front End Developer | Score 80+ and Shortlist | HR approves | Shortlisted email |
| Average candidate | Score 60 to 79 and Manual Review | HR decides manually | Depends on HR decision |
| Weak role match | Score below 60 and Not Matched | HR reviews before rejection | Disapproved email only if HR rejects |
First, test with a strong candidate, review the AI screening result, and approve or decline it from the Human in the Loop email.
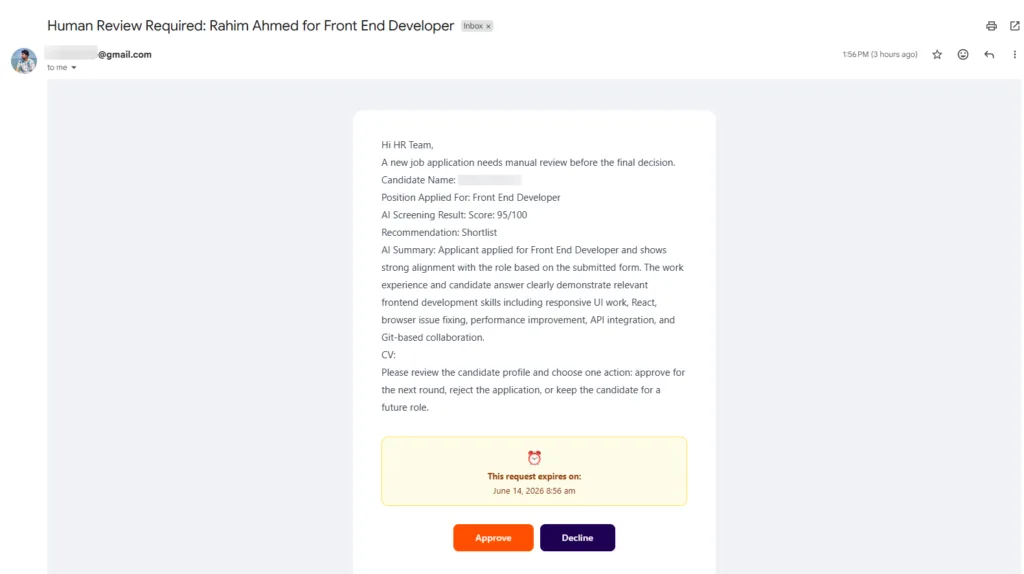
After HR approves or declines, check that the workflow sends the correct candidate email, adds the record to Google Sheets, and shows a successful run in the logs.
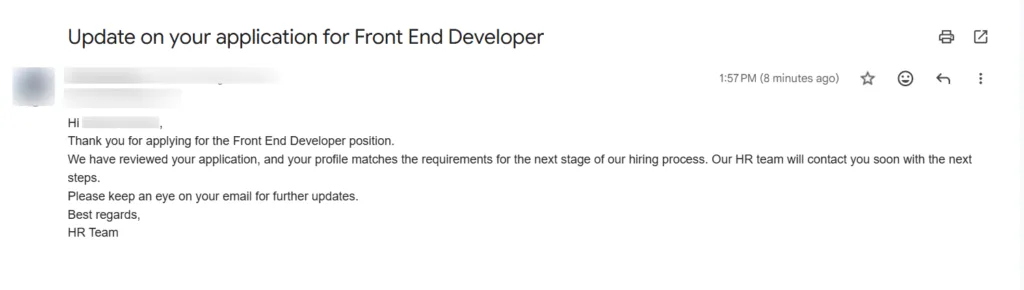
This test proves that AI prepares the screening result, HR makes the final decision, and the workflow sends the right email automatically.
AI can analyze a resume only if the workflow sends the actual resume content to the AI model or to a document-processing API.
In many form workflows, the uploaded CV field gives you a file URL, file path, or file name. That does not always mean the AI Agent has read the PDF or DOC file. If your AI prompt only includes the file name, the AI should not claim it reviewed the resume.
OpenAI supports file inputs through base64 data, file IDs, or external URLs in the Responses API. Gemini can process PDF documents within its document processing limits. That means a deeper CV analysis workflow is possible, but you need the extra file-processing step.
Avoid letting AI make the final hiring decision or send rejection emails automatically. Always use Human in the Loop before the final candidate email. Make sure the AI response is parsed with JSON Parser, the approval status matches the exact value returned by the review step, and the AI score stays internal. Also, do not assume the CV was reviewed if the workflow only receives a file name or URL. Keep the Google Sheet simple at first and check workflow logs after every test run.
A no-code AI job application screening workflow works best when AI handles the repetitive review work, and HR controls the final decision.
Start with one role, one form, one Google Sheet, and two candidate emails. Test approved and disapproved paths carefully. Once the workflow works, add more roles, better scoring rules, resume text extraction, and interview scheduling.
Bit Flows fits this kind of workflow because it can connect the form submission, AI Agent, JSON Parser, Human in the Loop, Google Sheets, Gmail, Router, Conditions, and logs inside one visual workflow.
Build the first version with human approval first. Then, improve the resume analysis step once the core hiring flow runs correctly.
Un flujo de trabajo de selección de candidaturas de IA sin código revisa los envíos de formularios, resume a los candidatos, envía solicitudes de aprobación a RR. HH., guarda registros y envía correos electrónicos a los candidatos sin código personalizado.
Sí, la IA puede filtrar automáticamente las solicitudes de empleo revisando las respuestas enviadas en formularios, calificando a los candidatos y preparando un resumen para la revisión de Recursos Humanos.
No, la IA no debería rechazar a los candidatos automáticamente porque RR. HH. debería revisar al candidato antes de que se envíe cualquier correo electrónico final.
Human in the Loop pausa el flujo de trabajo, envía el perfil del candidato a Recursos Humanos y continúa solo después de que Recursos Humanos apruebe o desapruebe la solicitud.
JSON Parser turns the AI response into usable fields like score, summary, recommendation, and HR note for later workflow steps.
Not by default; AI can read the resume only if the workflow sends the actual file content or extracted resume text to the model.
Yes, you can save each screened candidate in Google Sheets with name, email, position, CV link, AI summary, score, status, and HR note.
No, candidates should not see the AI score because it is only an internal HR review signal, not a final hiring explanation.
Yes, you can use this workflow for multiple job roles by adding role-specific skills and requirements inside the AI Agent prompt.
The HR review email should include candidate details, position, experience, AI summary, score, CV link, and clear approve or decline options.
The workflow waits for the HR response, so you should add a reminder step if applications need faster review.
The best first version screens form answers with AI, sends the result to HR, stores the record, and emails candidates after HR review.



 ES
ES  EN
EN  DE
DE  NL
NL  IT
IT  PT
PT  JA
JA